this is a page for
Browsing Tag: summer
Whew! It’s been a minute since I’ve posted. The last month or so has been wrapped up in packing, moving, and unpacking. Though I tried to save the kitchen things for last – and then unpacked them first – I wouldn’t say that my apartment was exactly ready for photos 😉
But now I live in Colorado, I am thrilled by my new life adventure out here, and I am back in the kitchen!
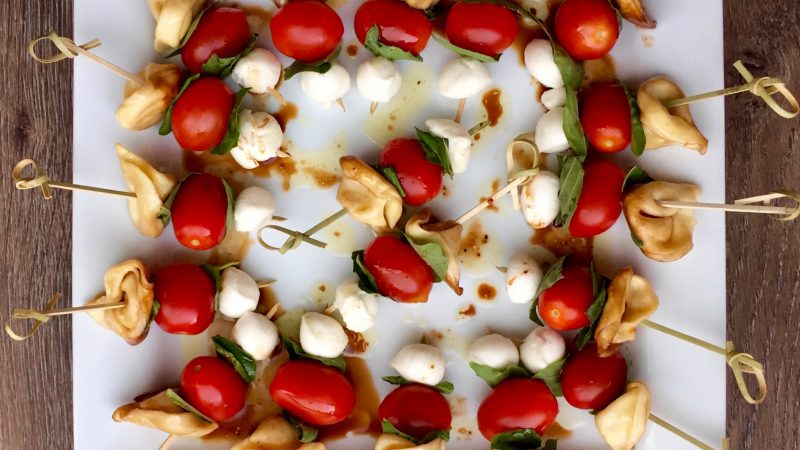
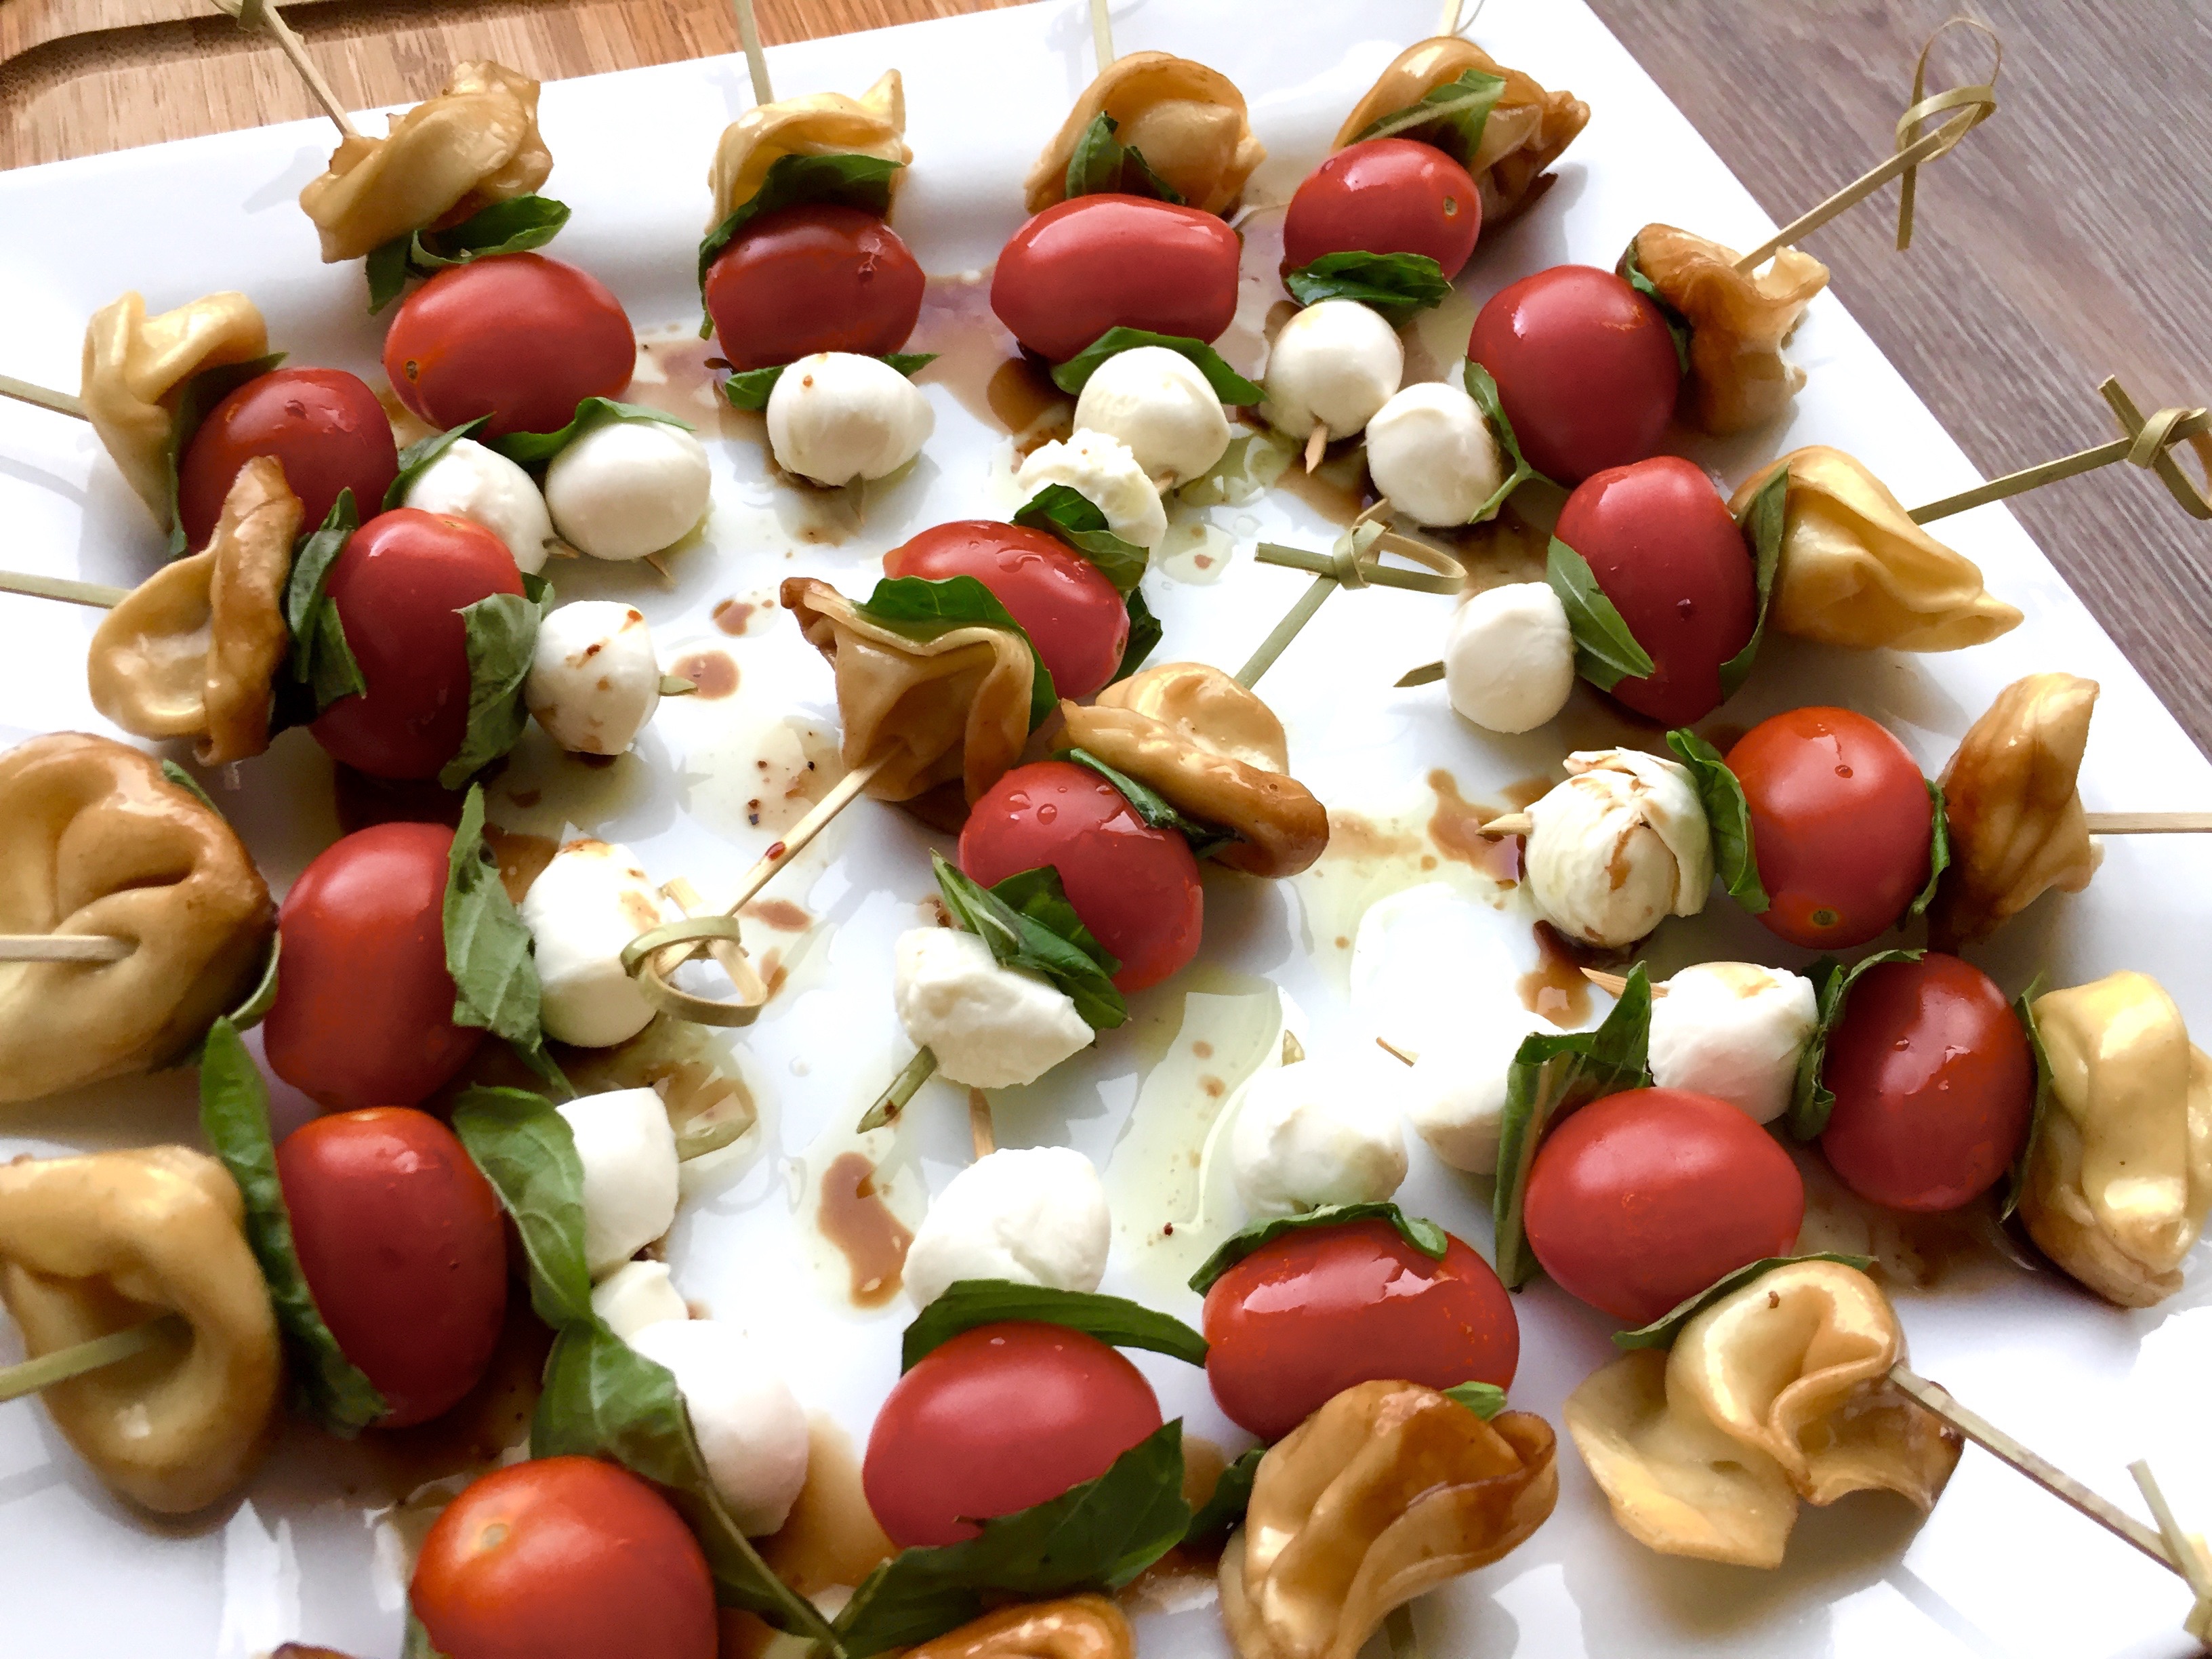
You’ve probably seen these around instagram – there’s a reason for the popularity! This is an amazingly simple and delicious summer appetizer. Whether you’re looking for a light snack, an appetizer, or a sharing dish for potluck, this recipe is a quick fix that is not only good for you, but tastes great too! And have I mentioned how easy it is? You can pick from a wide variety of pre-made tortellini to customize these to your preference. If you want even less steps, use a bottled balsamic vinaigrette to make it even easier!
~~~~~~~~~~
Step One.
Start with the tortellini so that they can cool before assembling the skewers. Cook the tortellini according to package directions. Drain them and put them in a heat-safe bowl. Pour some olive oil and balsamic vinegar over the top, stir, cover, and refrigerate them until they are cold.
Step Two.
Prep step! Measure out the oil, vinegar, and lemon pepper. Drain the mozzarella, wash the tomatoes, and cut the basil into strips about 1/2 inch thick.
Step Three.
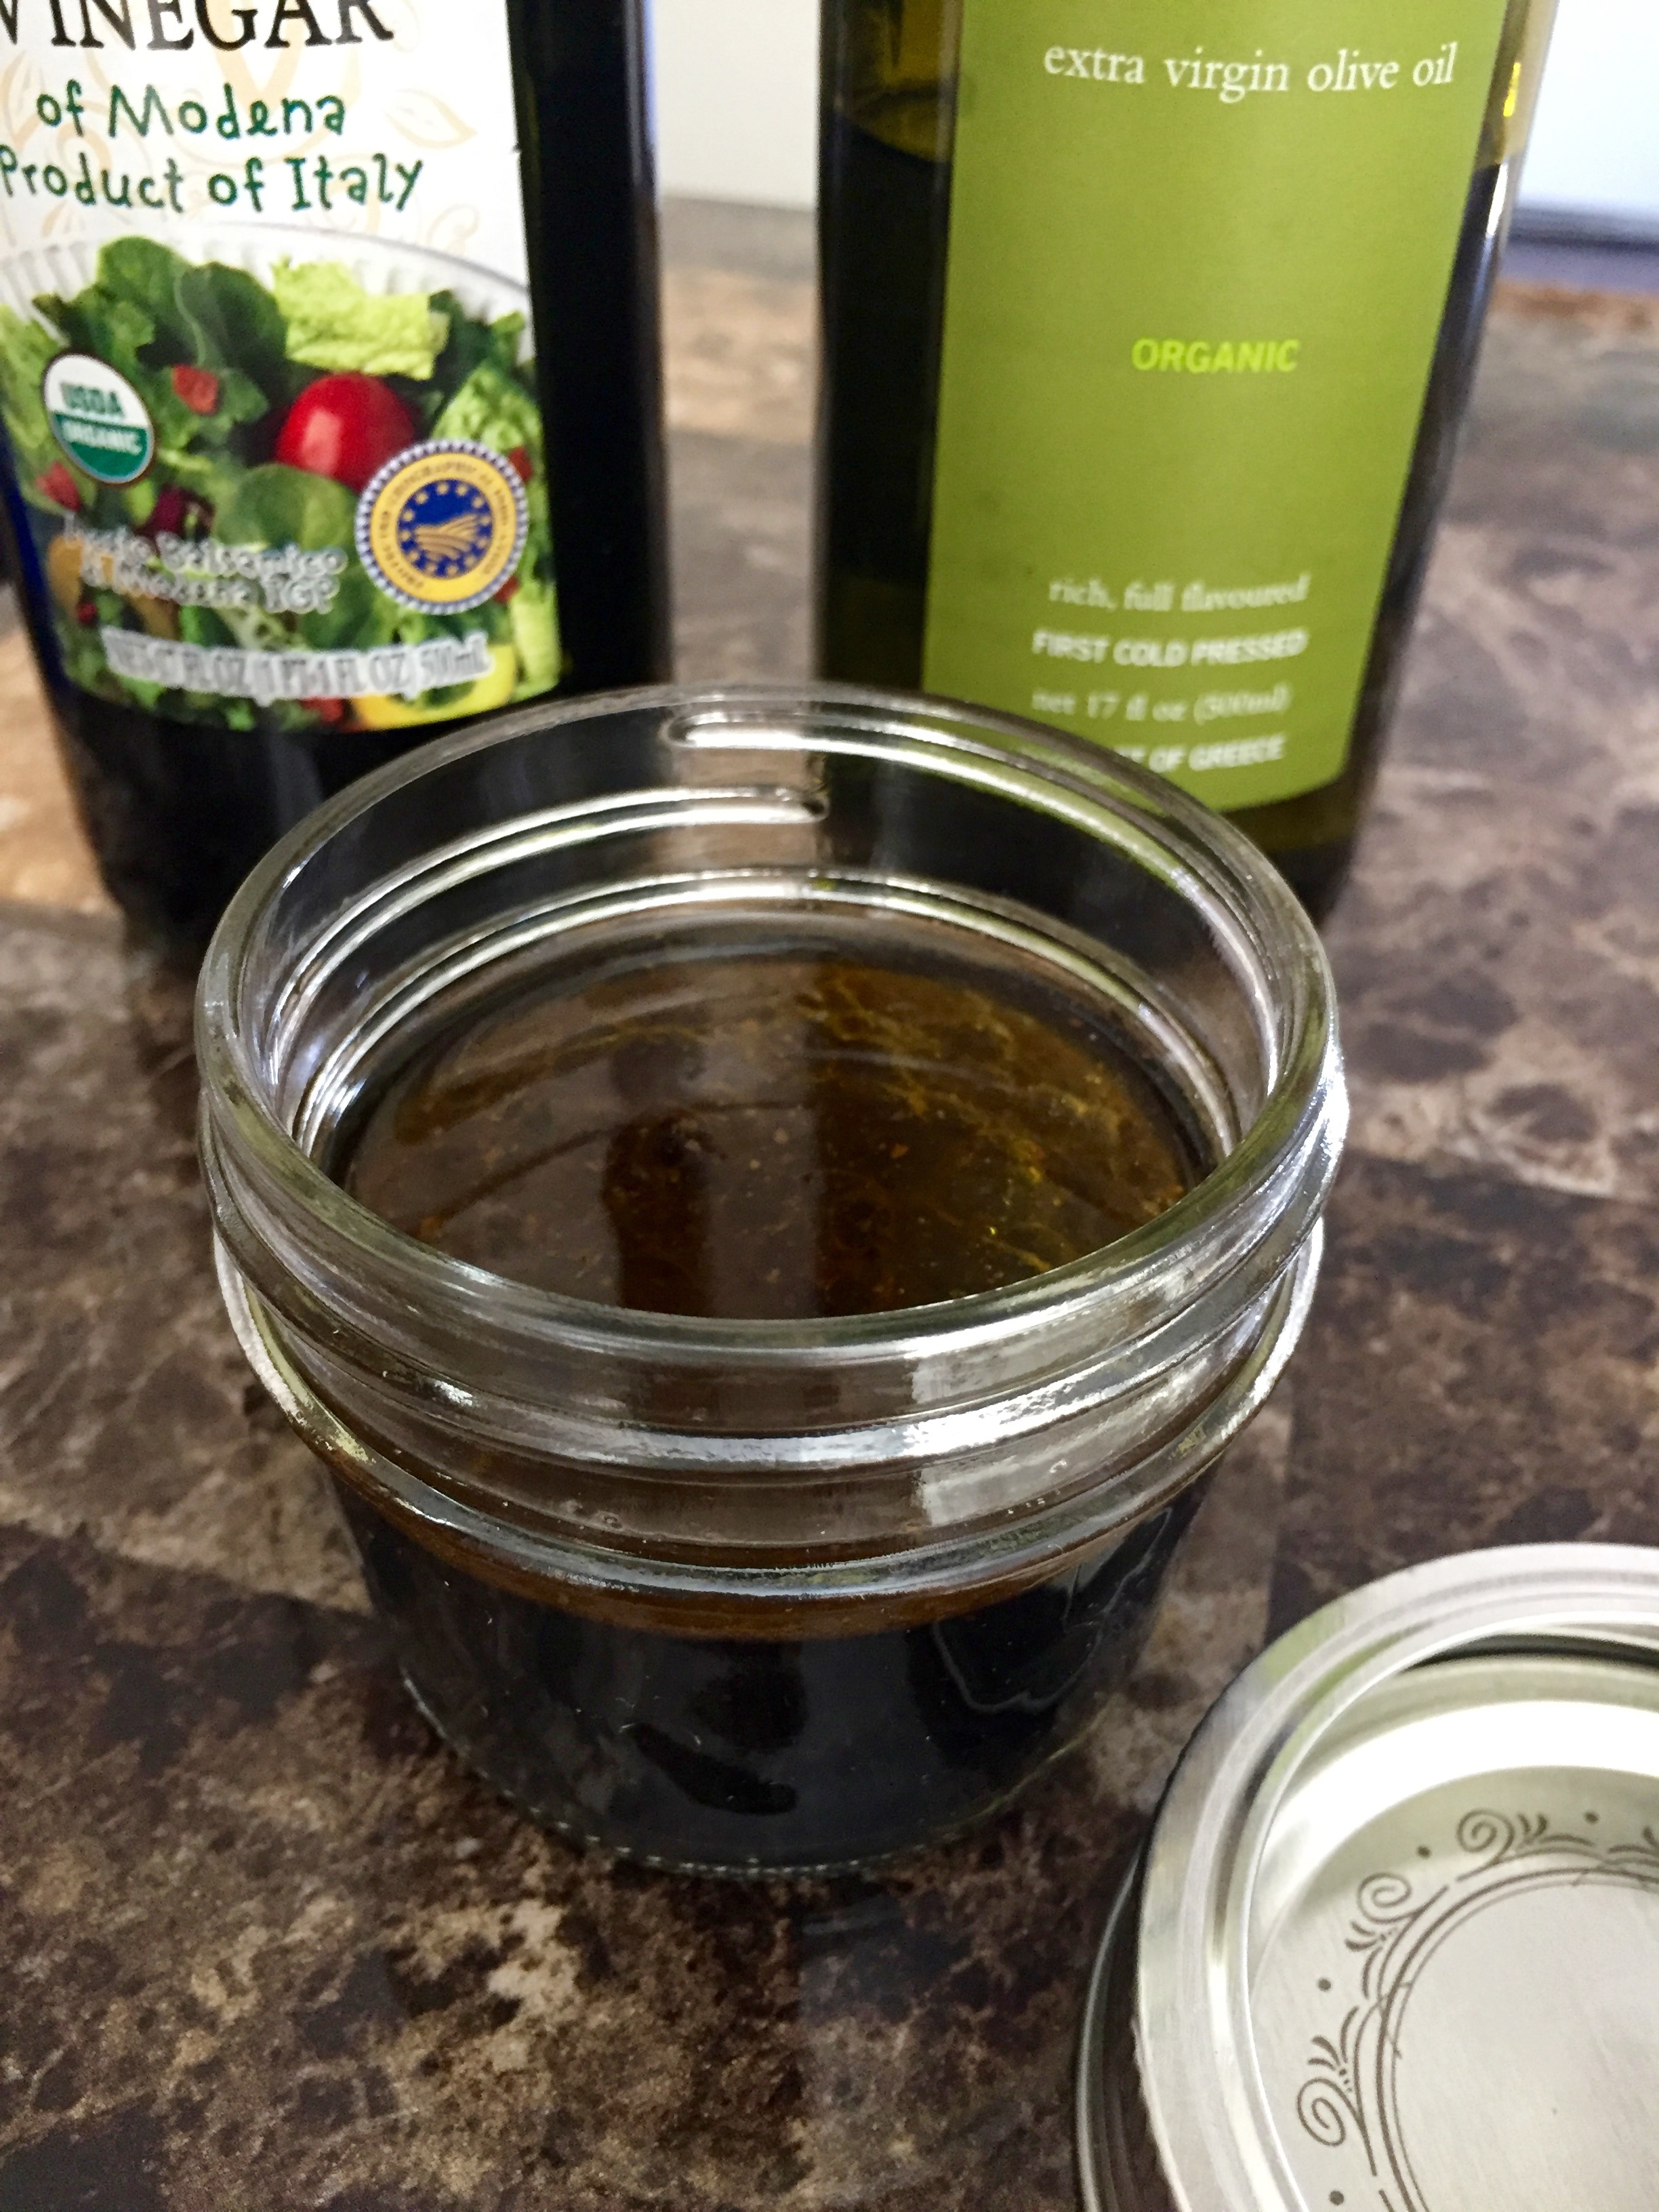
Prepare the vinaigrette. Pour the vinaigrette into a jar, and slowly add the oil while you stir it. Mix in the pepper. Seal the jar and shake the vinaigrette to complete the emulsion.
Pro Tip: If you want to make the emulsion even more perfectly, use a blender or a food processor to incorporate the oil.
 Step Four.
When the tortellini are cold, begin to assemble the skewers. I use this order, but pick whatever you like best: tortellini, basil, tomato, basil, mozzarella. When they are fully assembled, drizzle with the vinaigrette, and serve!

Whether you're looking for a light snack, an appetizer, or a sharing dish for potluck, this recipe is a quick fix that is not only good for you, but tastes great too!
Ingredients
- For the Vinaigrette
- 1/2 cup olive oil
- 1/4 cup balsamic vinegar
- 2 tsp lemon pepper
- For the Skewers
- 1 package prepared tortellini
- 1 cup basil
- 1 pint cherry tomatoes
- 1 tub of mini pearl mozzarella cheese
Instructions
- Start with the tortellini so that they can cool before assembling the skewers. Cook the tortellini according to package directions. Drain them and put them in a heat-safe bowl. Pour some olive oil and balsamic vinegar over the top, stir, cover, and refrigerate them until they are cold.
- Prep step! Measure out the oil, vinegar, and lemon pepper. Drain the mozzarella, wash the tomatoes, and cut the basil into strips about 1/2 inch thick.
- Prepare the vinaigrette. Pour the vinaigrette into a jar, and slowly add the oil while you stir it. Mix in the pepper. Seal the jar and shake the vinaigrette to complete the emulsion.
- Pro Tip: If you want to make the emulsion even more perfectly, use a blender or a food processor to incorporate the oil.
- When the tortellini are cold, begin to assemble the skewers. I use this order, but pick whatever you like best: tortellini, basil, tomato, basil, mozzarella. When they are fully assembled, drizzle with the vinaigrette, and serve!
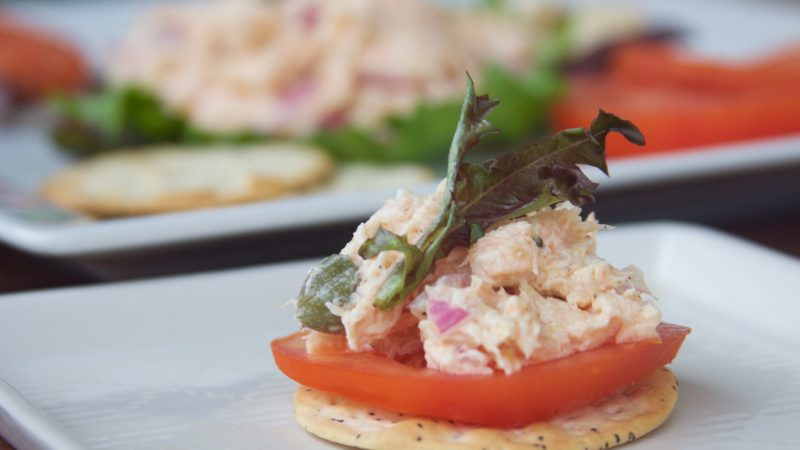
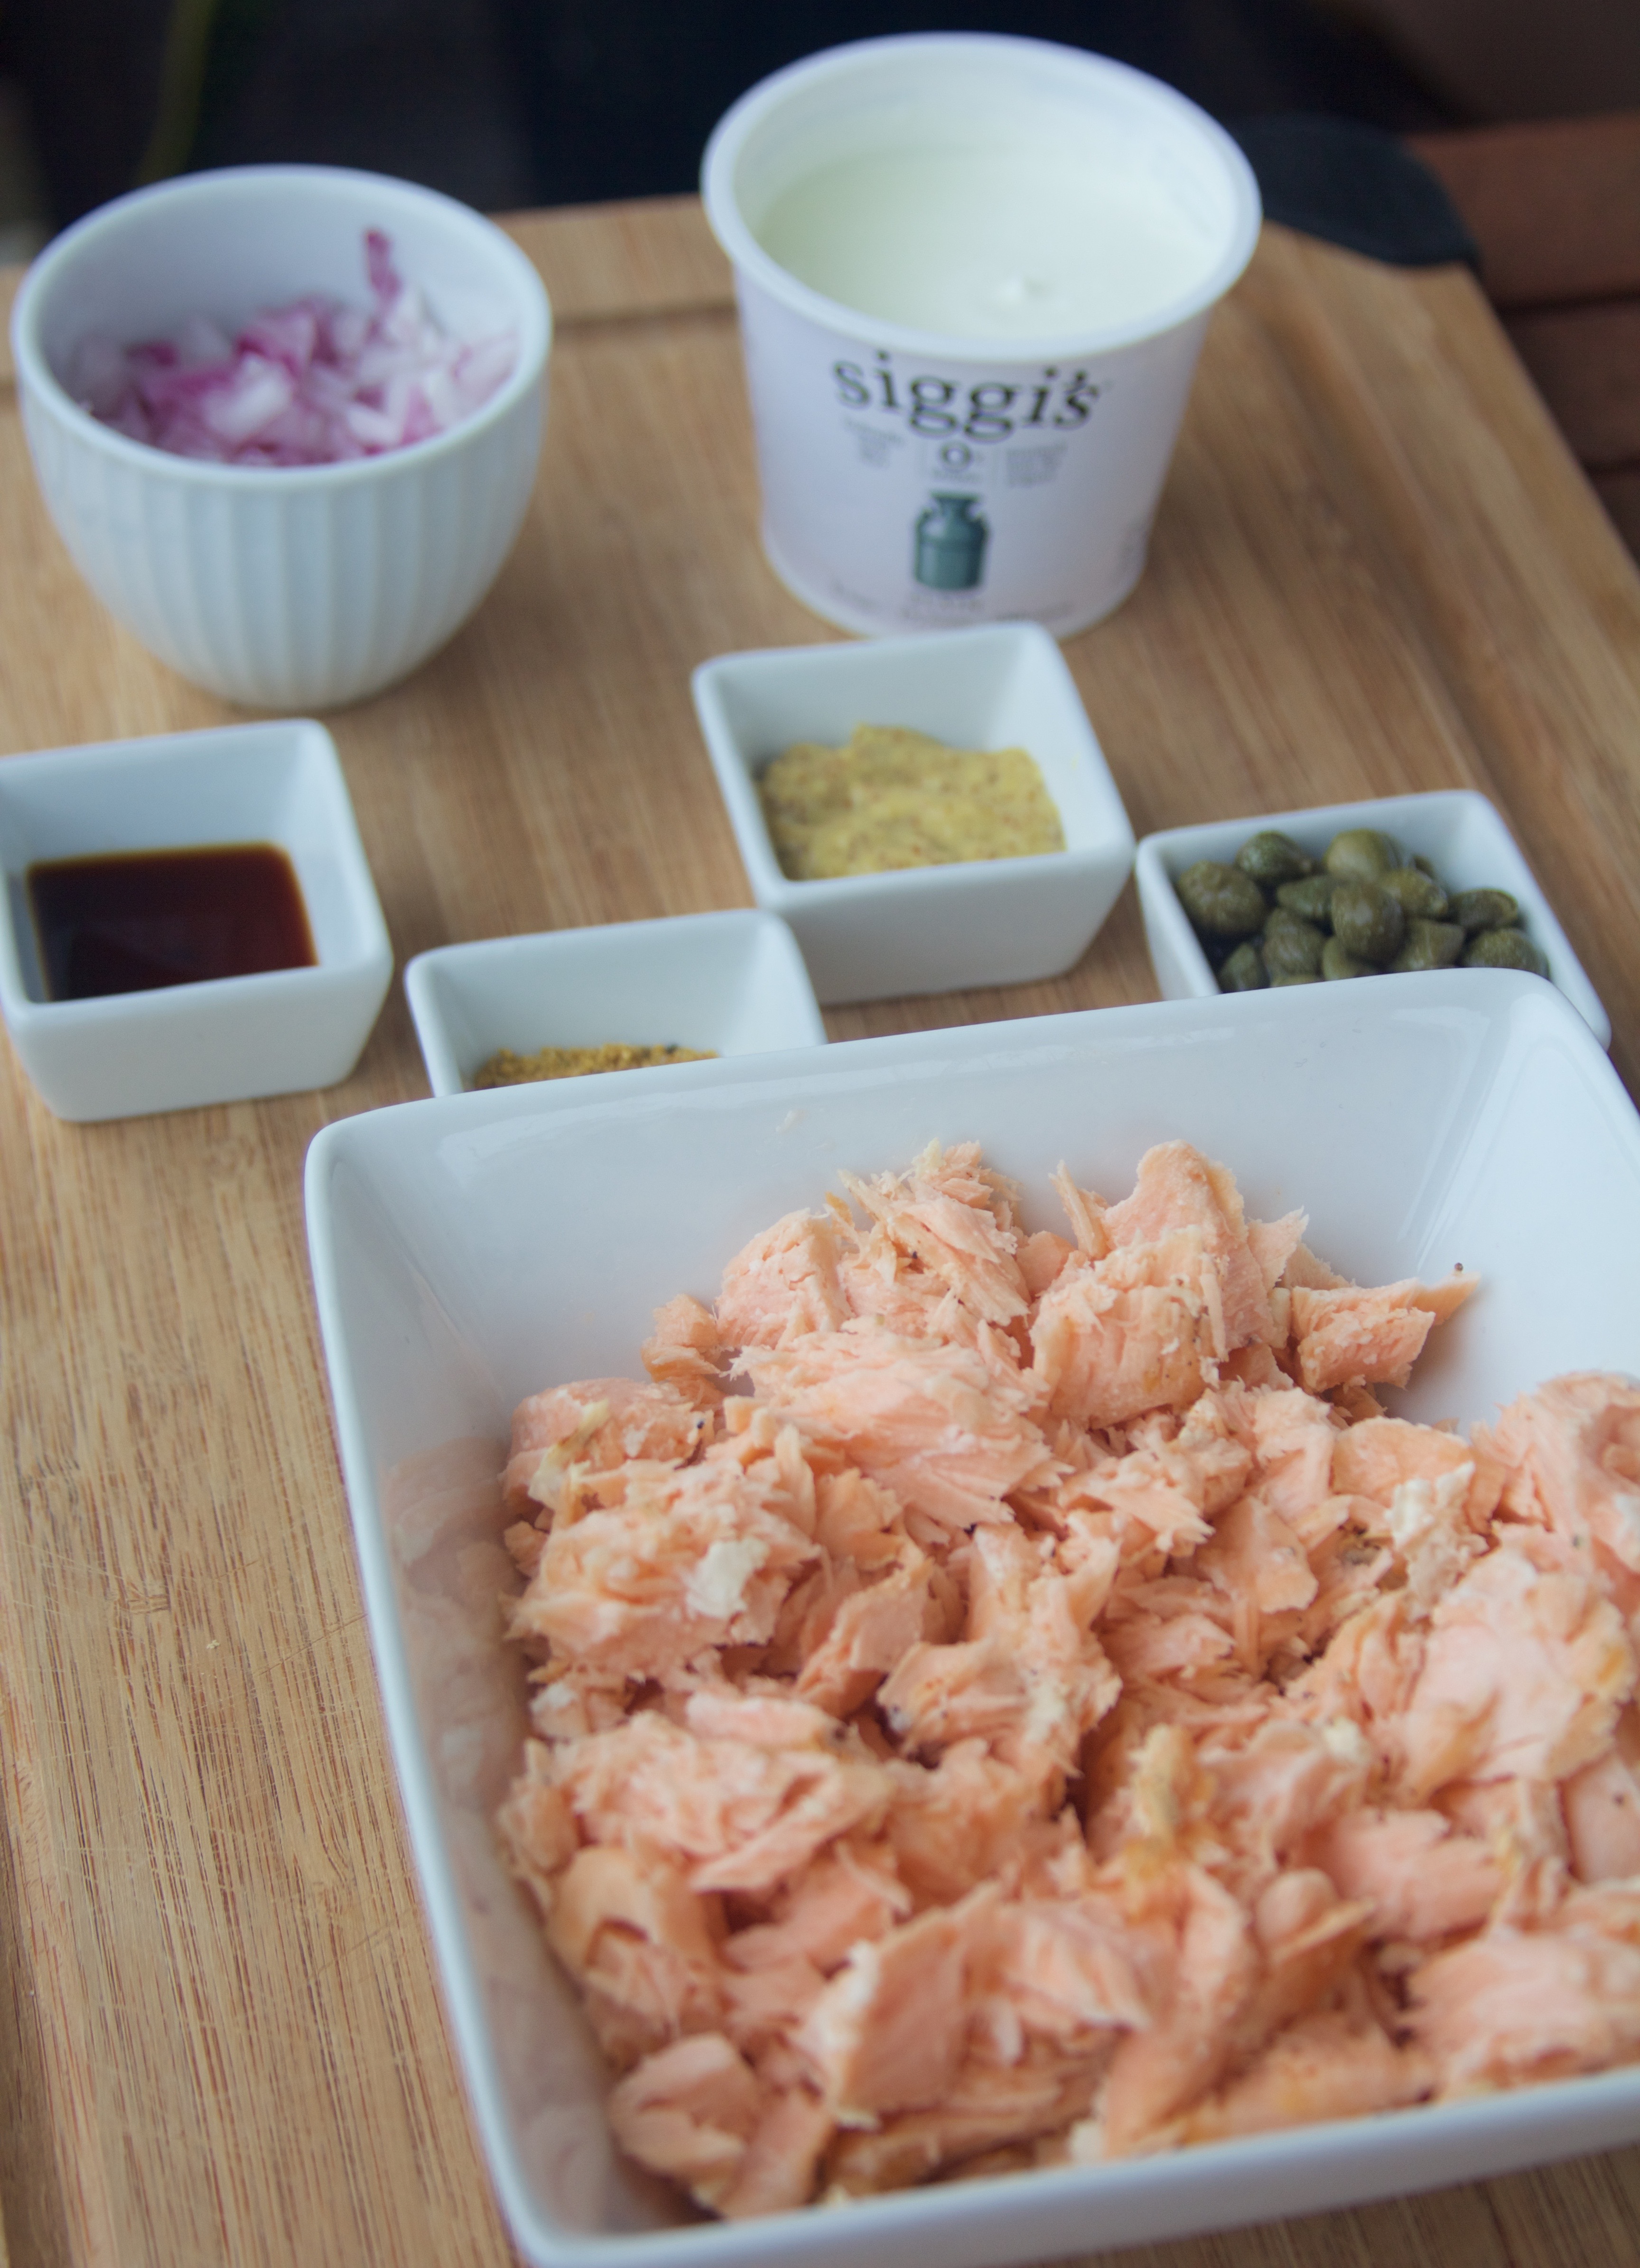
When it’s this hot outside, the last thing I want to do is eat something warm! This salmon salad is a cure for the summer heat blues. And it’s super easy to put together! Whether you enjoy the spread as a protein-packed snack after a summer workout or as an appetizer at a picnic or party, it’s light, crunchy flavors will remind you that summer is a great time to be outside!
~~~~~~~~~~
Step One.
Bake the salmon filets. I did this the night before I wanted to serve it, so that the fish was good and cold by the time I was ready to use it!
Preheat your oven to 425°F, and lightly coat the fish with olive oil. Sprinkle with salt and pepper, and then bake the fish for 15 – 18 minutes. Let them cool to room temperature, then seal them in a container and refrigerate until you’re ready to use them.
Step Two.
Prep Step! Measure out your ingredients. Dice the red onion – you don’t want any chunks that are too big!
Step Three.
Last big step! (See how easy this is?!?) In a mixing bowl, break up the baked salmon into big chunks with a fork. You don’t want to shred it yet, because it will further break down as you mix in the other ingredients. Mix in the onion and capers.
In the yogurt container, mix together the yogurt, Worcestershire sauce, mustard, and spices. Add the sauce to the salmon mixture, and stir until combined.
Step Three and a Half. =]
Ok, well, one more small step. The salad will be best if it has a chance for the flavors to blend in the fridge, but no biggie if you’re in a rush! Slice up some tomatoes, add a few crackers and greens, and you’re all set to enjoy this light snack!

Ingredients
- 2 salmon filets (about 4 oz each)
- 1 Tbsp olive oil
- Salt and Pepper
- 1 tub of Greek Yogurt
- 1 Tbsp capers
- 1/2 red onion
- 1 tsp Worcestershire sauce
- 1 tsp stone ground mustard
- 3/4 tsp lemon pepper
- Salt to taste
Instructions
- Preheat your oven to 425°F, and lightly coat the fish with olive oil. Sprinkle with salt and pepper, and then bake the fish for 15 - 18 minutes. Let them cool to room temperature, then seal them in a container and refrigerate until you're ready to use them.
- Prep Step! Measure out your ingredients. Dice the red onion - you don't want any chunks that are too big!
- In a mixing bowl, break up the baked salmon into big chunks with a fork. You don't want to shred it yet, because it will further break down as you mix in the other ingredients. Mix in the onion and capers.
- In the yogurt container, mix together the yogurt, Worcestershire sauce, mustard, and spices. Add the sauce to the salmon mixture, and stir until combined.
- The salad will be best if it has a chance for the flavors to blend in the fridge, but no biggie if you're in a rush! Slice up some tomatoes, add a few crackers and greens, and you're all set to enjoy this light snack!
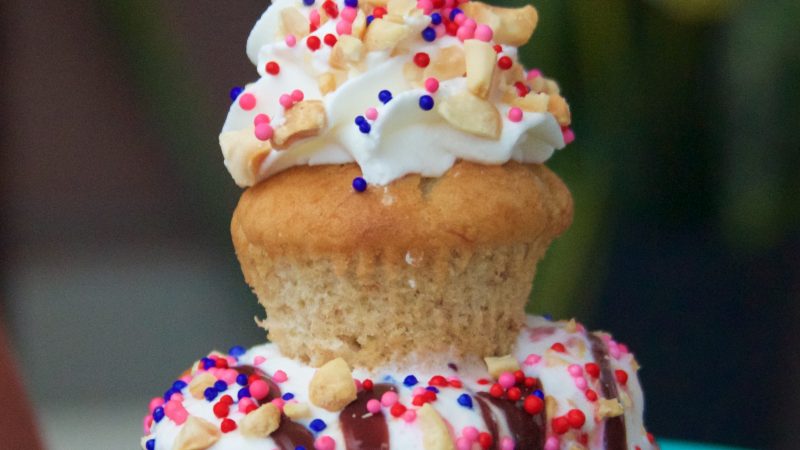
I remember the first time that I had a banana split. My grandpa had taken us fishing, and I had a really good day! This was not normal fishing, where 90% of the time is a test of your patience. This was a trout farm, where they bite the second the lure hits the water. So I was a very happy camper already, AND I got a banana split! I don’t know if I ate the whole thing, but I like to think I did. I remember liking the pineapple part the best.
This cupcake combines all of the yumminess of a banana split into one delicious baked treat that you can enjoy year round!
~~~~~~~~~~
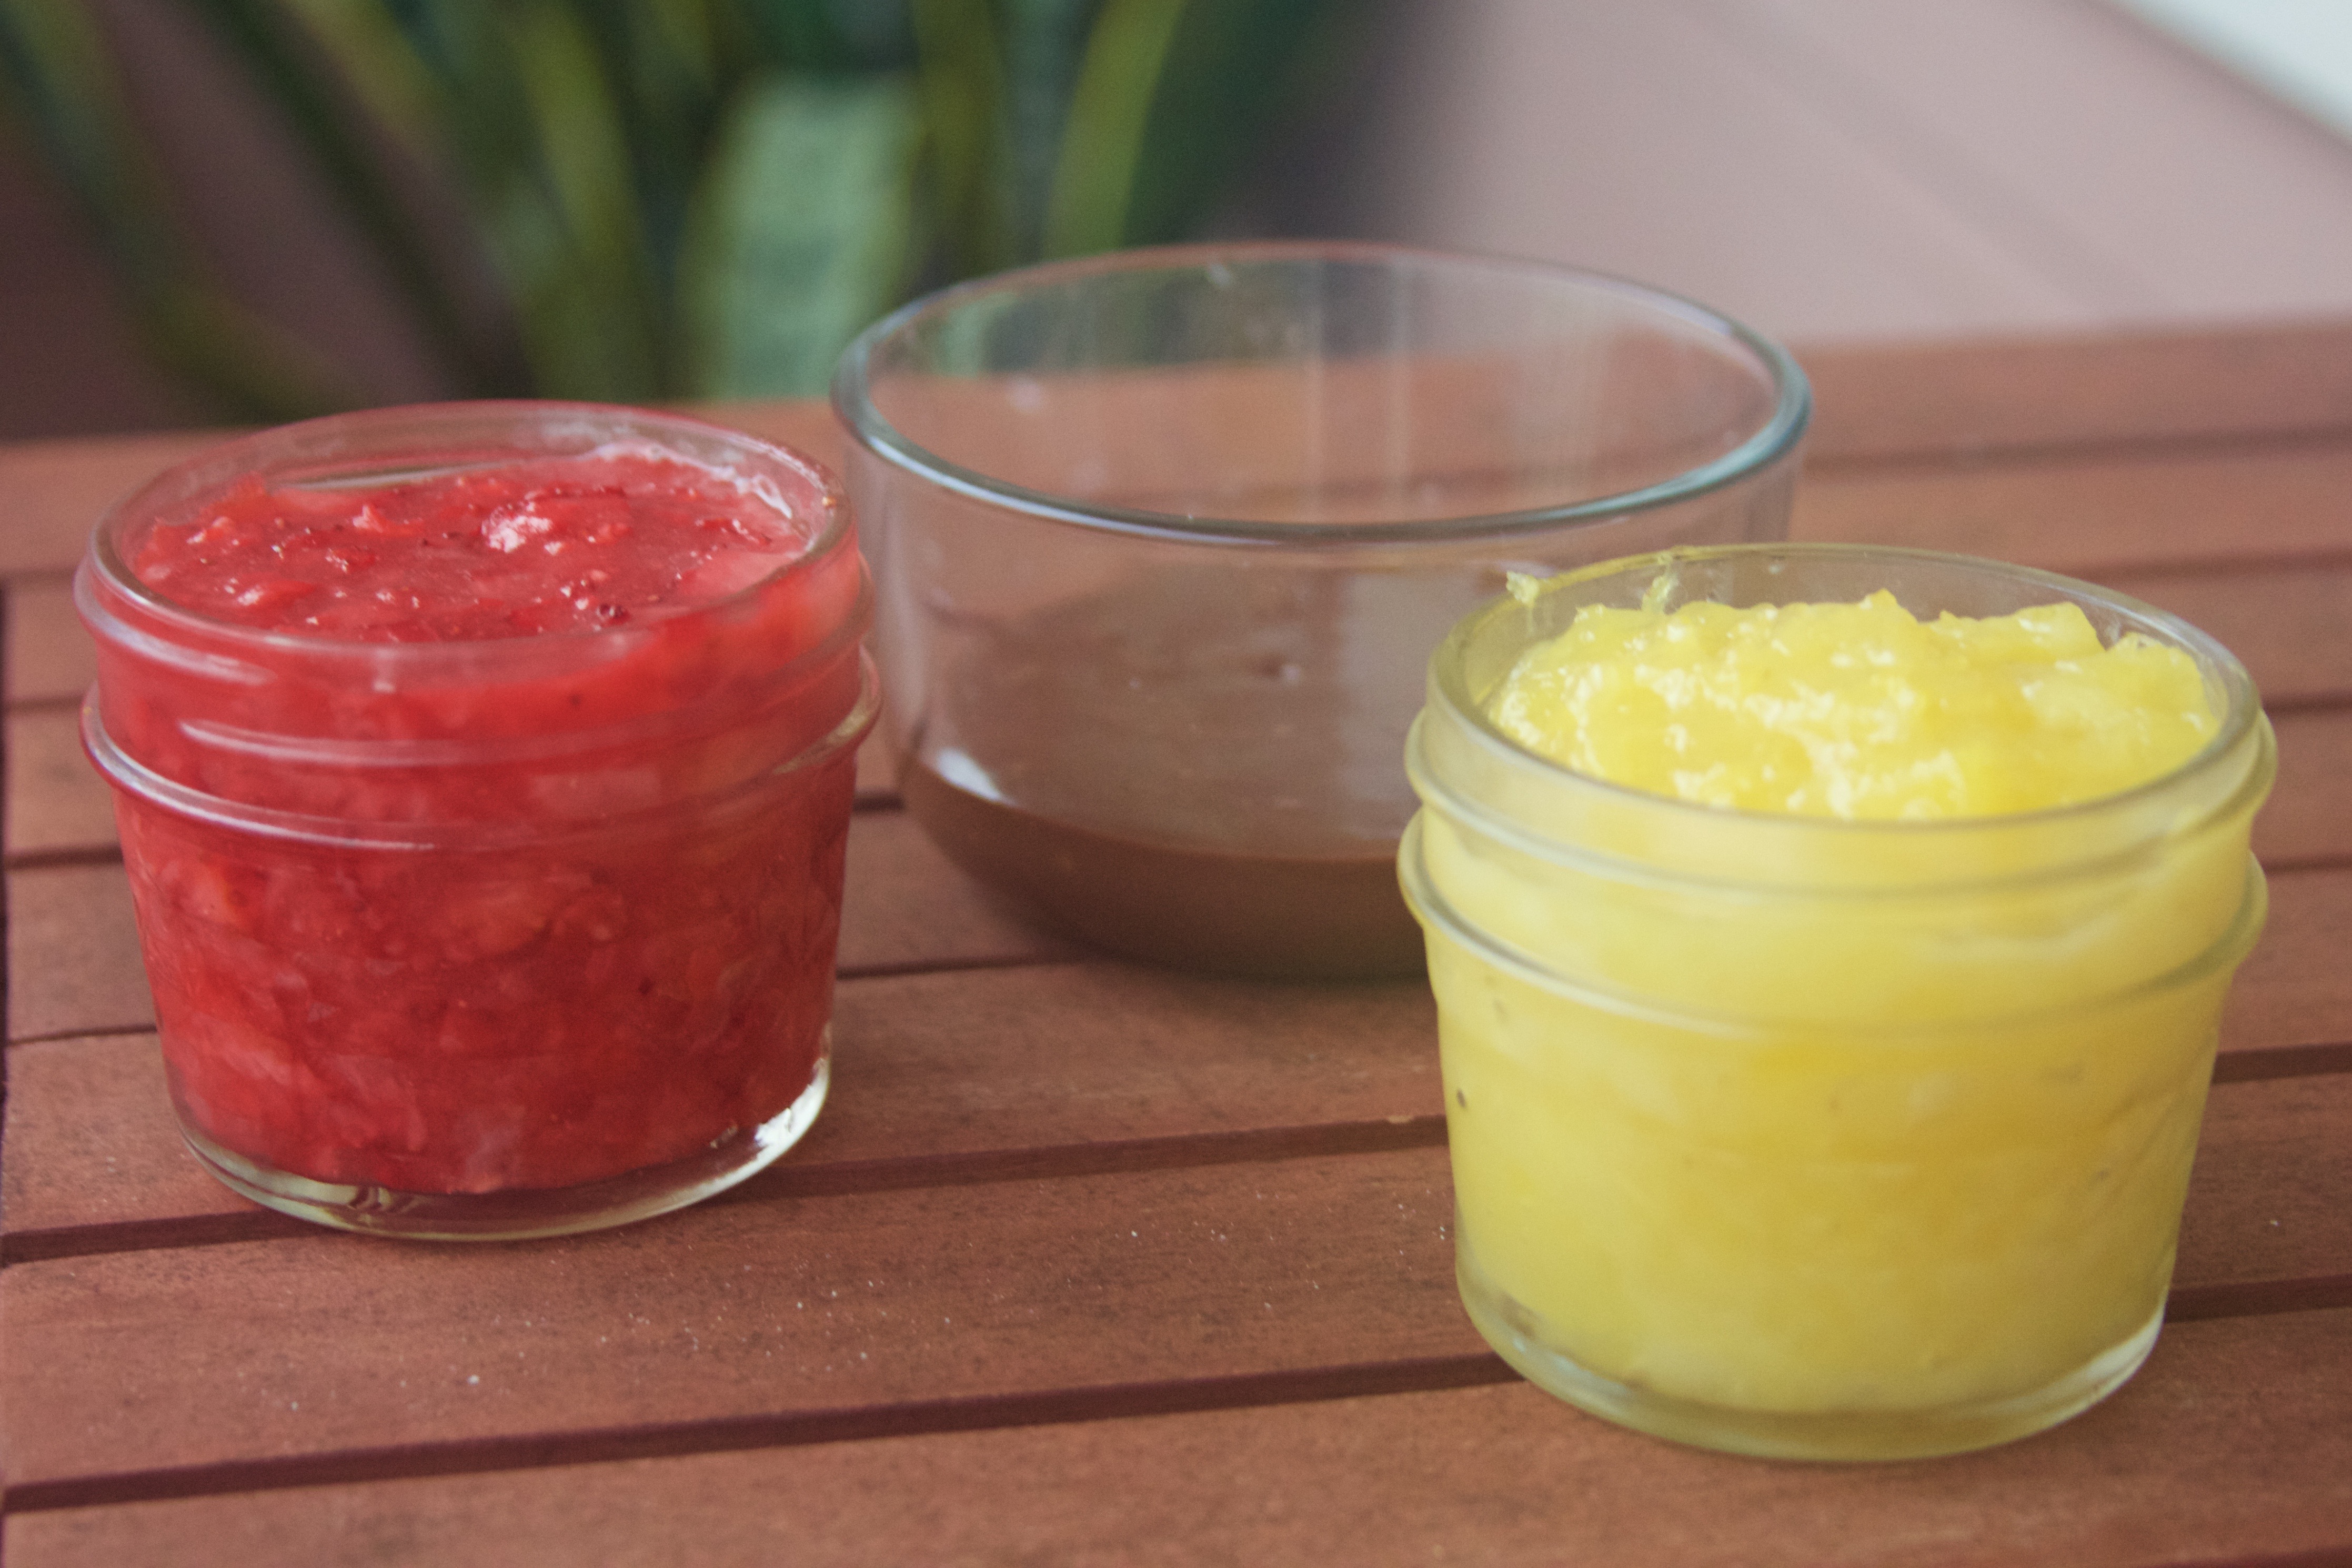
Step One – Sauces!

Step Two – Cupcakes!
Prep the cupcakes! Measure out all of your ingredients. Let the butter and the eggs warm up to room temperature (about 30 minutes). Preheat your oven to 350°F.
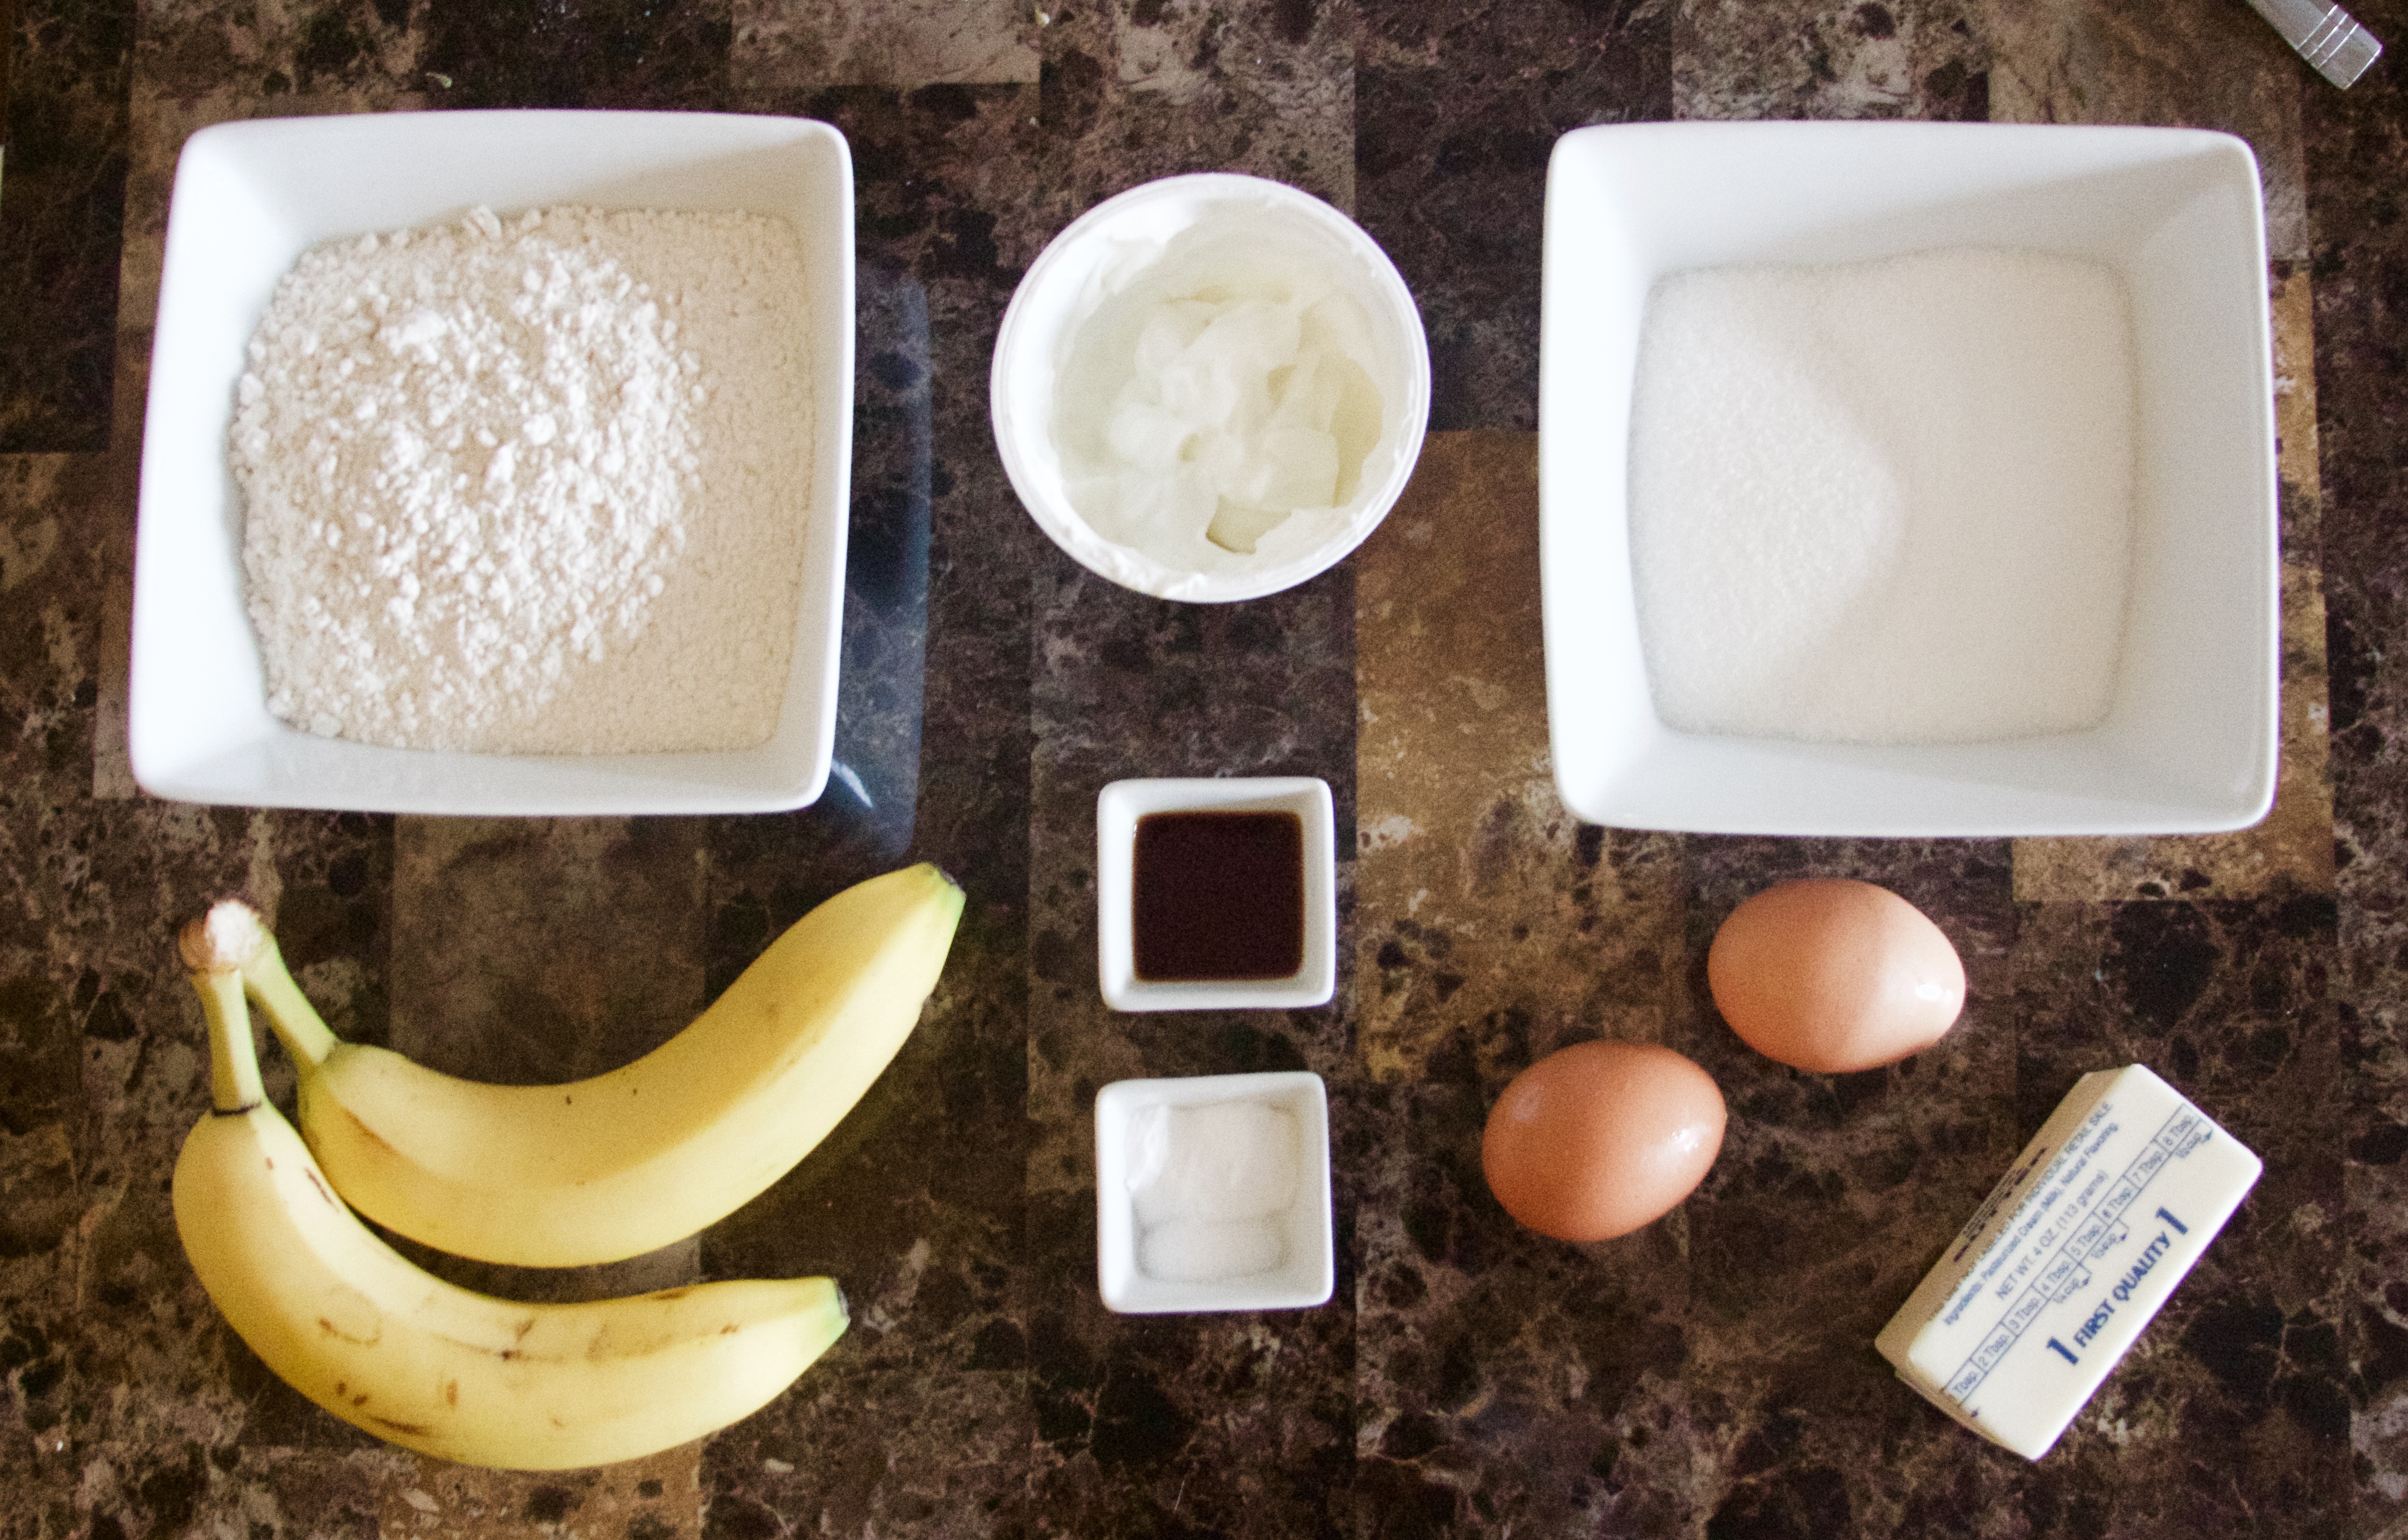
With a fork, mix together your dry ingredients in a bowl and set aside.
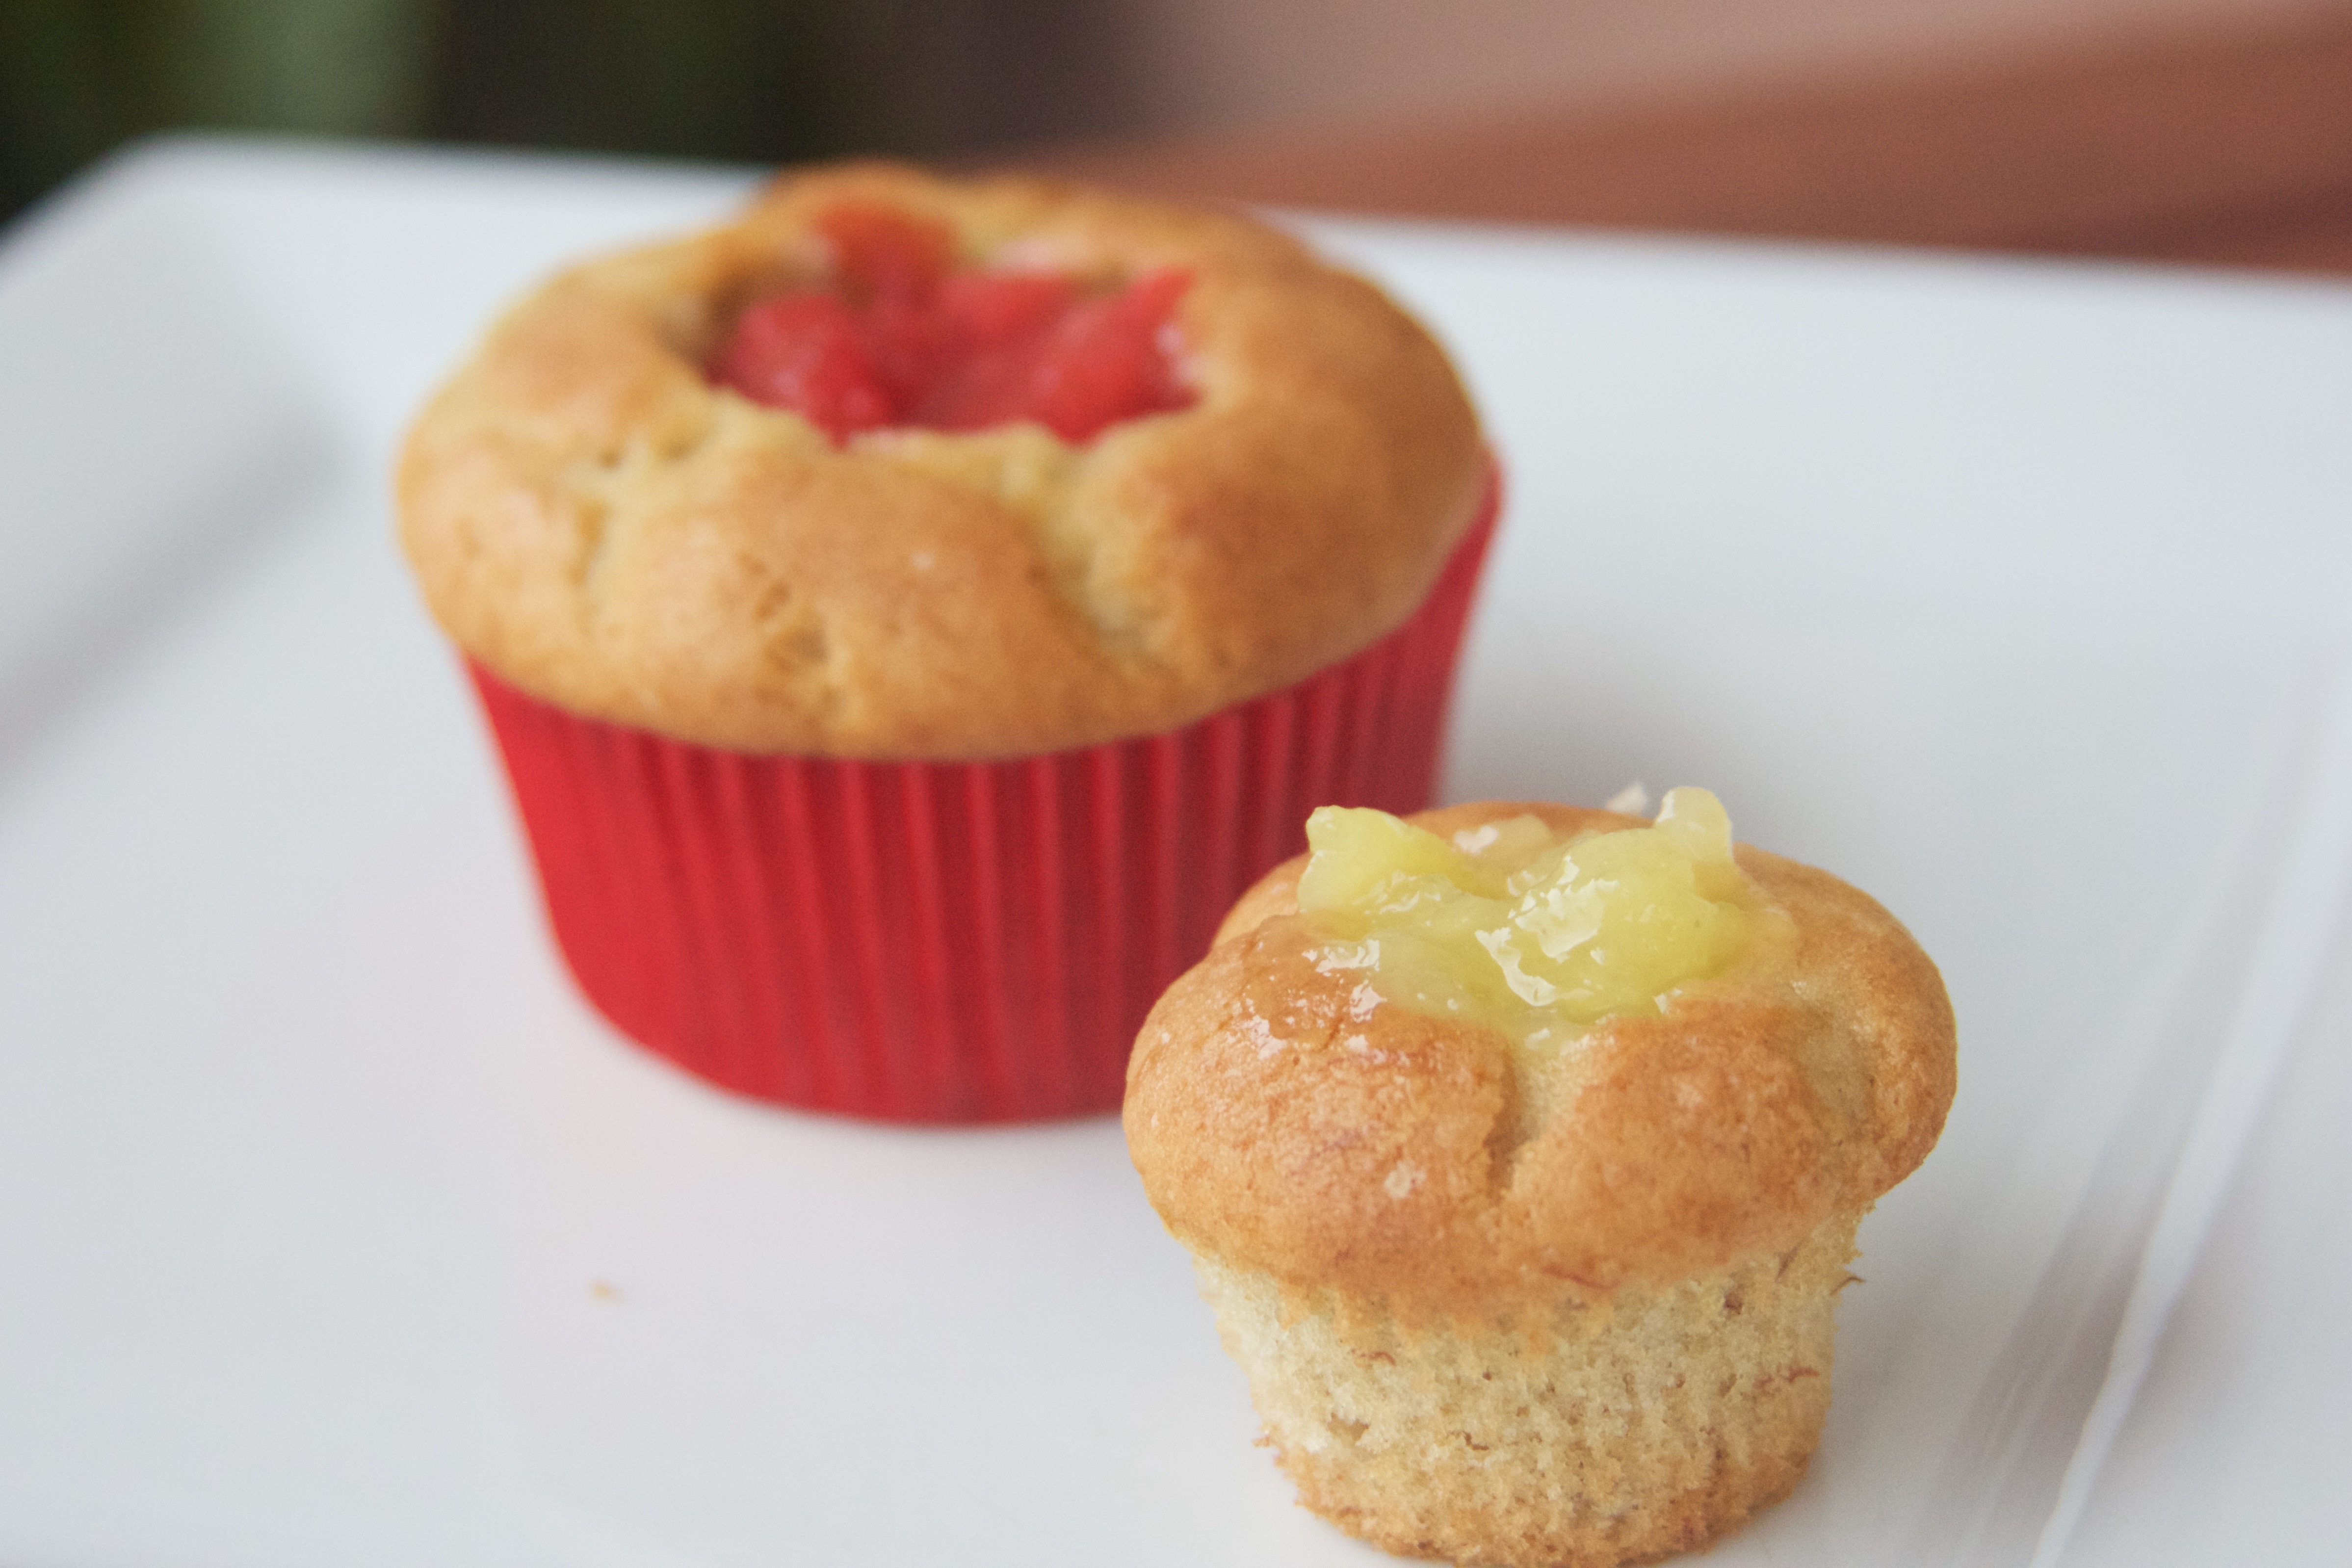

This cupcake combines all of the yumminess of a banana split into one delicious baked treat that you can enjoy year round!
Ingredients
- !Banana Cupcakes
- 1/2 cup (1 stick) unsalted butter
- 1 cup sugar
- 2 eggs
- 2 tsp vanilla
- 2 bananas, mashed
- 1 tsp baking soda
- 1/4 tsp salt
- 1/2 cup plain greek yogurt
- 2 cups strawberries, chopped
- 1 Tbsp sugar
- 1 Tbsp cornstarch
- 2 cups pineapple, chopped
- 1 Tbsp sugar
- 1 Tbsp cornstarch
- 1 cup milk chocolate morsels
- 1 Tbsp heavy whipping cream
- 1 cup heavy whipping cream
- 1 Tbsp powdered sugar
- Salted peanuts, crushed
- Sprinkles
- Ice cream (I used strawberry)
- Maraschino cherries
Instructions
- *Note: You want to make the sauces first so that they are cool enough to use when the cupcakes are done!
- Prep Step!
- Put the chopped strawberries into a saucepan over medium heat. Cook for about five minutes, until they start to lose their juices.
- Add the sugar and mix thoroughly.
- One the sauce looks slightly syrupy, add the cornstarch.
- *Tip: I pre-mix my cornstarch with about a teaspoon of water so that I don’t get clumps.
- Cook for about three minutes, just until it starts to thicken and come together.
- Repeat the same steps for the pineapple sauce.
- In a microwavable bowl, heat the chocolate chips and whipping cream at 30 second intervals, stirring in-between.
- Let all sauces cool to room temperature.
- Prep the cupcakes! Measure out all of your ingredients. Let the butter and the eggs warm up to room temperature (about 30 minutes). Preheat your oven to 350°F.
- With a fork, mix together your dry ingredients in a bowl and set aside.
- In a stand mixer, beat together the butter and sugar for about five minutes, until light and fluffy.
- Now add the eggs, one at a time, and beat until it is mixed together.
- Add the vanilla and beat until it is well-mixed.
- Stir in the mashed bananas.
- Add one-third of the dry ingredients and mix until just incorporated.
- Now, add half of the yogurt and mix until incorporated.
- Repeat this process until all of the dry ingredients and yogurt is used.
- Now they are ready to bake! Use about 2/3 of the batter in a regular sized pan; use the rest in a mini cupcake pan. Bake at 350°F for 20-22 minutes, or until the tops are golden brown.
- Add the heavy whipping cream and powdered sugar to a mixing bowl. Beat on high with the whisk attachment until stiff peaks form. Add to a piping bag fitted with a star attachment.
- Unwrap the mini cupcakes from their wrappers. Using either a knife or a fancy cupcake corer, cut the middle out of the big and small cupcakes.
- Fill the big cupcakes with strawberry filling and the small ones with pineapple filling.
- Place a scoop of the ice cream on the big cupcake. Drizzle with chocolate sauce.
- Place the small cupcake on top and “frost” with the whipped cream. Sprinkle with the peanuts and sprinkles, and add a cherry on top!
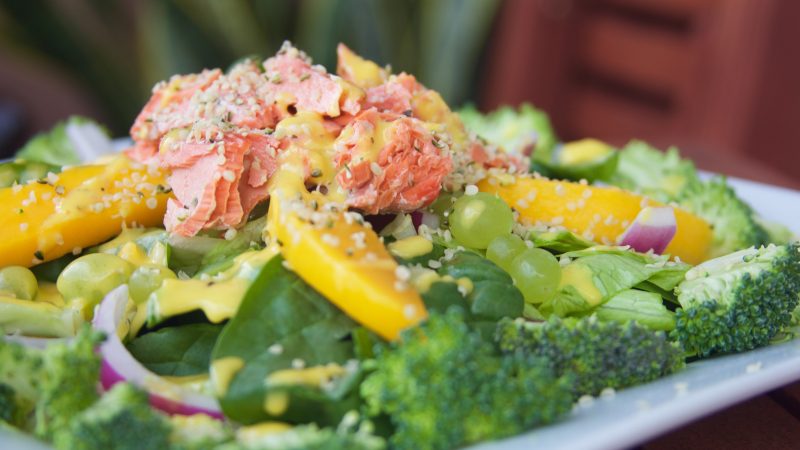
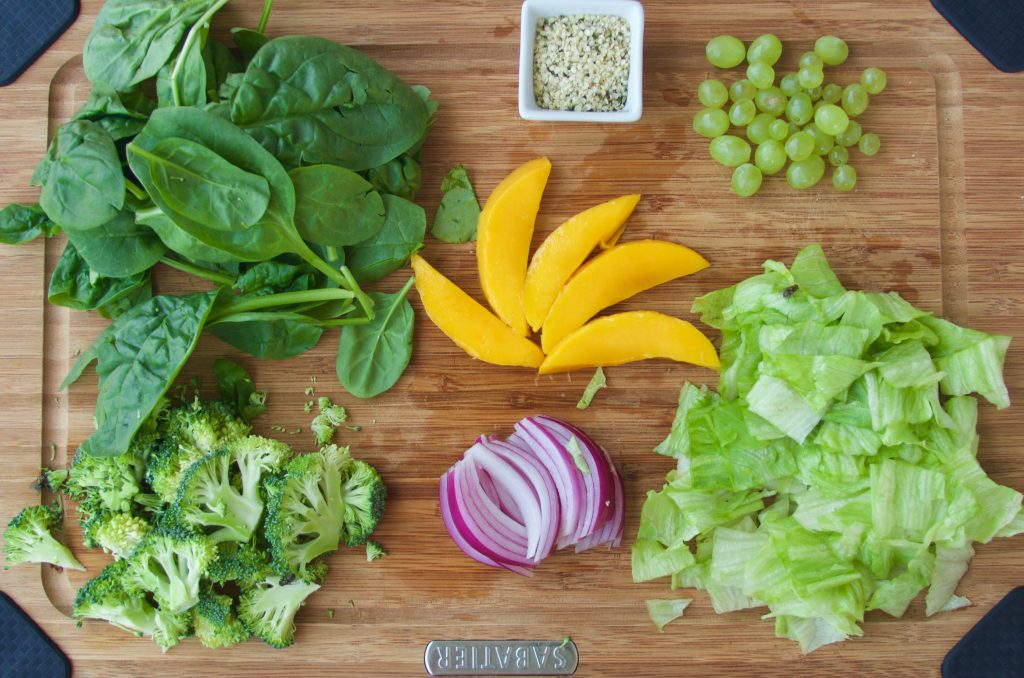
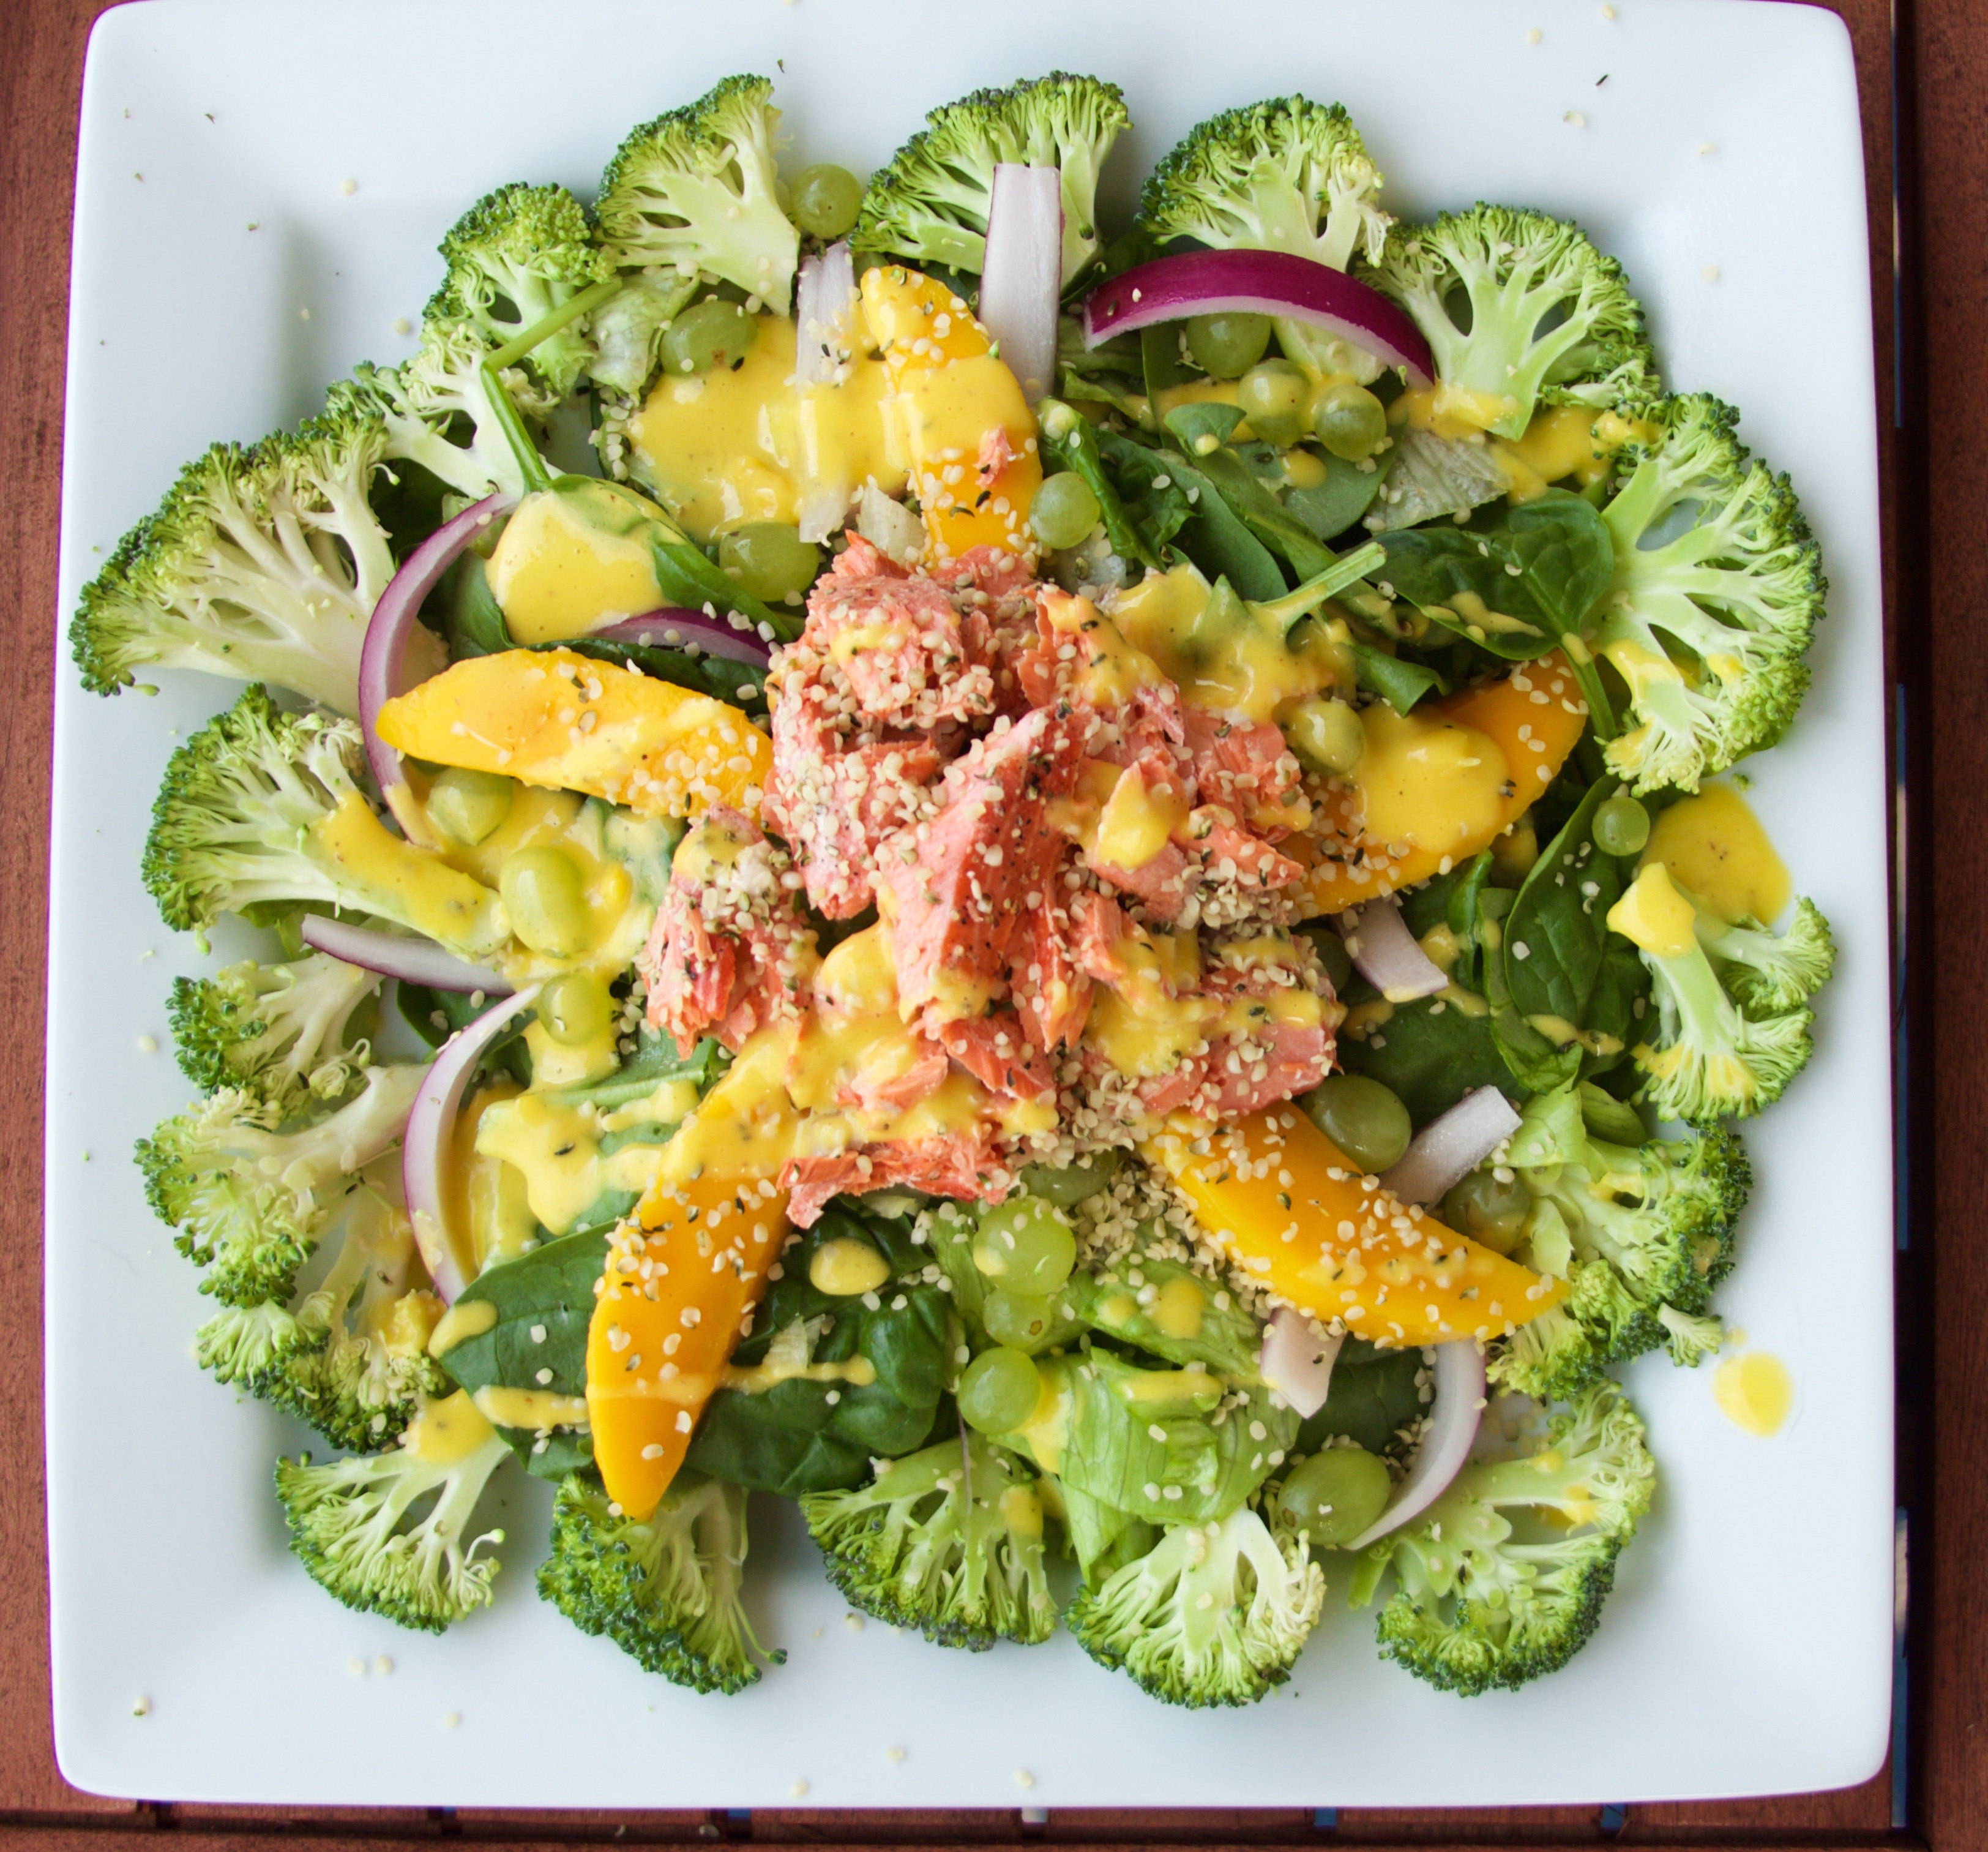
On a sticky summer day, I just love to crunch down on a crisp, flavorful salad. Usually I like to enjoy a hot dinner at night, but I just can’t bring myself to do that when it’s 95° outside!
I have a cooking philosophy that I think this salad does a wonderful job of exemplifying. Gourmet cooking is fun and zen, but sometimes “what’s in the fridge” is just as good, and way easier. This is that salad.
I didn’t run to the store. I didn’t spend a lot of time. Any cook of ANY skill level can whip up this salad and bite into yum.
Protein-rich salmon and hemp seeds paired with sweet mango and bursts of grape make this salad another summer staple.
~~~~~~~~~~
Step One.

Protein-rich salmon and hemp seeds paired with sweet mango and bursts of grape make this salad another summer staple.
Ingredients
- 4 oz salmon (wild is best!)
- salt and pepper to taste
- 1.5 oz spinach (one large handful)
- 3 oz iceburg lettuce (about three leaves), torn
- 5 broccoli florets, sliced
- 1/2 mango, sliced
- 1/8 red onion, thinly sliced
- 1 Tbsp hemp seeds
- 1 small bunch baby green grapes (or sliced regular ones)
- 1/2 mango
- 1 Tbsp white balsamic vinegar (or vinegar of choice)
- dash hot sauce
- 2 Tbsp avocado oil
- salt and pepper to taste
Instructions
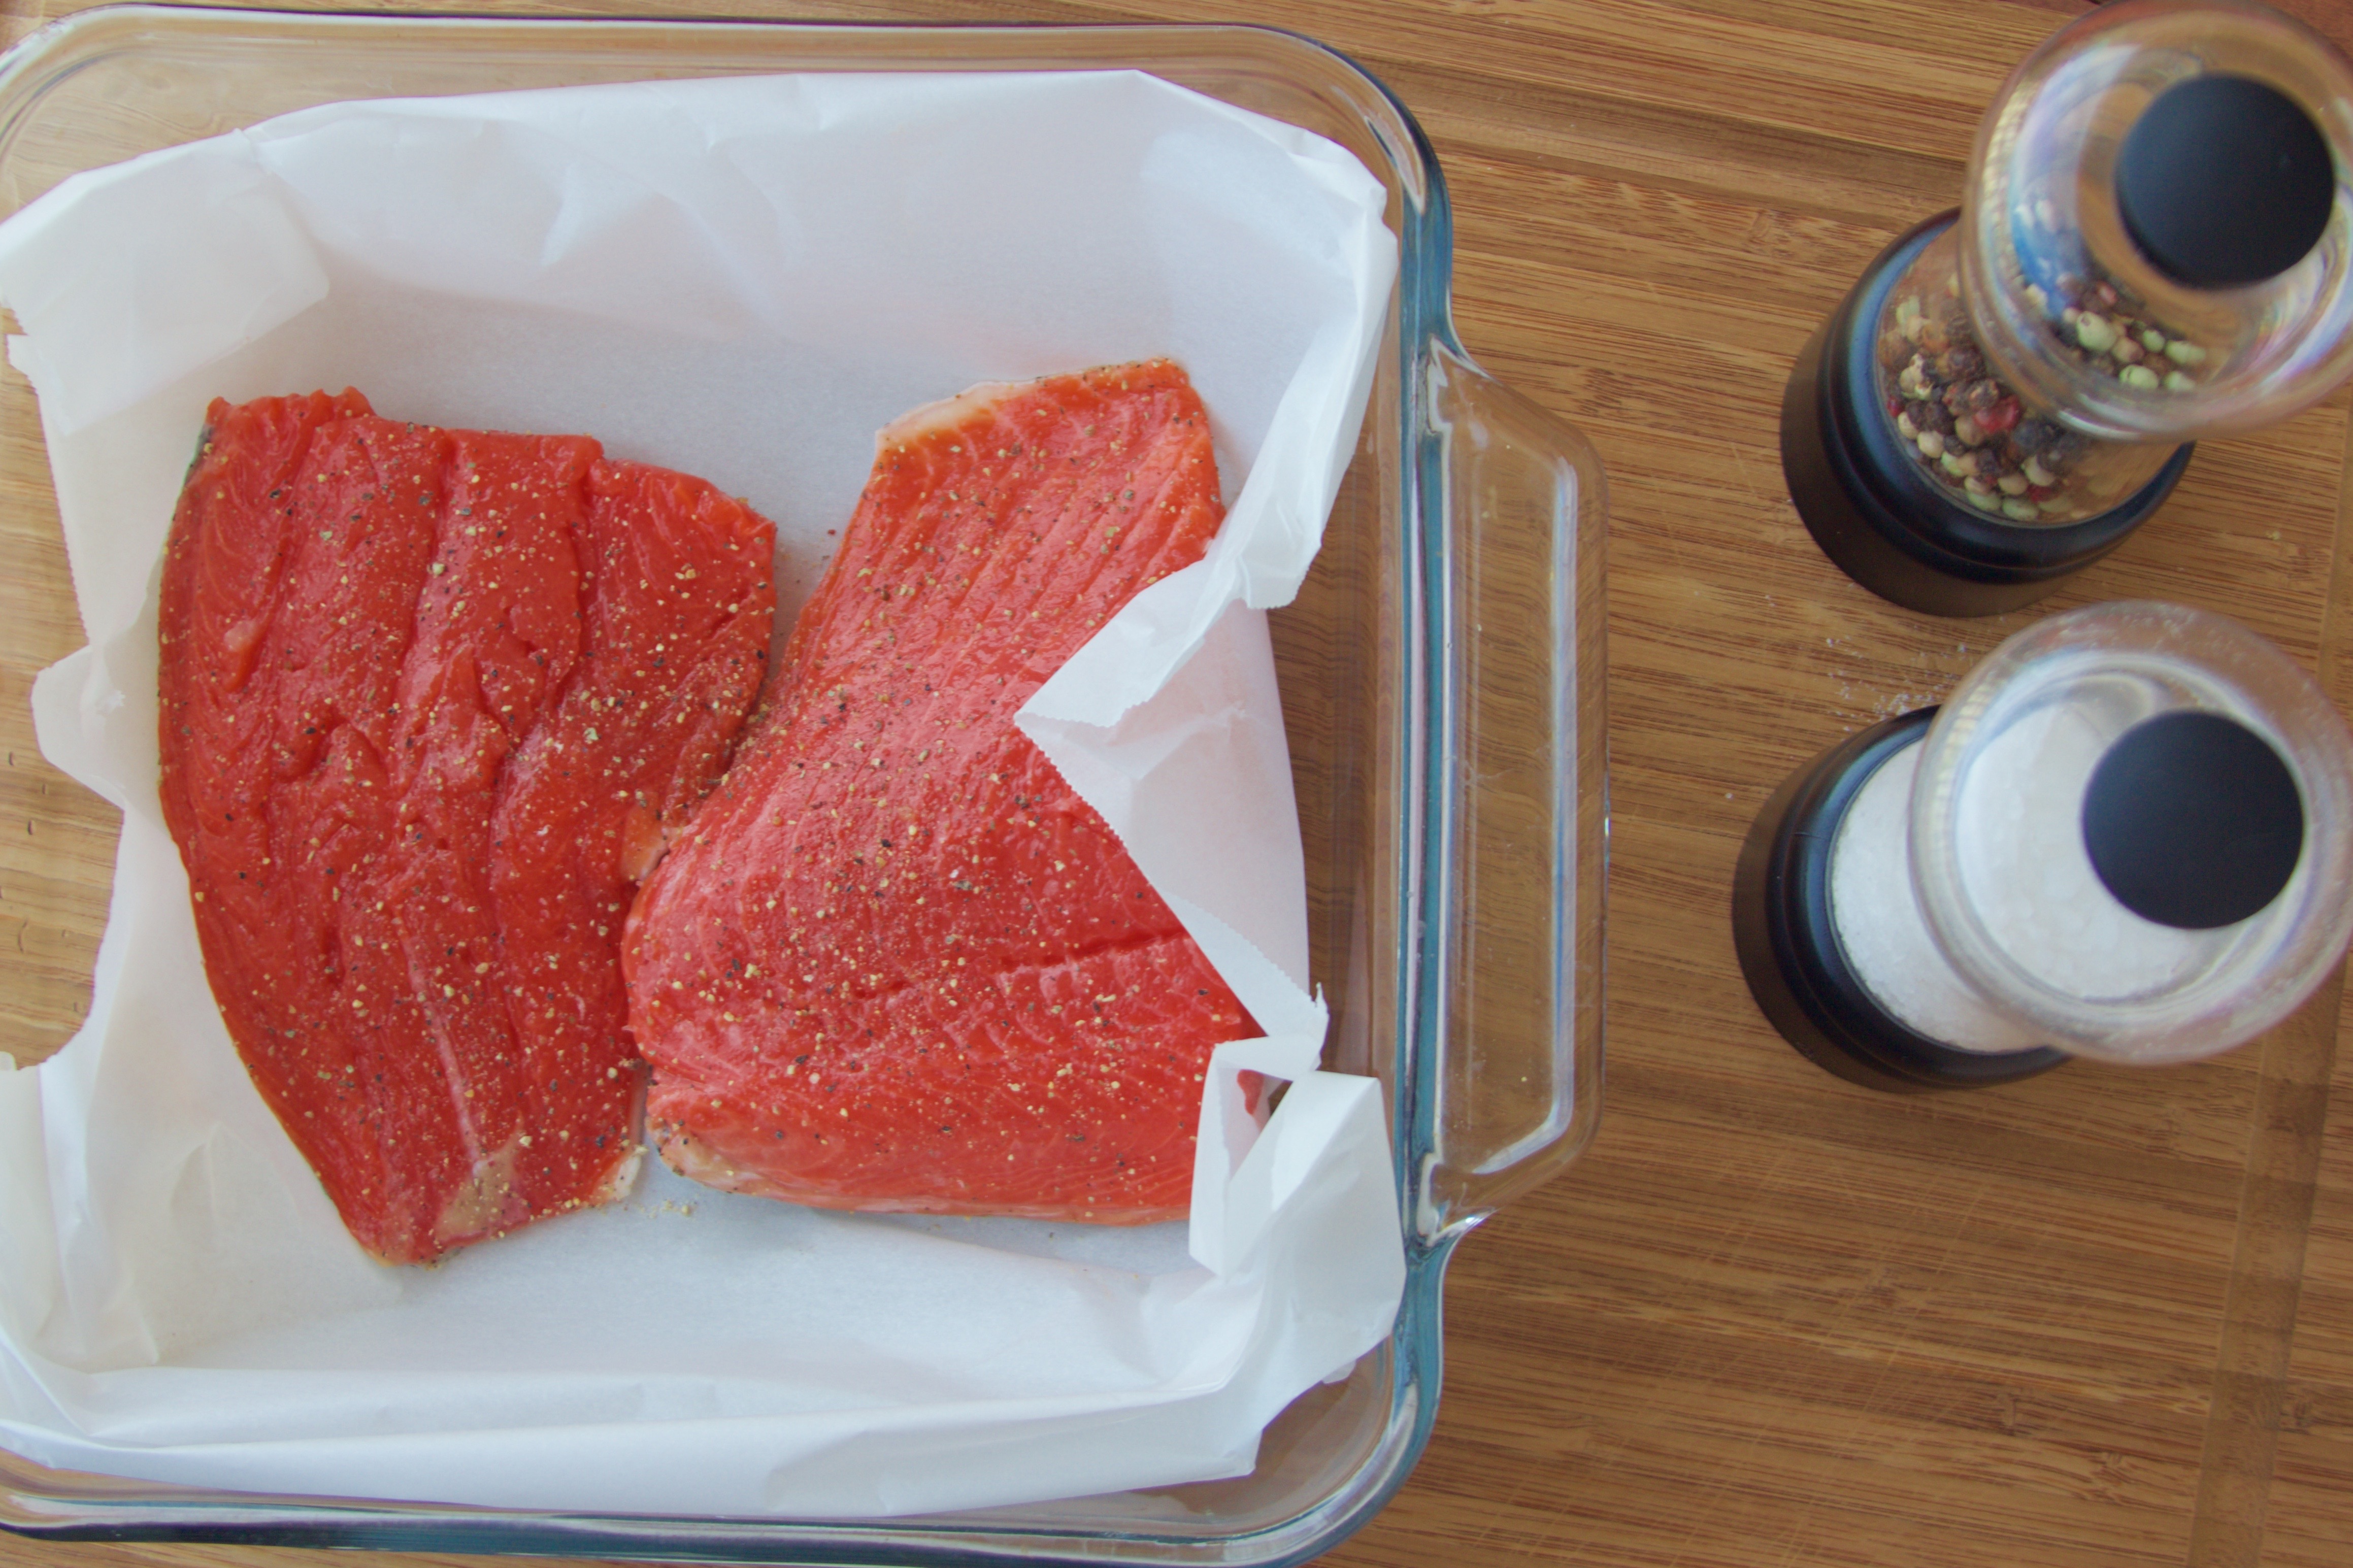
- Salmon Prep Step! We’re going to prep the rest of the salad while the salmon bakes. Preheat your oven to 425°F. Line a baking pan with parchment paper.
- Pat the salmon dry with a paper towel. Season lightly with salt and pepper. Add any other spices (like cayenne) if you prefer a stronger taste.
- Place the salmon, skin side down, in your lined pan. Bake for 20 - 24 minutes, until done. If you want your salmon warm, slice it up and add “as is” to the salad. If you would like it cooler, let the salmon cool for a few minutes, and then stick it salmon in the freezer for a few more minutes.
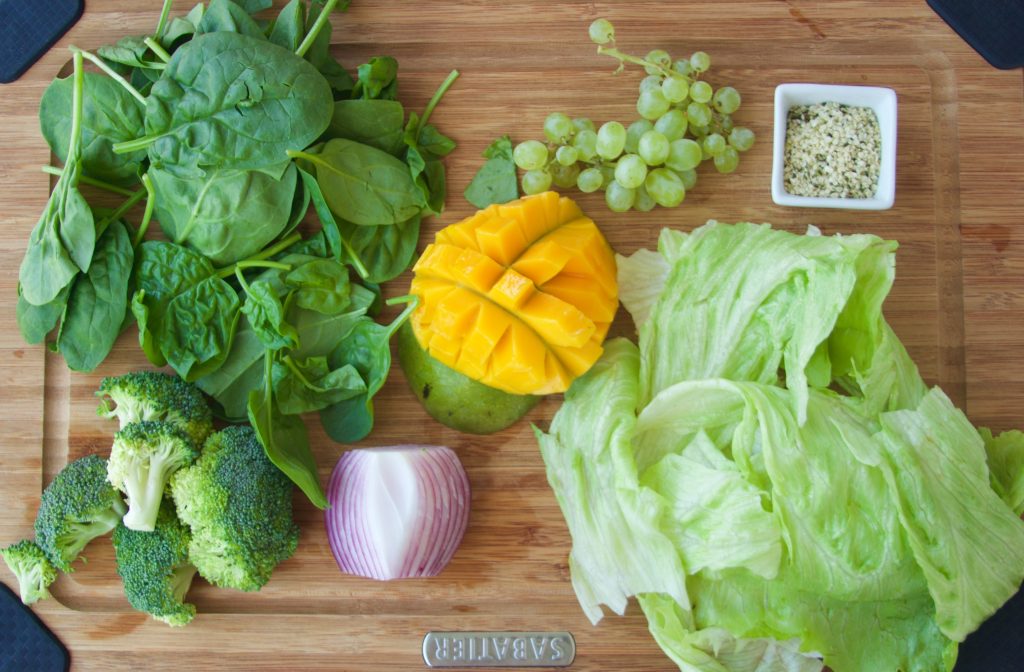
- Now prep the salad! Measure out and chop your ingredients. Have those on stand by for when the salmon is done.
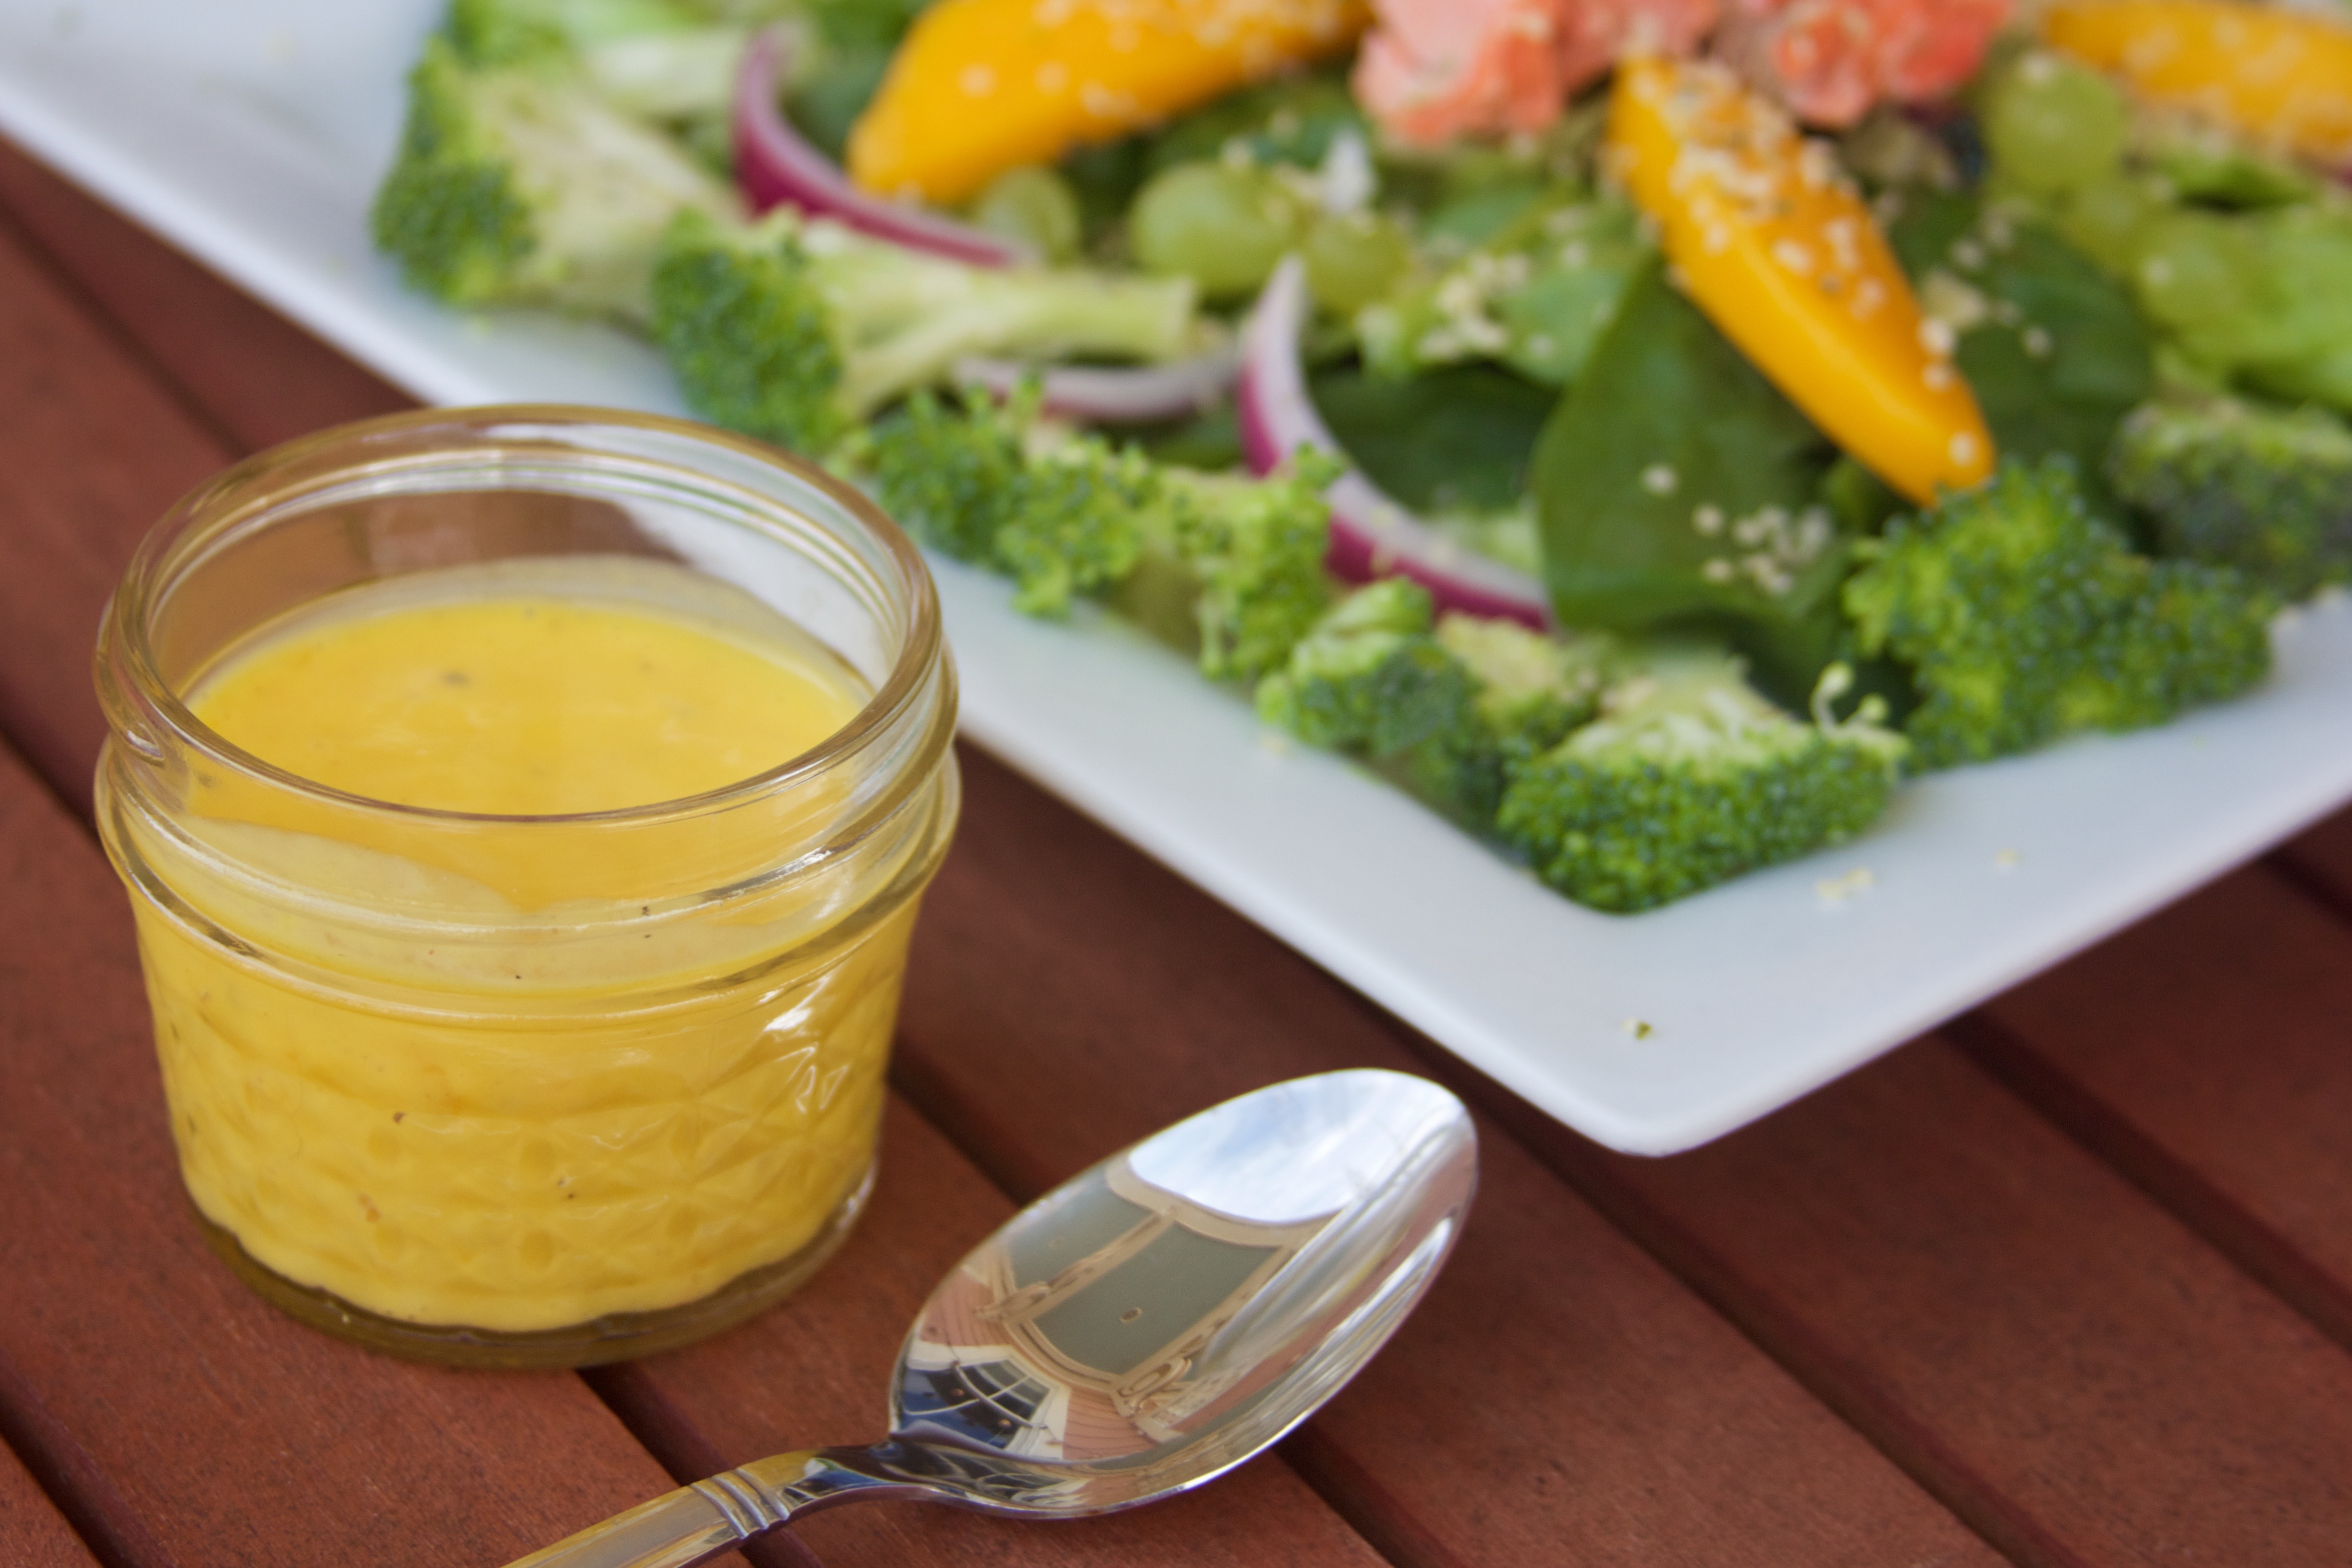
- Add all of the ingredients, except the oil, to a food processor or blender and process until liquified. In order to create an emulsion, you must slowly add the oil and mix it in vigorously. This is done by adding a very light trickle of oil in, with your blender or processor going, until it is all added. You will want to store it in a closed container so that you can shake it up again before serving.
- Arrange the spinach and lettuce on the plates and top with broccoli, mango, and red onion. Add your (hot or cold) salmon, and sprinkle the hemp seeds on top. Drizzle with dressing. Enjoy on a hot summer day, preferably with some Chardonnay.
I think I’m ready to quit my life and start fresh as a farmer! Well, almost. But this experience was so zen and wonderful!
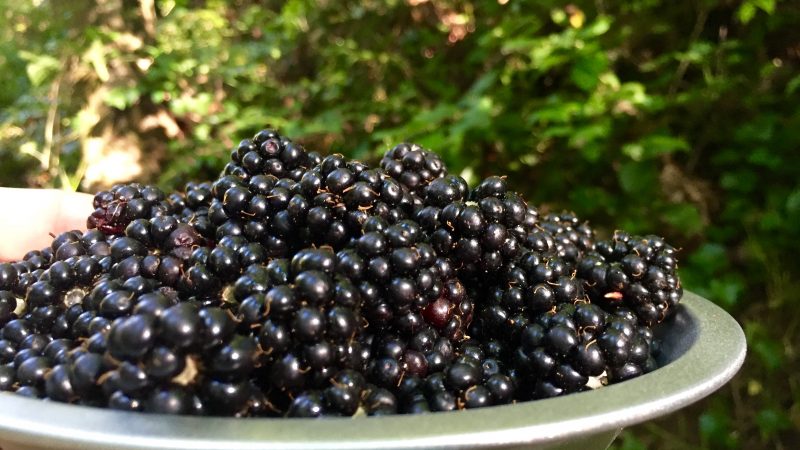
Travels have kept me away from the kitchen recently (sorry, but no apologies for that!), but I had to see what I could make when visiting Seattle. Apparently, blackberries are weeds, effectively, there. I first saw them when we were driving to a national park- they were everywhere!
Decision made.
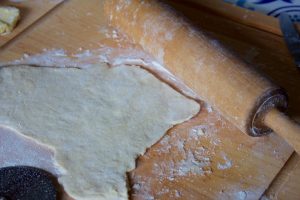
I bought a perfect little pie tin at the Pike Place Market for my adventure. Then I set to picking berries, listening to a small creek behind me and smiling at the birds in my baking Cinderella moment.

Naturally, half of the blackberries went straight into my mouth. They were so perfect and tart, so I knew that a plain Jane butter crust would not be the perfect partner. A sweeter platform for a low-sugar filling would be perfect.
Quick question to address:
Why don’t these cookies have normal cookie ingredients?
Think of it more as a shortbread. Cookies are meant to rise, and that does not make for good pie crust. Trust me on this one!
This cookie crusty is the perfect base for all-natural, tart berries. Another quintessential summer treat!
Please Note: Unfortunately, my uncle’s kitchen has awful lighting. As such, I have not done the usual step-by-step with pictures before the recipe. I do have the pictures, though, so if you need more information or want to see what a step looks like, just ask! Thanks!

This cookie crusty is the perfect base for all-natural, tart berries. Another quintessential summer treat!
Ingredients
- Note: this recipe has been scaled up from what you see in the picture so that it will make a full pie
- 1 cup butter
- 1 cup sugar
- 3 cups all purpose flour
- Zest of one lemon
- 9 basil leaves, chopped
- 3 Tbsp heavy cream
- 4 cups blackberries
- 2 Tbsp sugar (add more of you like it sweet!)
- Juice of 1/2 lemon
- 3 Tbsp cornstarch mixed into 1 tsp water
- 1 Tbsp butter
Instructions
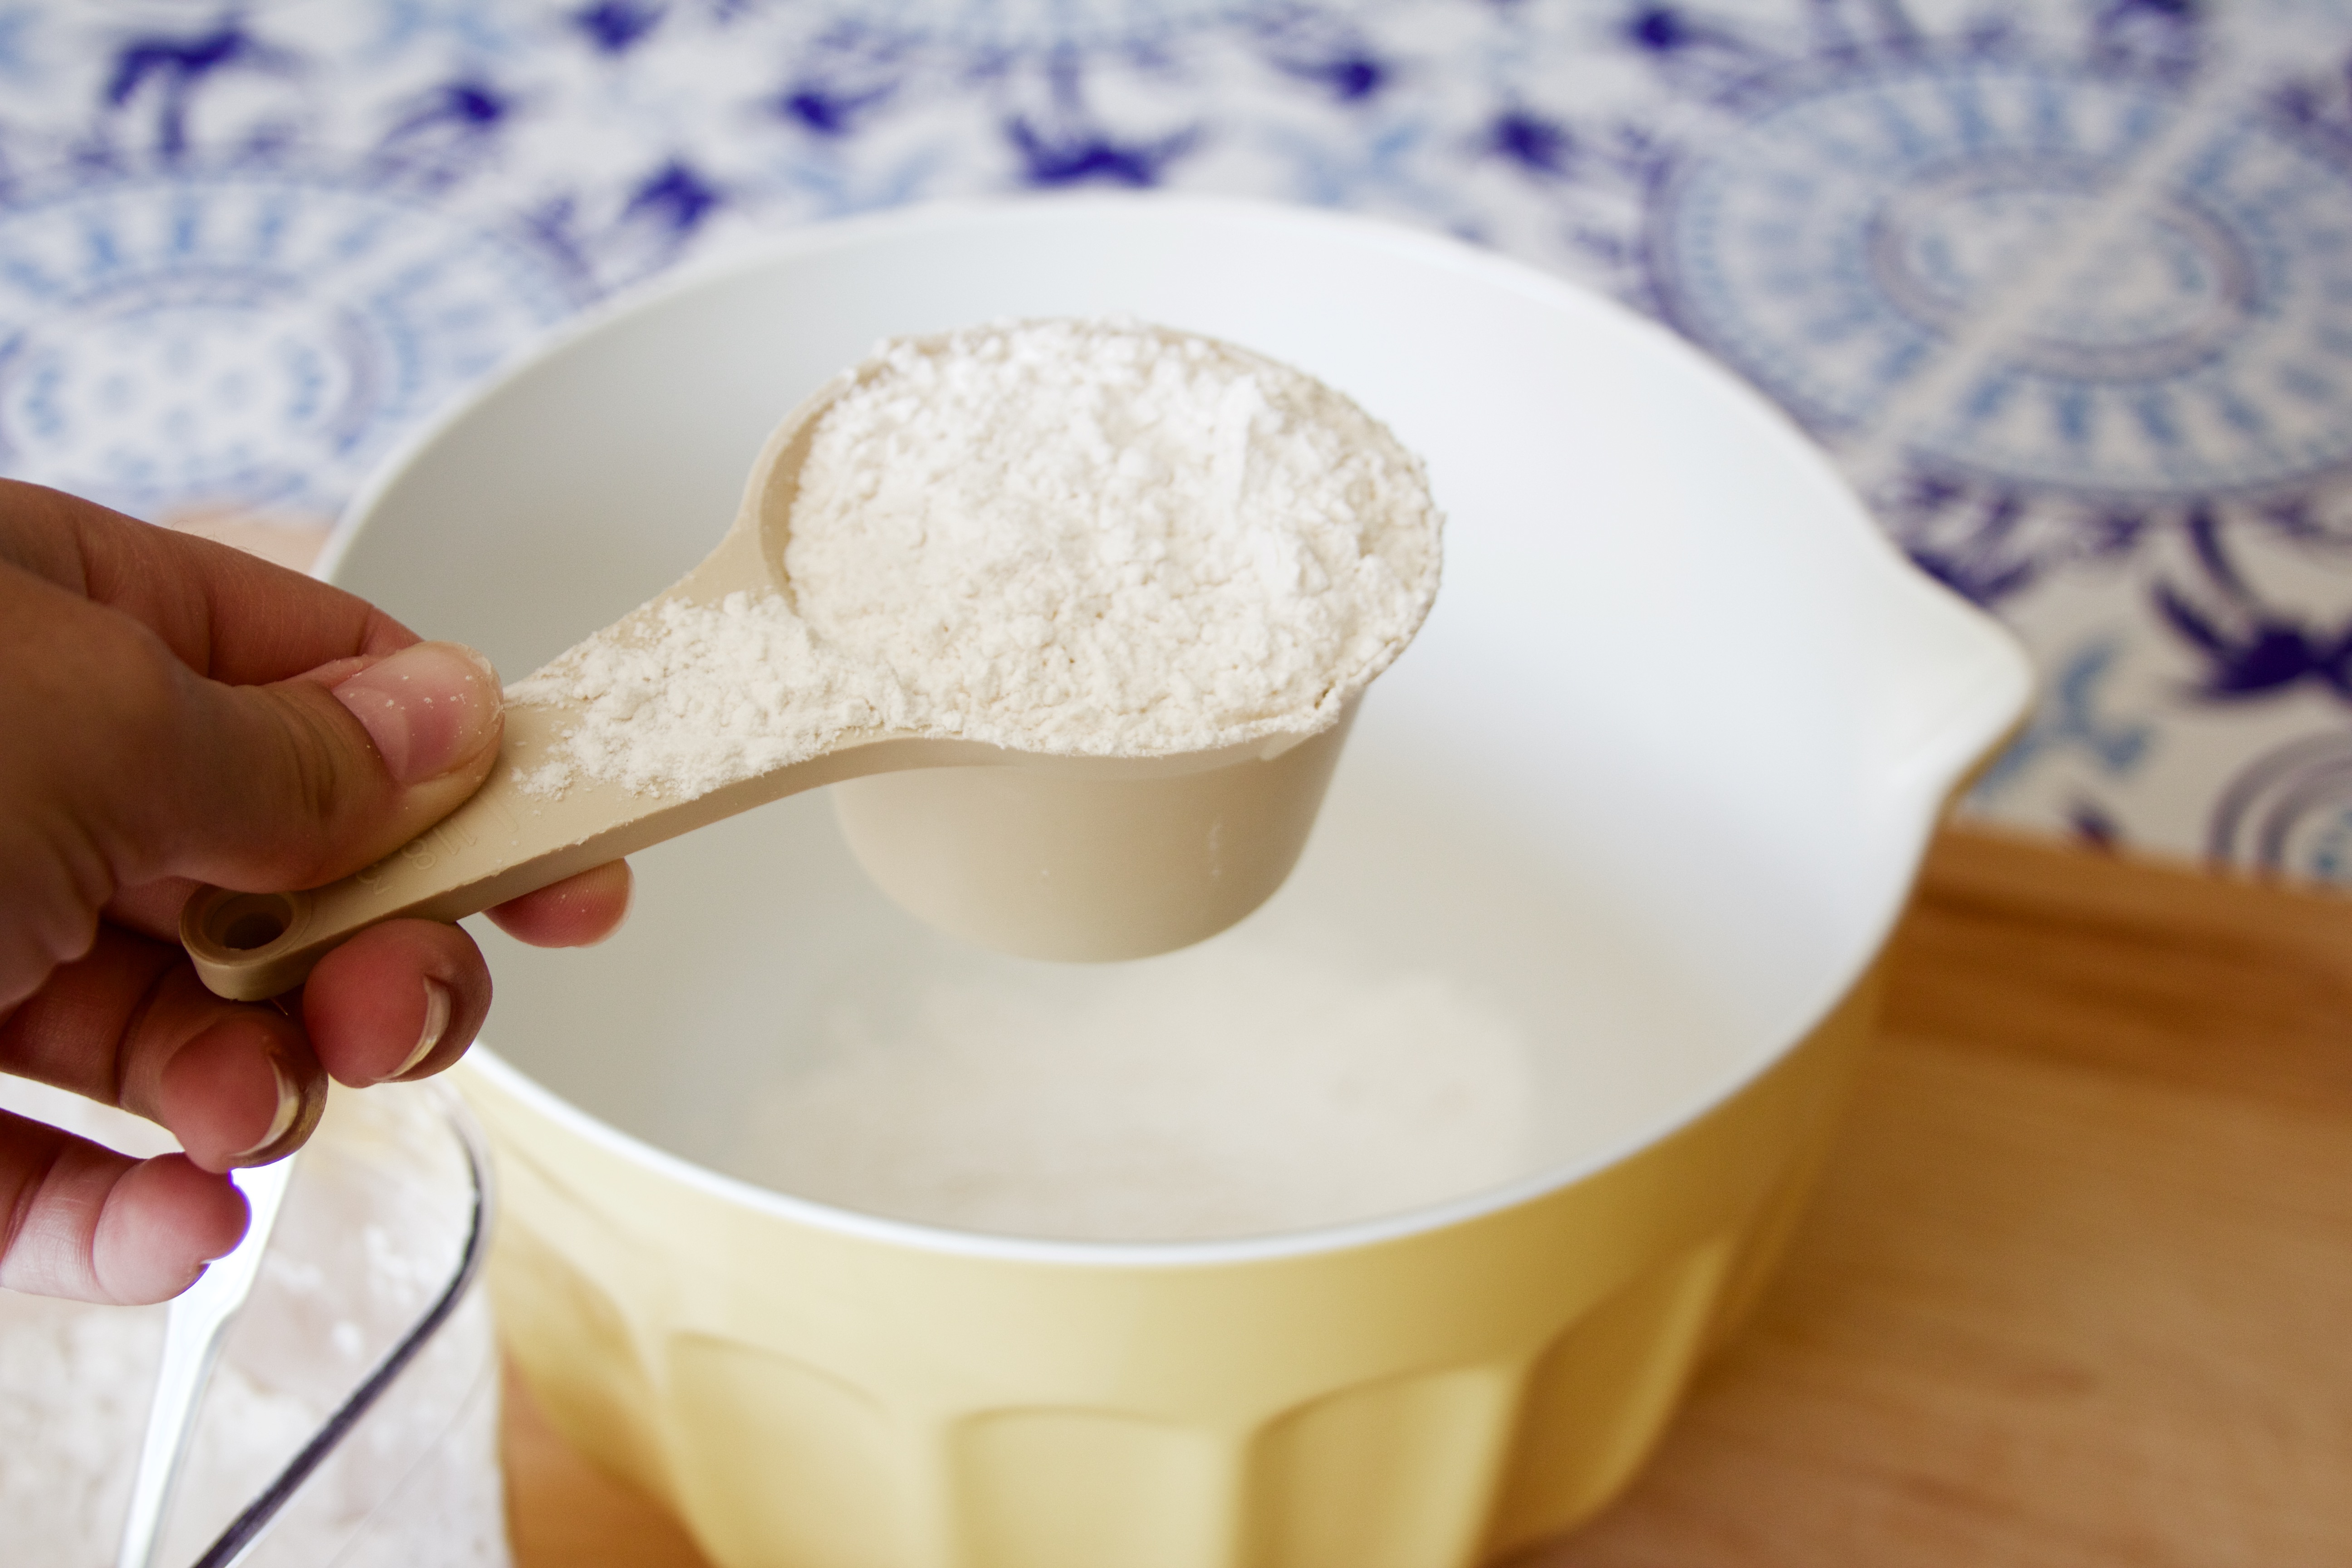
- Prep Step! Measure out all of your ingredients. Wash the blackberries now, so that they can drip- dry while you make the crust. Preheat your oven to 375
- Cream the butter on medium speed for 2 minutes until it is aerated. Add your sugar and beat on high for 5 minutes until it is light and fluffy.
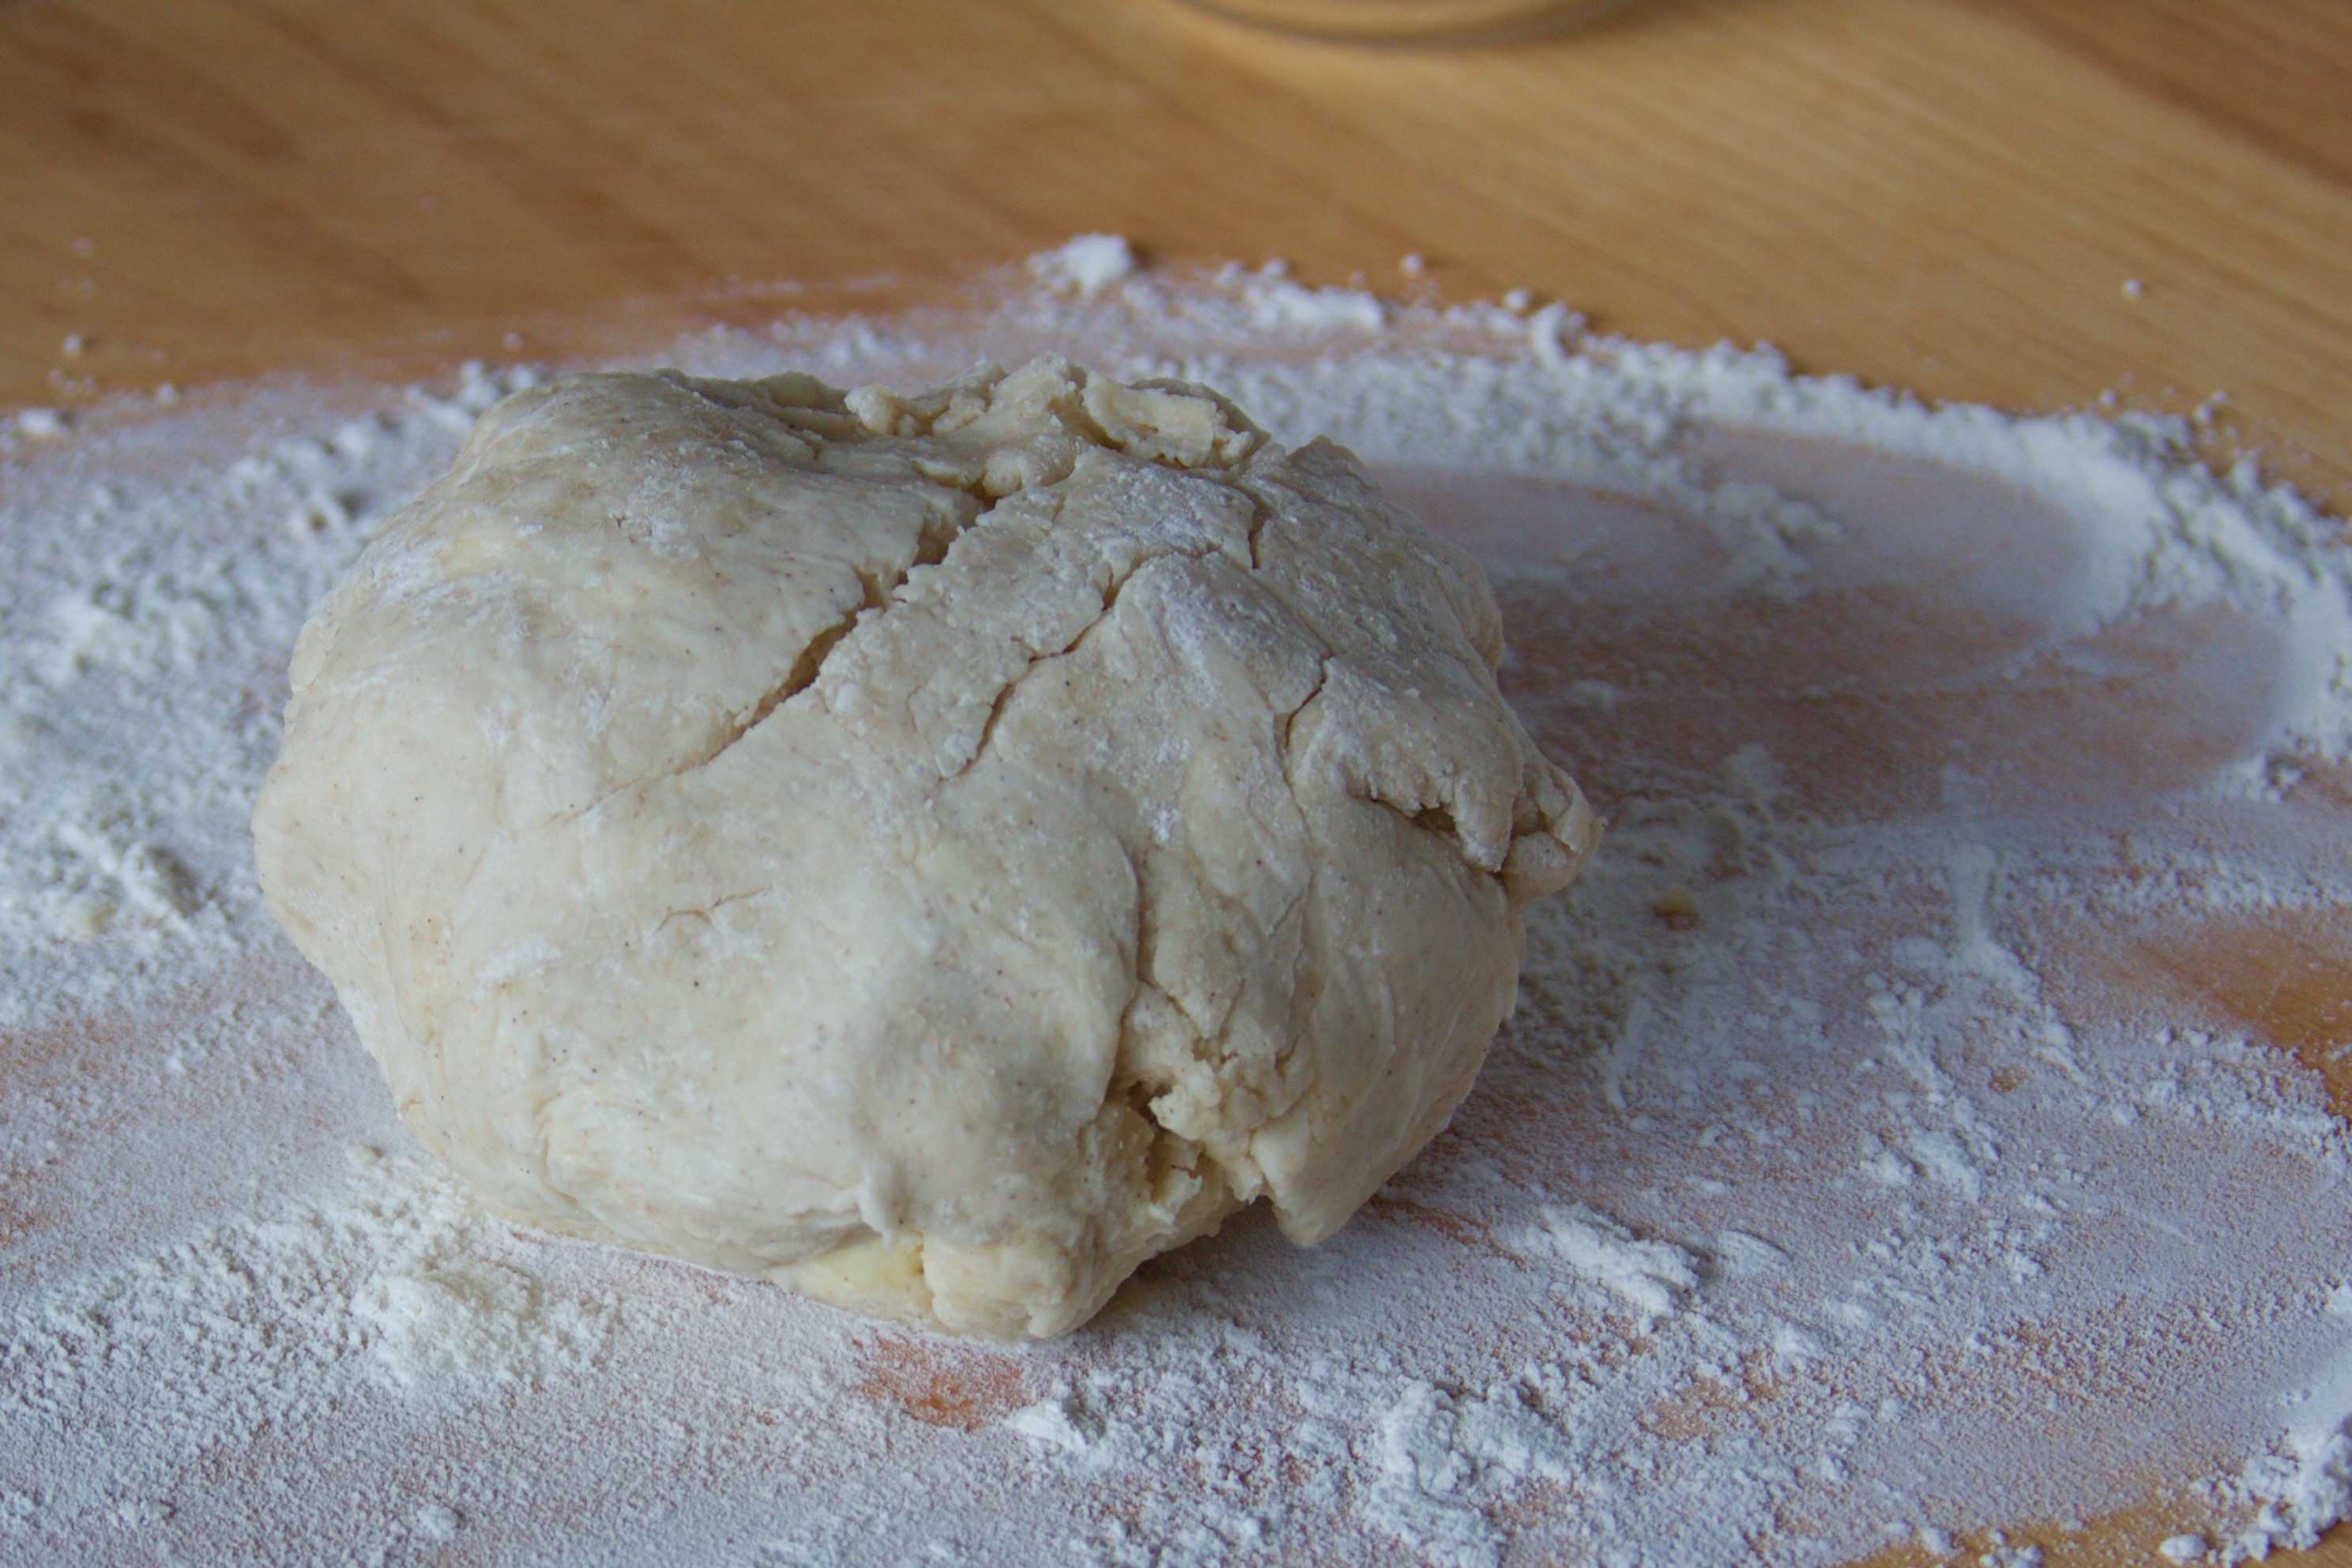
- Add 1 cup of flour and incorporate on low speed, or with a spatula. Add 1 Tbsp of the cream, and do the same. Repeat your process, scraping down the bowl, until the batter is ready.
- Mix in the zest and basil. It's ready! Wrap the dough with plastic wrap and chill for an hour. If you're impatient, like me, freeze it for 15 minutes.
- Press the cookie crust with your fingers into your pie plate. Pinch around the edges so that they don't look messy.
- Cover the edges with aluminum foil (so that they don't brown too much) and stick it in the over for 15-20 minutes. Check it to make sure you're not getting it too brown (like I did. Oops.)
- Once done, let the crust cool completely. Bonus points for cooling it on the windowsill like in children's books.
- Heat the blackberries over medium heat. Once they get warm and start to steam a little, start stirring. Sprinkle the sugar over the berries, and mix it in. Juice the lemon into the pan and cook, cook, cook.
- Once they are all juicy-looking, add the cornstarch. Follow this tip:
- Mix the cornstarch with one teaspoon of water before adding it. This will keep is from clumping and yielding nasty-tasting, starchy glops in your final pie.
- Remove the filling from the heat and stir in the butter. Let the filling cool.
- Pour the filling into the pie crust. You can dig right in, or chill for 30 minutes to let the filling stiffen and get thicker.
- I whipped some very legit cream with just a little lemon zest to serve.
- Best enjoyed overlooking the beauty of the Pacific Northwest!
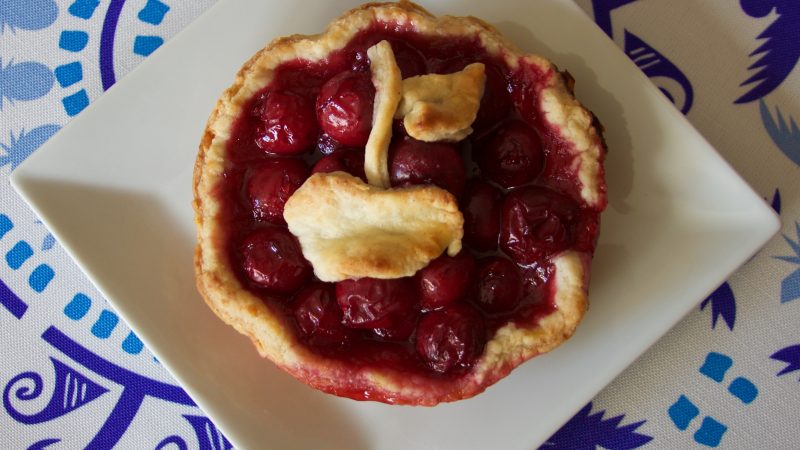
Door County is one of my favorite places in the world. Granted, there are many places that I have not been, but I’m sure it would still rank highly had I been to every country. There are multitudes of outdoor activities, orchards, great restaurants, quaint boutiques, everything wonderful.
There are two types of big orchards there – apple and cherry. Each season is a celebration and there are festivals, custom dishes, and special treats galore. We even saw a musical up there are cherry picking. Seriously, they’re way into this stuff.
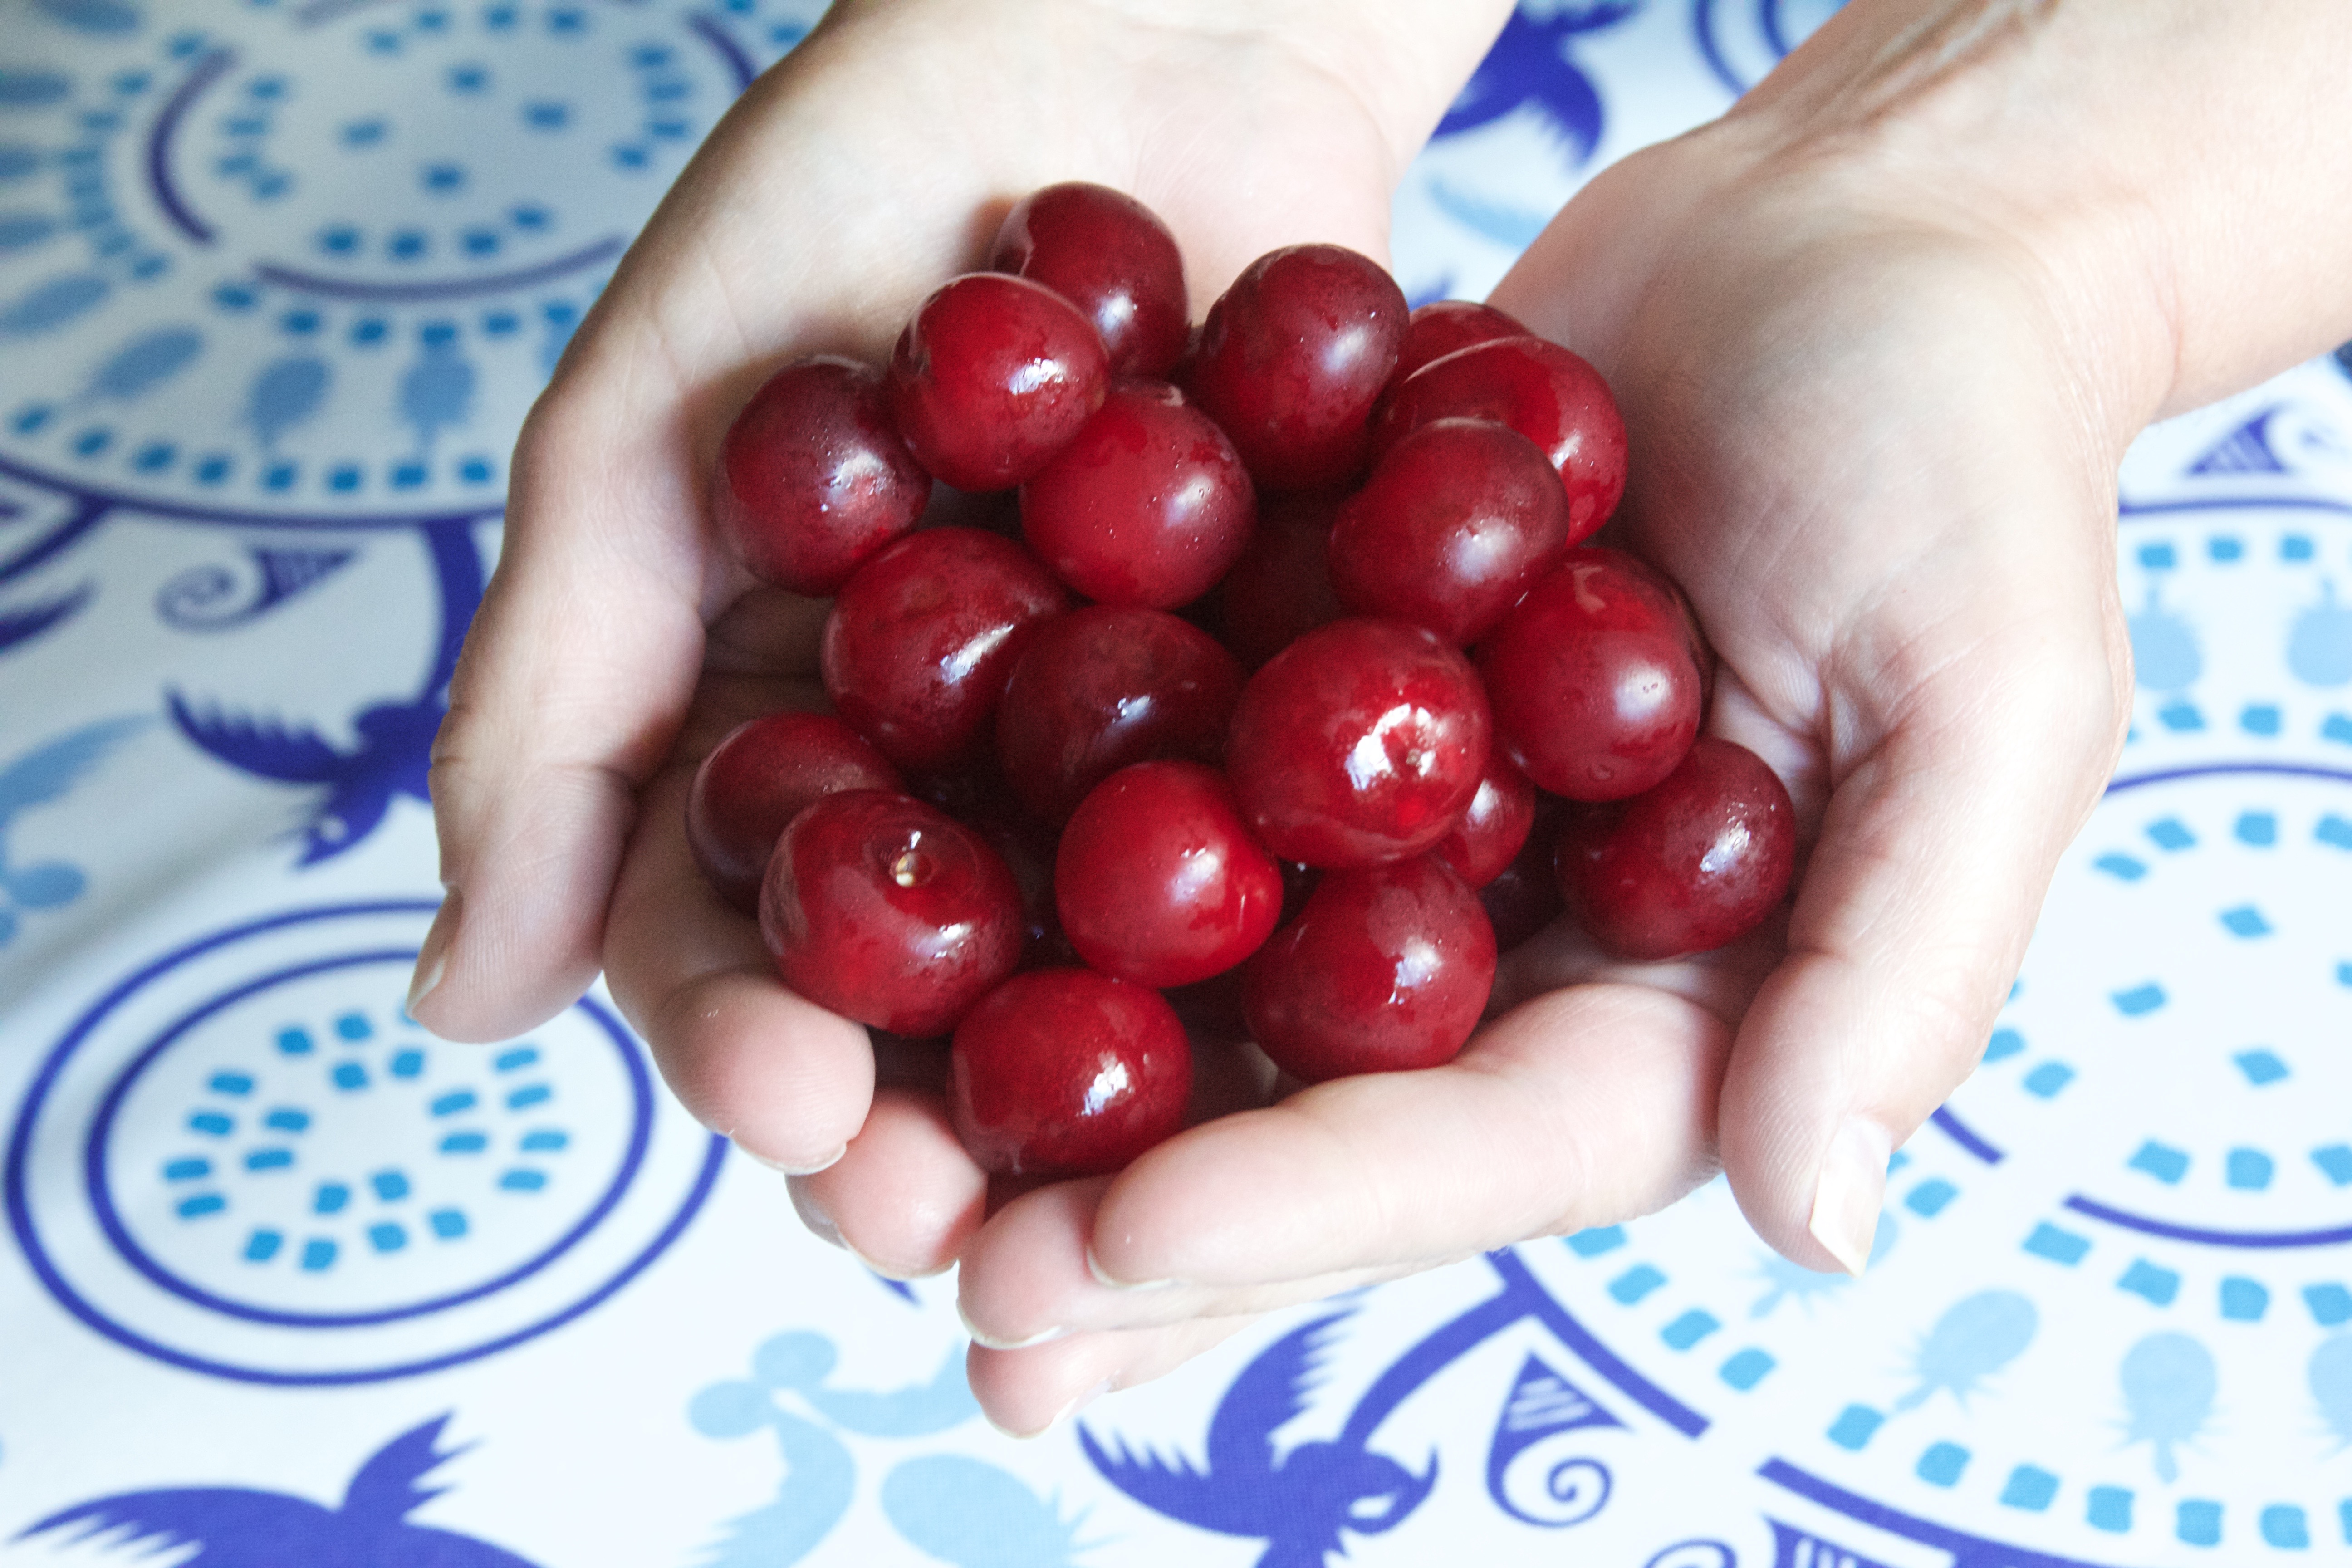
So, whenever i go, I stock up on fruit. Recently, I was there right at the end of kirschen (German for cherry) season. Naturally, I got many cherry things, along with a pint of tart cherries. I like their puckery flavor, so of course I ate a few straight, but these are best for baking.
I can’t promise that this pie will be as amazing with cherries sourced elsewhere (ok, maybe that’s a bit dramatic), but it will still be a spoonful of happiness on a summer day.
~~~~~~~~~~
**Note – I only bought enough cherries for baby pies, but the recipe here will yield you a full pie.
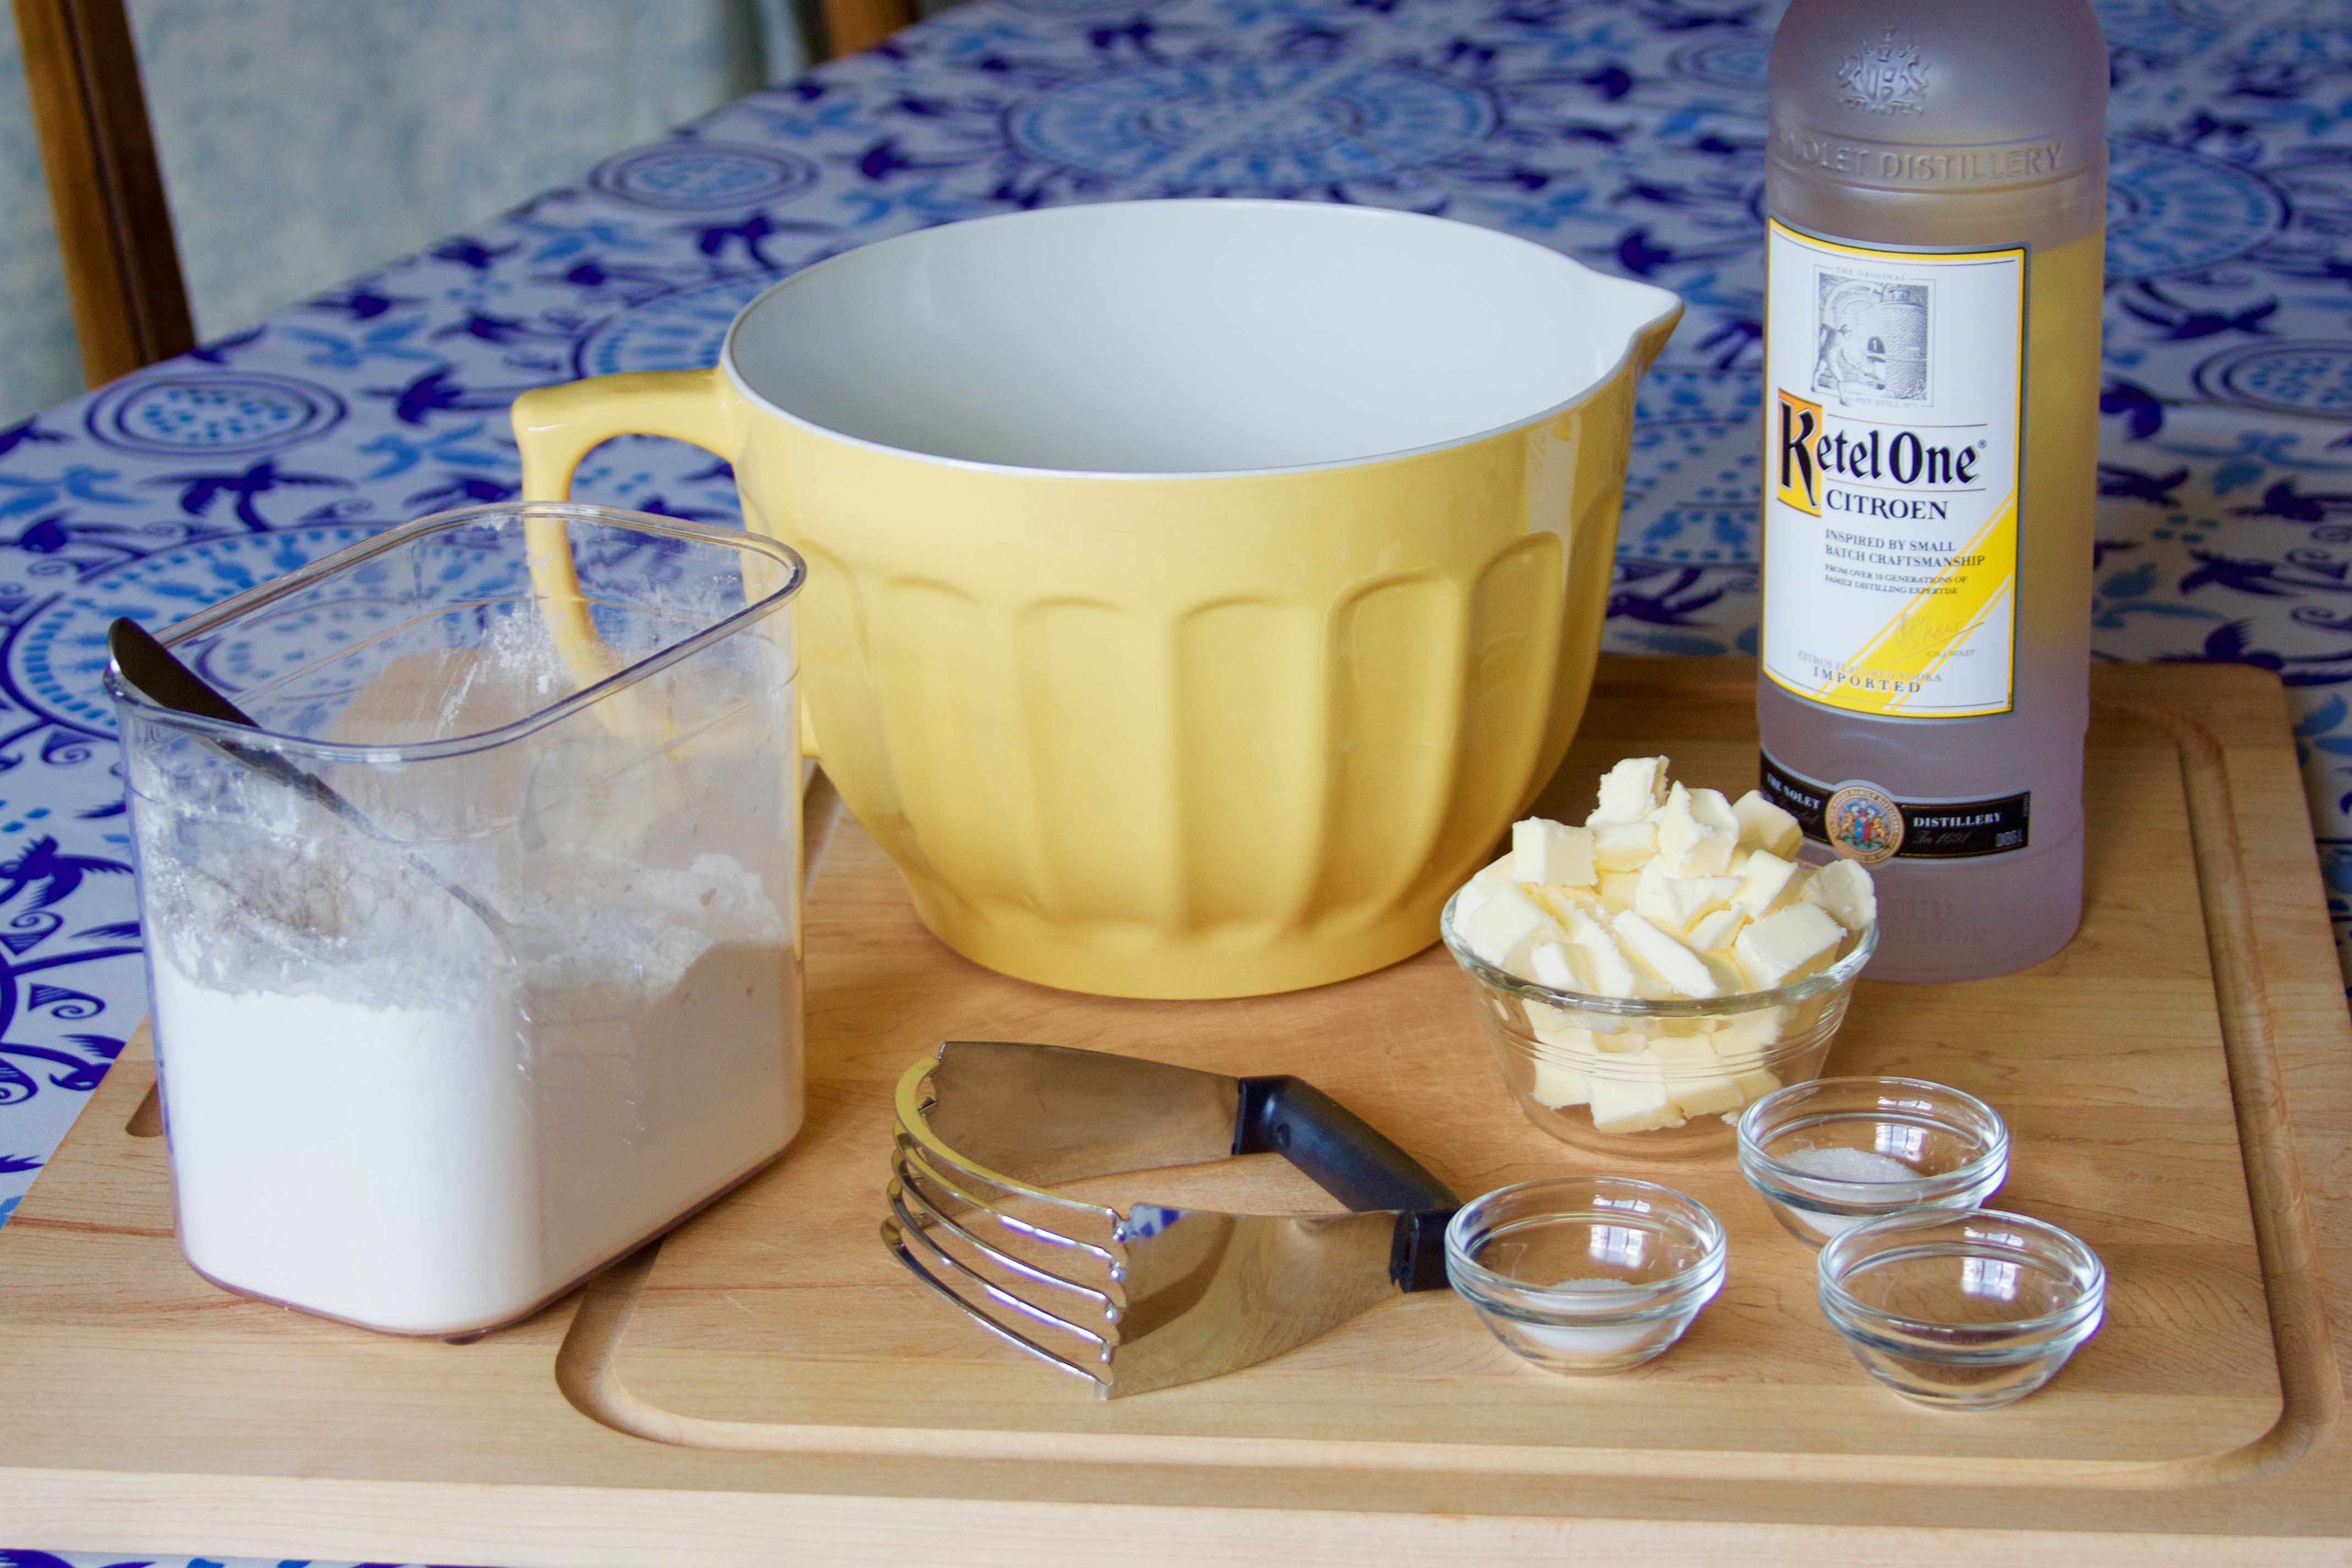
Picture Note – I was not baking at home, and the only vodka on hand was citron. It did not seem to leave any flavor behind, but the crust was of a slightly different consistency because of the sugar. Use plain if possible.
Step One
Prep – but just the crust. I always stick the butter in the freezer for a few minutes to get super cold after I cut it. Mix the vodka and water, and put that in the freezer too.
….Vodka? I’m giving this to kids….
No worries! The alcohol part will be gone after you bake the crust. But why vodka? It gets a lot colder than water without freezing. The secret to great crust is the coldness of the ingredients when you mix them in. This ensures that your “wet” ingredient will be as cold as possible.
Step Two
Make your crust now – cut the butter into the dry ingredients, then mix in the vodka / water mix by Tablespoon-ful until your crust is just wet enough. DO NOT OVERWORK IT. It will get all tough and nasty when baked.
Wrap that bad boy in plastic wrap and let it chill in the fridge for an hour.
Step Three
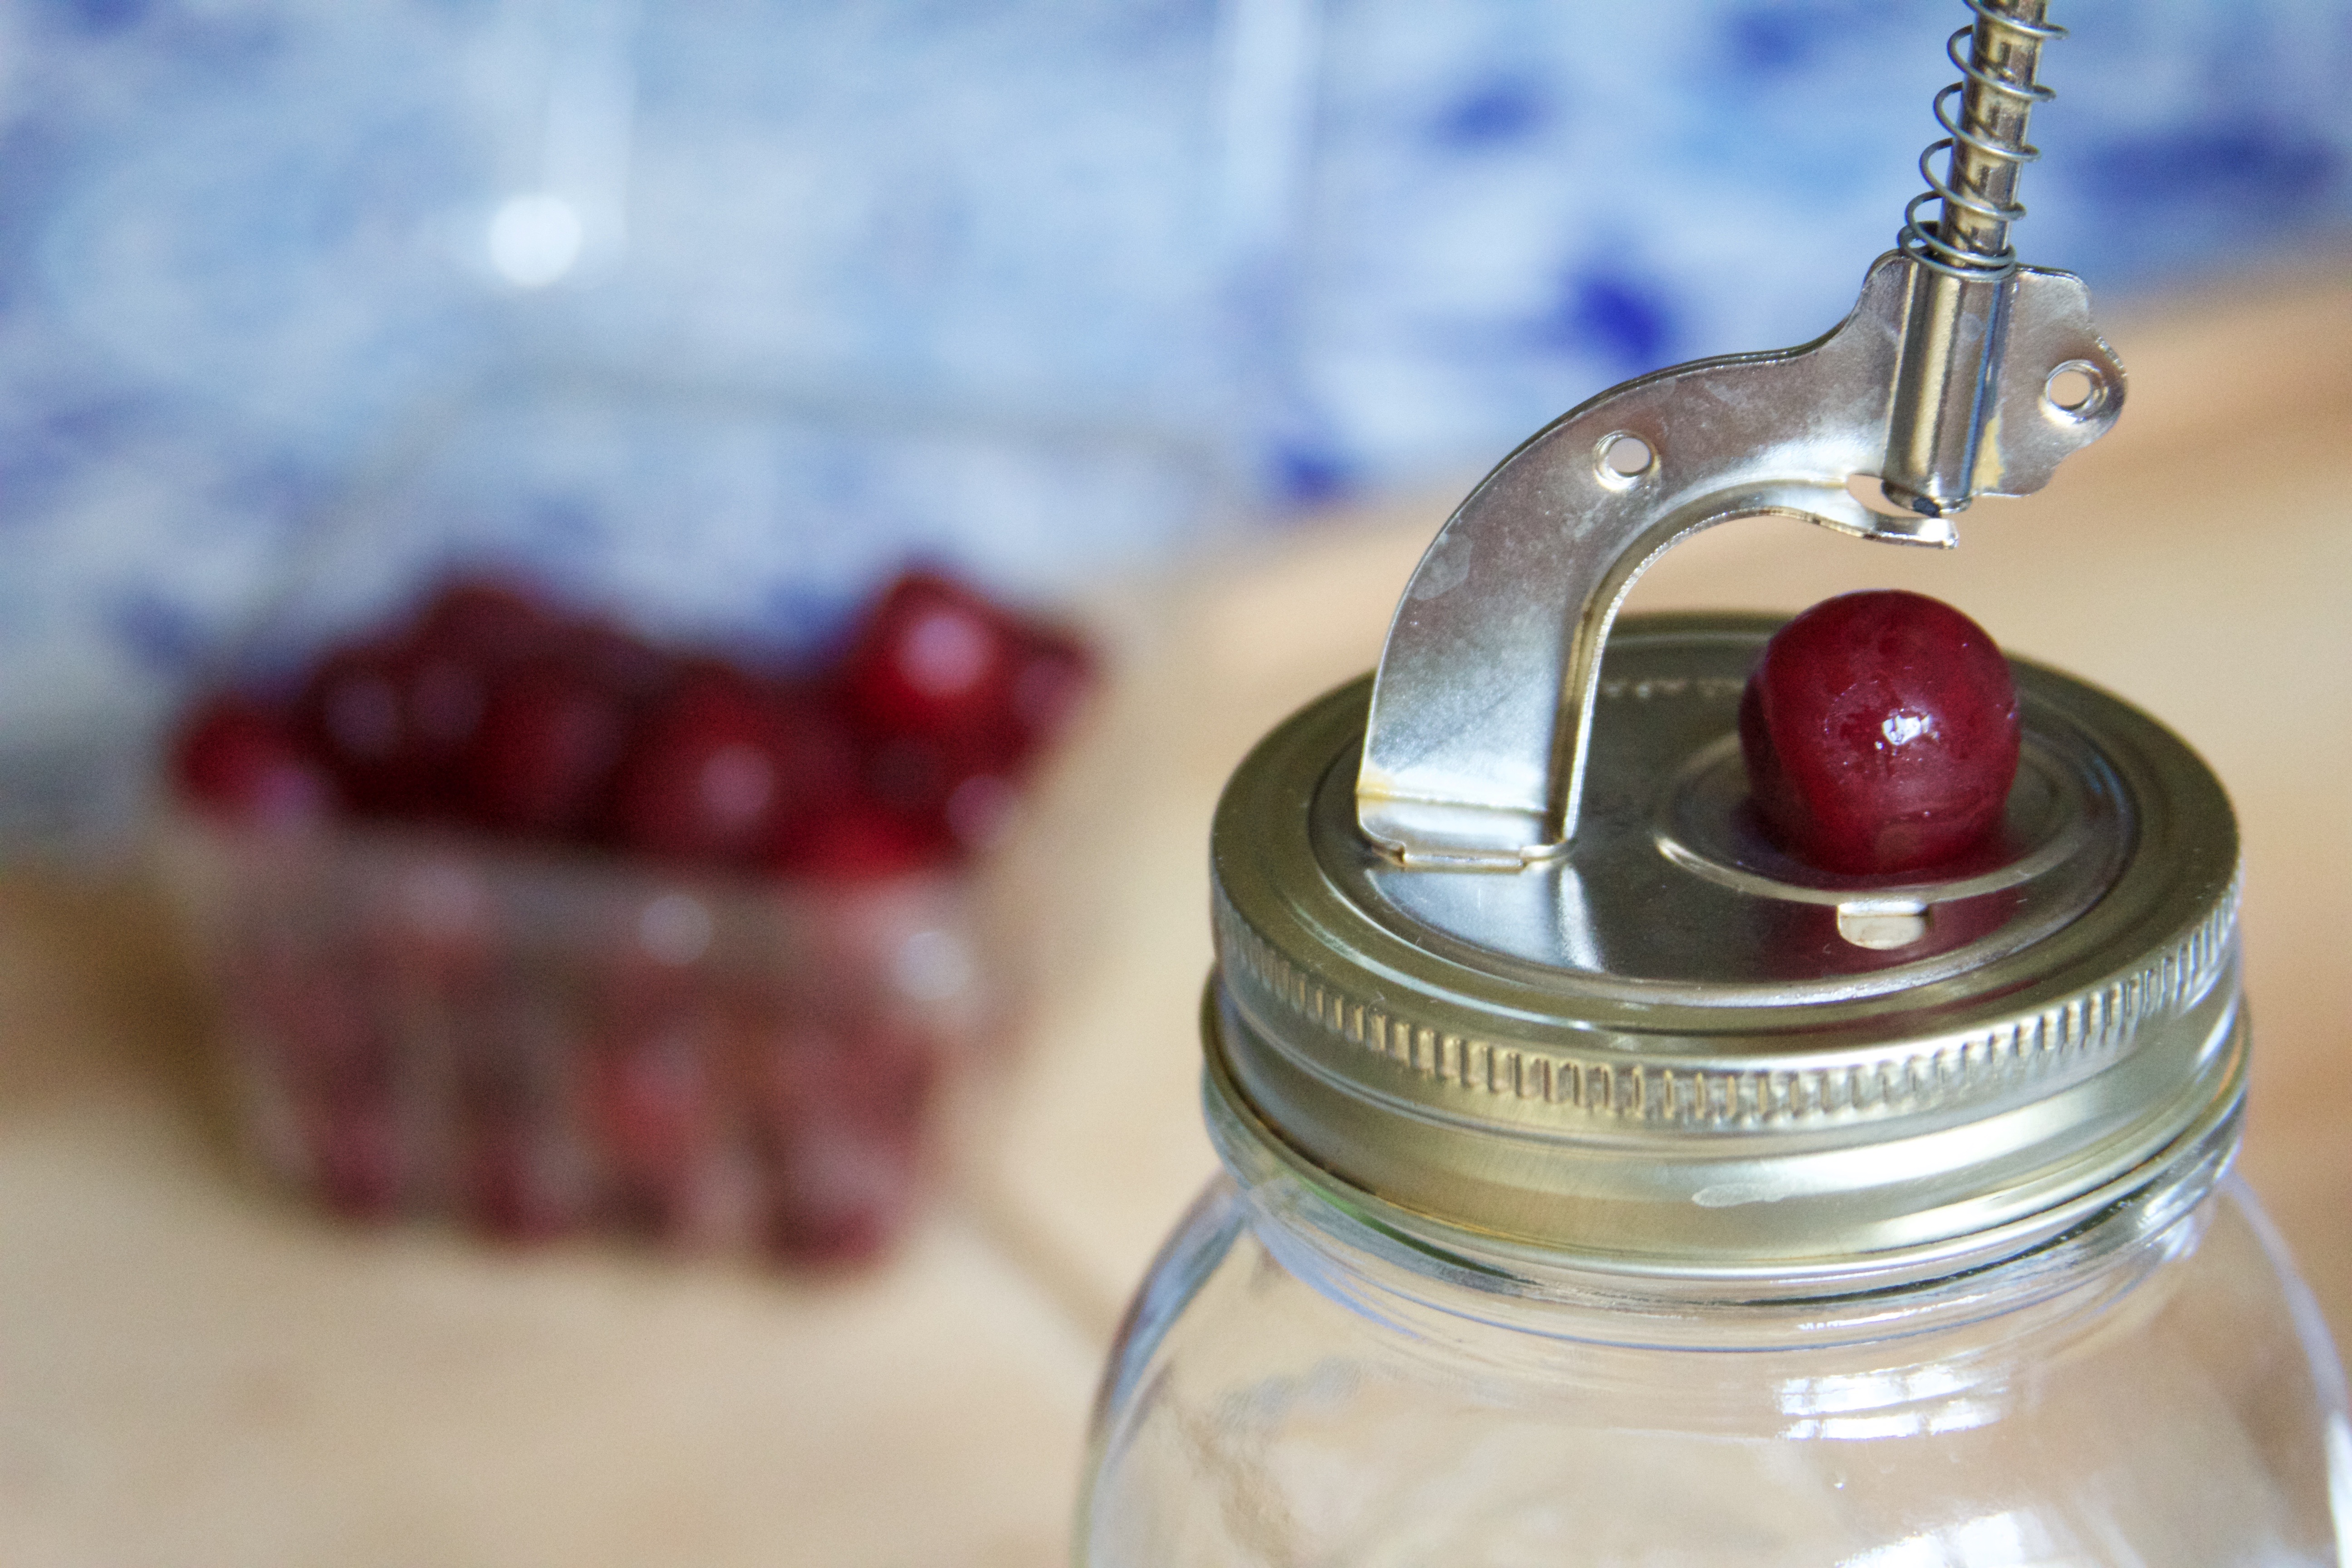
Filling time. If you have a cherry pitter, use it. So much less work. But if you don’t, you can push them out with a straw or the tip of a pairing knife. It’s just a pain in the butt.
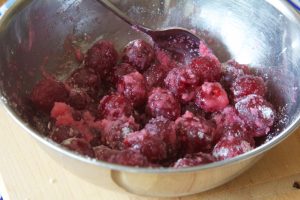
Add the sugar and cornstarch (pre-mixed) to the cherries.
Step Four
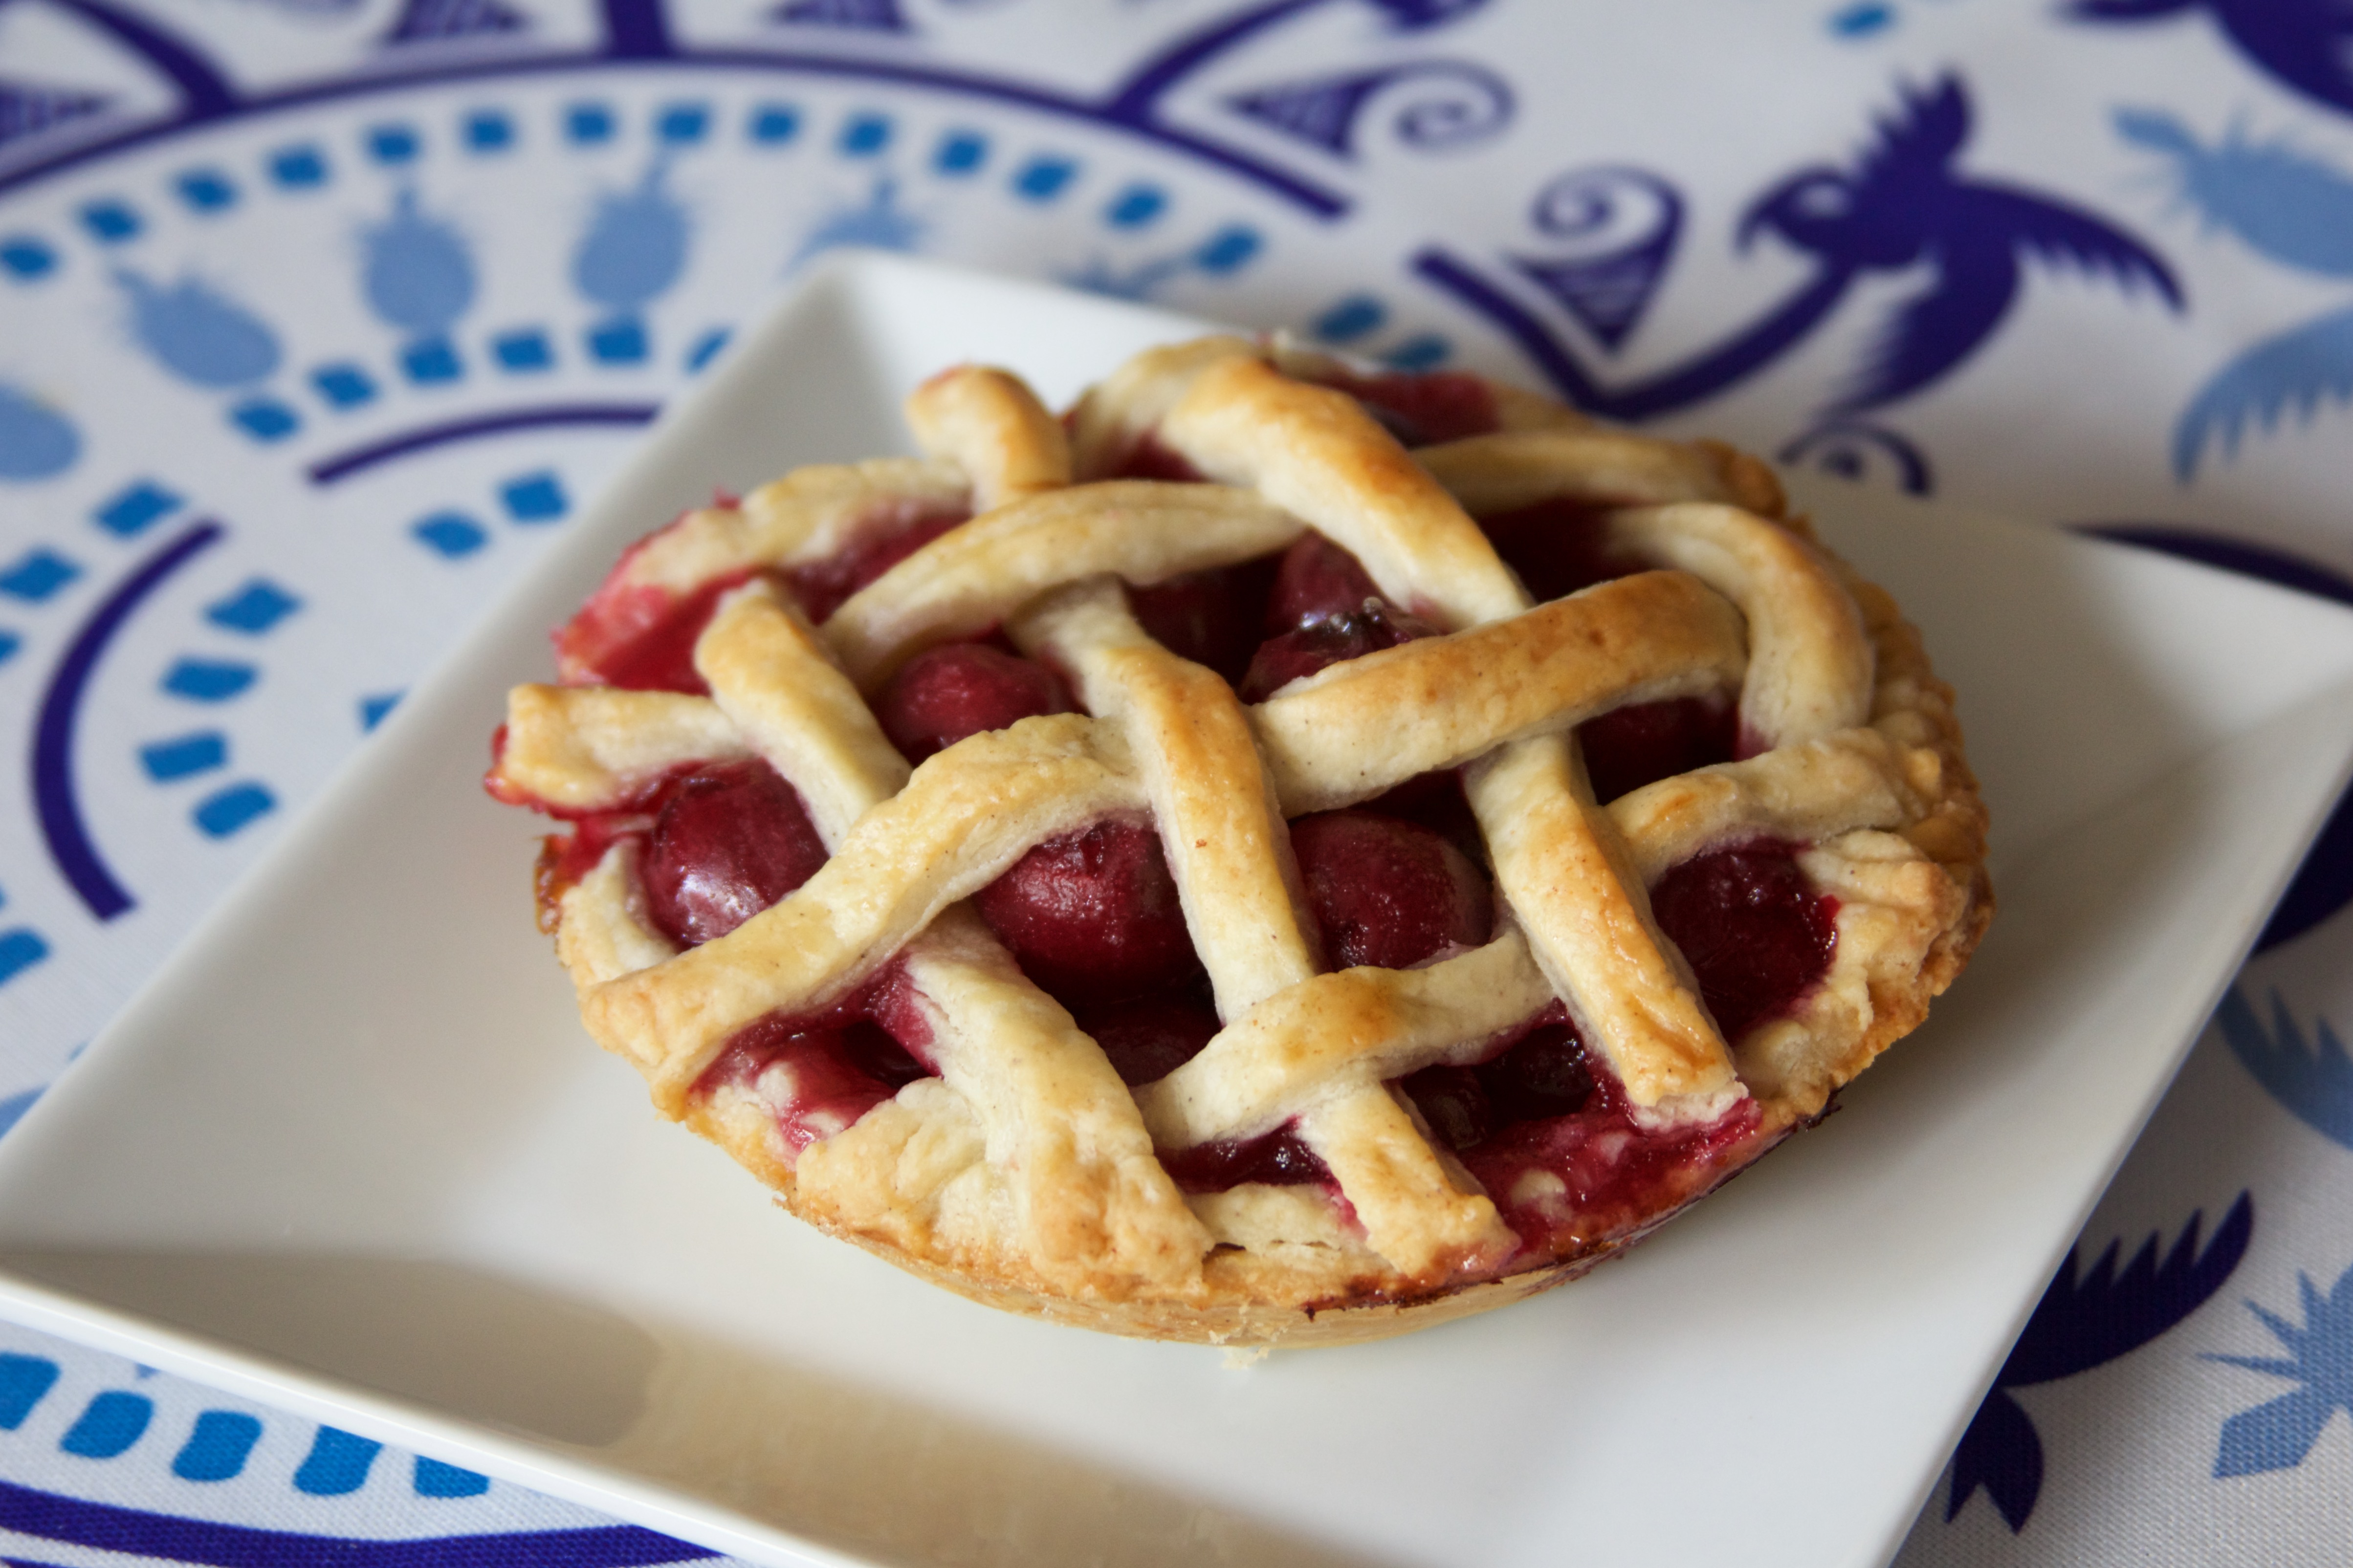
Roll out your pie crust to fit your pie plate. You can do whatever you want on the top – make a full cover, do a lattice, or get fancy and cut out some shapes.
Step Five
Add your filling – it should be a bit domed so that the pie looks nice and stuffed. Dot with up to a Tablespoon of butter and place your top on. You can seal it with a fork (dipped in water so that it doesn’t stick) or make the pretty pinches. Later on, I’ll add a demo of how to do this – so check back!

Step Six
Time to bake! Even though it’ll be tempting to dig in as soon as it’s out of the oven, let it cool for at least ten minutes. Brew a pot of coffee while you wait. Slice, top with ice cream, and enjoy!
 Cherry Pie")
Warm and juicy, this is a perfect pie for summer. Cherry pie is a classic!
Ingredients
- 2 1/2 cups all purpose flour (350 grams)
- 2 Tbsp sugar
- 1/2 tsp ground allspice
- 2/4 tsp salt
- 1 cup unsalted butter (2 sticks) (226 g) (8 oz)
- 2 - 3 Tbsp ice cold water
- 2 - 3 Tbsp vodka
- 1 egg white mixed with 2 tsp water
- 4 cups pitted cherries
- 3/4 - 1 cup sugar (83 - 110 g)
- 3 Tbsp cornstarch
- 1 Tbsp unsalted butter
Instructions
- Prep Step! Measure out the ingredients for the pie crust. Mix the dry ingredients in a large
- mixing bowl. Cut each stick of butter in a 3 x 3 grid. Mix the water and vodka in a small bowl. Put the butter and liquid mix in the freezer for 5 - 10 minutes.
- Cut the butter into the dry mix using two forks or a pastry cutter.
- Mix in the liquid, one Tablespoon at a time, until the crust is just holding together as a dough. DO NOT OVERMIX.
- Gather the crust into a ball, wrap in plastic wrap, and chill in the fridge for 1 hour.
- Pit the cherries, preferably using a cherry pitter. Mix the sugar and cornstarch. Cover the cherries with the mix and stir to coat.
- Roll out the pie crust to the size of your pie plate. Dump in the filling, and dot with butter. Cover with the crust in the method of your choice (full crust, lattice, shapes, etc). Brush the crust with the egg white and water mixture to make it nice and golden brown.
- You many want to protect the crust before you put it in the oven. Rip three rectangles of aluminum foil, about 3 in tall. Wrap around the edges of the crust so that they do not get burnt. Bake for 45 - 50 minutes.
- Let your kirschen pie cool for at least ten minutes, then top with ice cream. Enjoy with a cold glass of milk or a warm mug of coffee.
I saw a picture on the internet recently that had replaced Mars’ solar ranking with Louisiana. If you’ve even been in the summer, you would agree that it can’t be too far off!
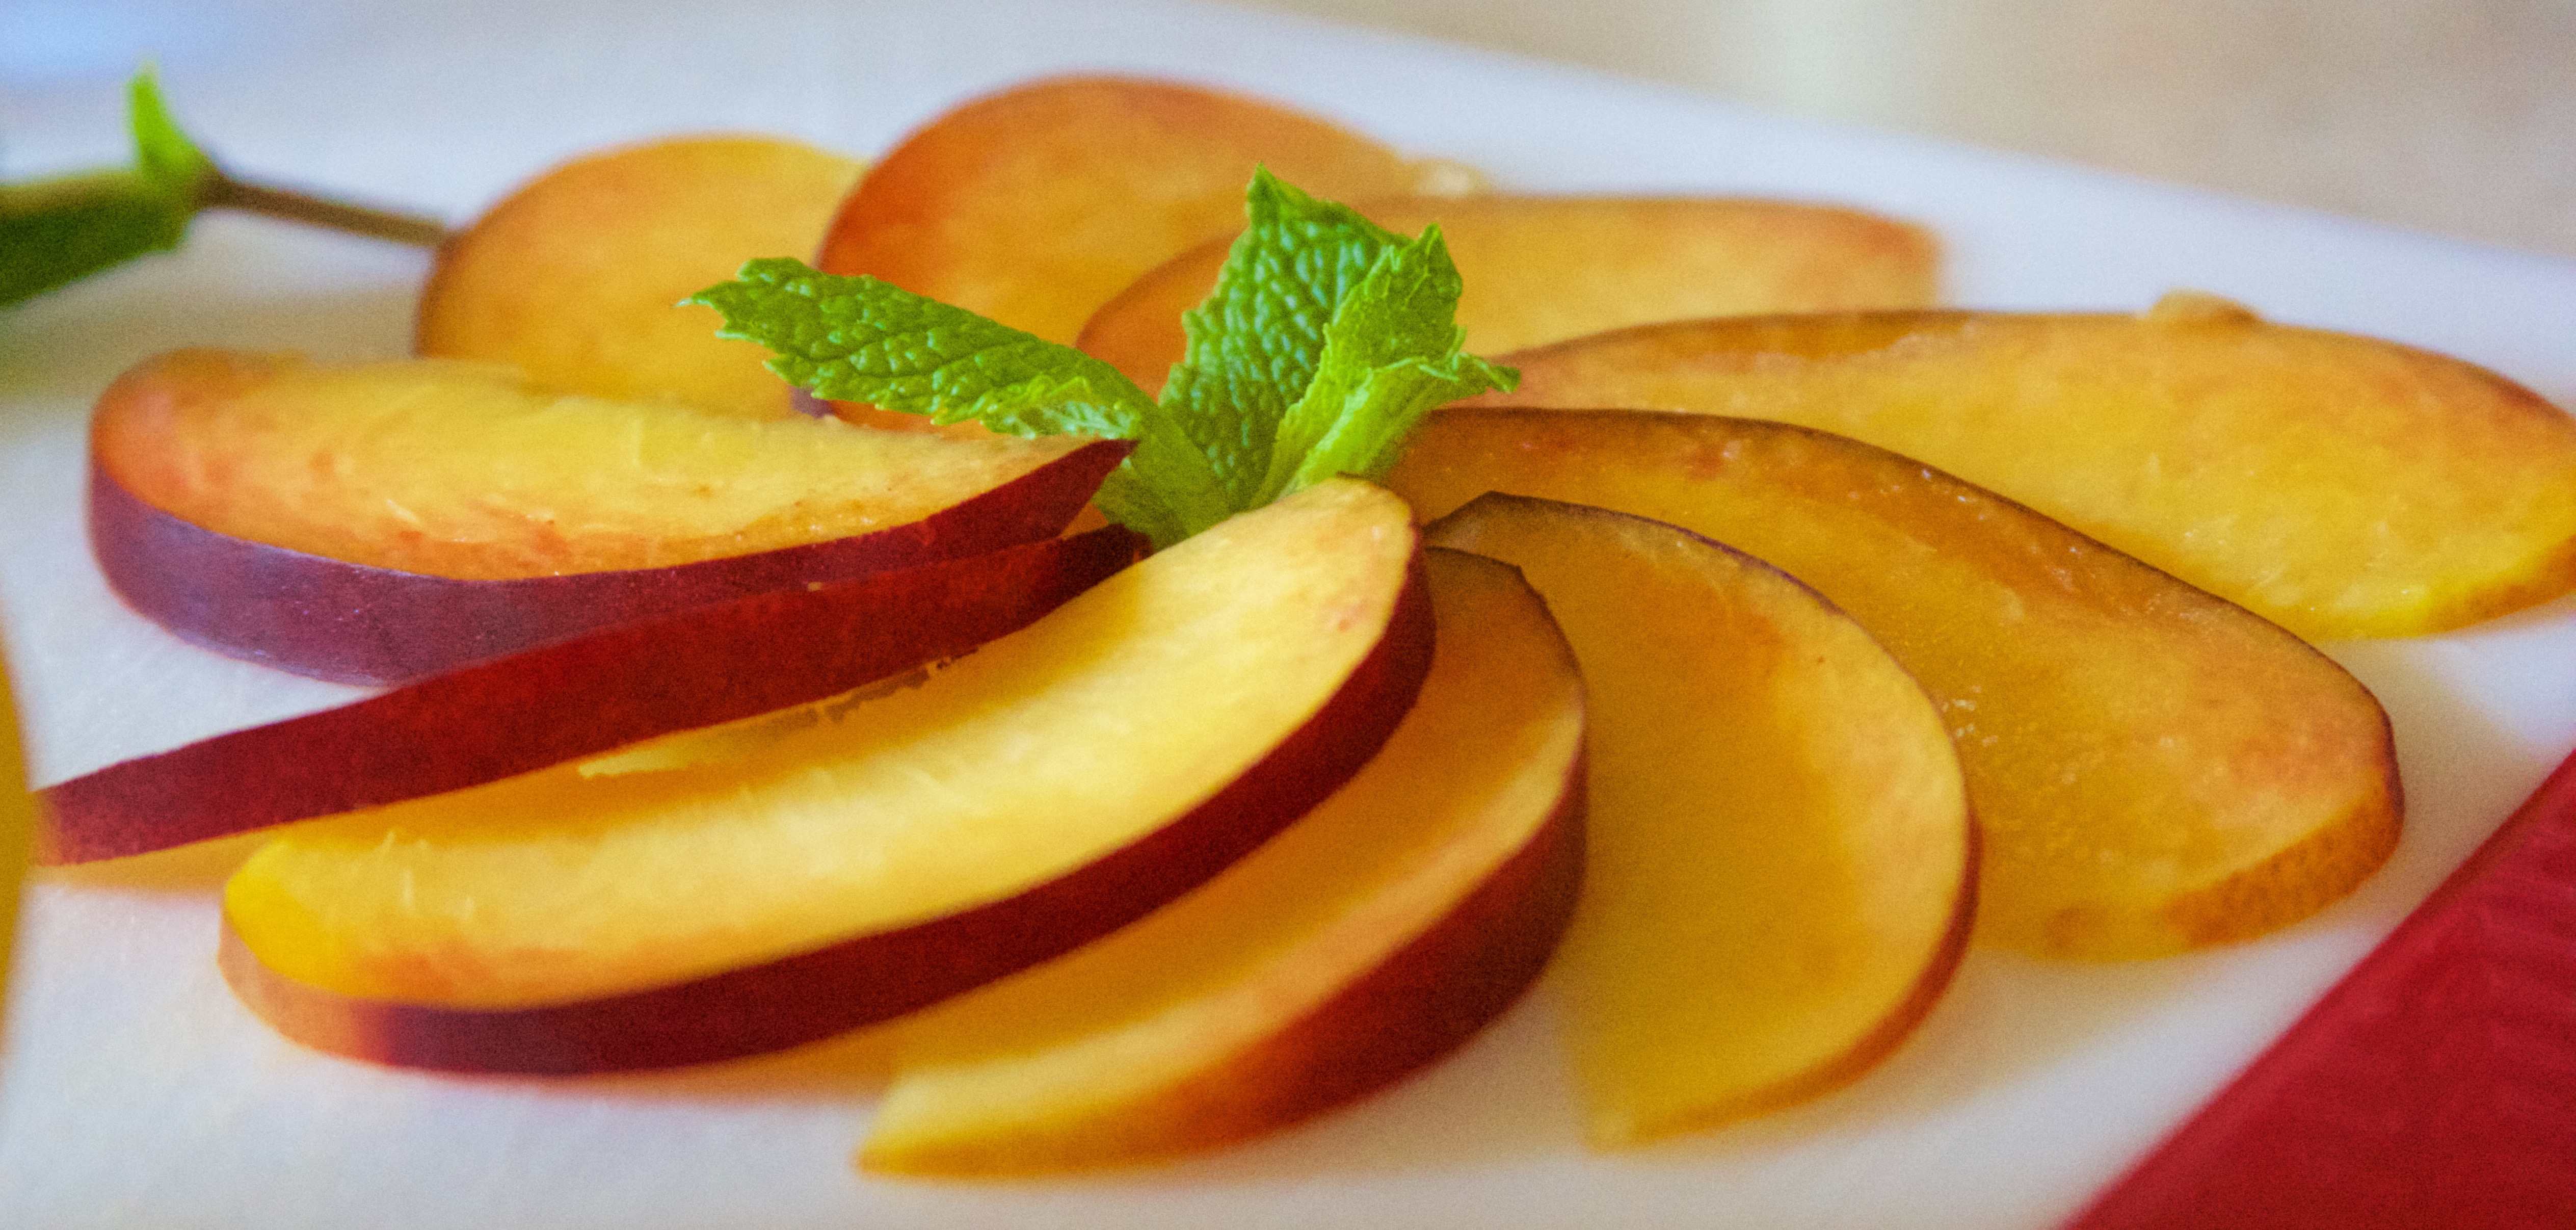
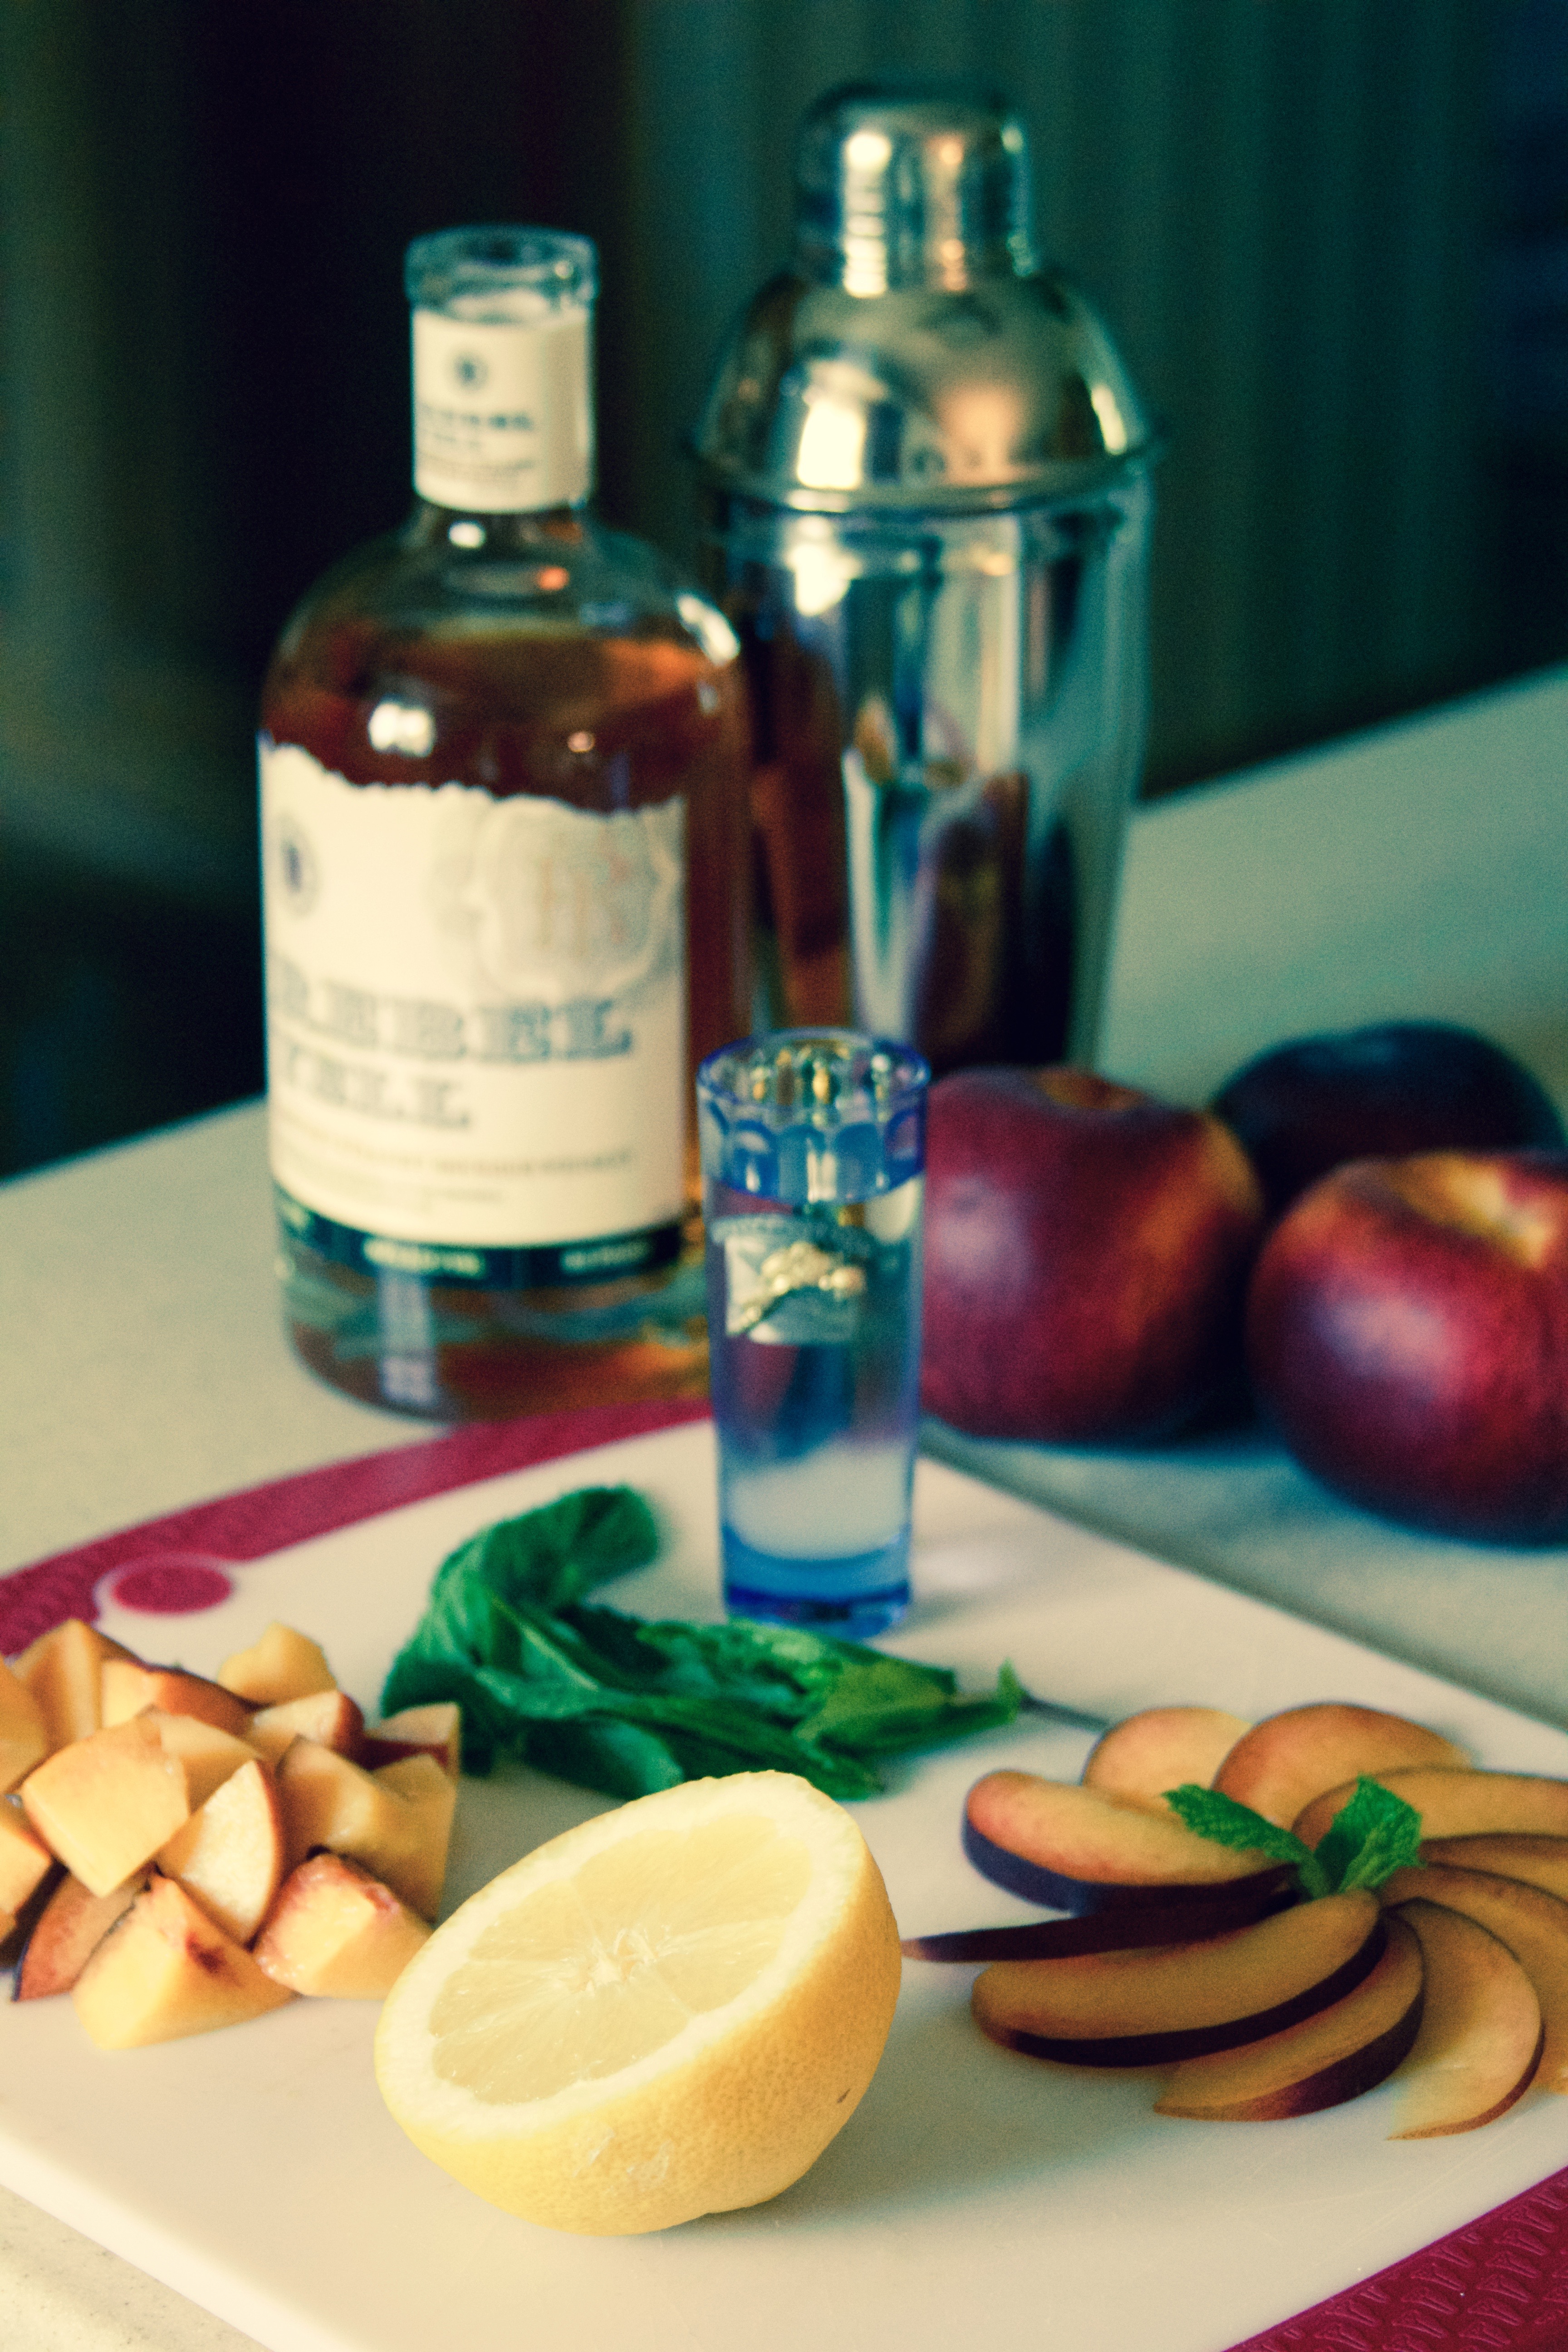
This cocktail is the perfect summer night (or morning, whatever) cool down. It combines sweet, ripe peaches with the earthy and robust taste of whiskey. You can sweeten it up or not all. You can choose a simple sparkling wine or a sweet champagne.
Cocktails technically have recipes, but I say go with whatever floats your boat – this is a suggestion that you can tweak to your heart’s content!
~~~~~~~~~~
Step One
Prepare your ingredients! Separate the mint, chop the peaches, cut a lemon, slice one for garnish, and get your alcohol nearby
Step Two
Put a few ice cubes in the bottom of the shaker. Add the peaches, mint, and juice of the lemon. Pour the amount of whiskey that is desired, and add any simple syrup that you would like.
Note: You’ll see from my picture that I chose a pretty cheap whiskey. I have acquired a “whiskey snob” taste from my family, but it’s not worth the cost when you’re mixing with flavors that will mask what makes expensive booze good. Save your money on this cocktail.
Step Three
Shake, shake, shake! Pro Tip: Cocktails mix best when you come up with a dance. 😉
Step Four
Pour the whiskey mix into a glass of choice (I used a white wine glass – a champagne flute would be much more classy). Fill the glass with your desired bubbly. Add garnishes of mint and peach.
Sip on the porch under a fan and laugh at the weather – it can’t rain on your parade with this drink in hand!

Ingredients
- 3 oz whiskey
- 1 peach - half cubed, half sliced
- 4-5 sprigs of mint
- 1/2 lemon
- up to 1 oz simple syrup
- prosecco or brut champagne
Instructions
- Prep your ingredients! Slice your peach in half. Cube half and cut the other half into thin slices. Cover the bottom of a cocktail shaker with ice cubes (about 4-5)
- Add all of the ingredients except the champagne to the shaker.
- Shake, shake, shake!
- Strain the whiskey mix into a champagne or white wine glass. Top with champagne and enjoy!
Notes
© Adventures of a Frostaholic